Have you spent hours crafting those perfect emails for them to finally land…in SPAM? We know how frustrating that can be! Email service providers nowadays are stricter than ever about what they let through, and if your email accounts aren't warmed up properly, chances are, your emails will never see the light of day. Worse yet, when your deliverability is affected, so is your sender reputation and, ultimately, your entire success in cold outreach. But that's what you've got email warm up tools for!
Think of them as personal trainers, but for your email. They exist to gradually build up your sender reputation, helping you avoid those dreaded spam filters so your emails land directly where they belong: in your recipients' primary inboxes.
But with dozens of options on the market in 2025, how do you know which one actually works?
To save you time (and your domain), we tested and compared the best email warm up tools, looking at their features, pros, cons, pricing, and overall impact on deliverability.
You’ll also learn:
- What email warm-up is and why it matters
- How email warm up tools work
- How to choose your ideal tool
- Our top recommendations for different use cases
Let’s dive in and find the right warm-up tool to boost your deliverability in 2025.
Our testing process: How we evaluated each tool
Before moving on, let’s make one thing clear: we are not going to provide you with another feature-analysis type of blog.
In fact, our goal was to put each email warm up tool to the test to see how it performs in real life, so we:
- Connected each tool to a new or low-activity email account and sent approximately 200 warm-up emails per tool over a consistent time frame.
- Tracked where those emails landed (Inbox, Spam, or Promotions) to measure real-world deliverability performance.
- Monitored whether emails were opened, replied to, and how the tool engaged with them.
Each tool’s performance was then rated based on its inbox deliverability rate, spam rate, ease of setup, customization options, and overall value for money.
Overview of the 12 best email warm up tools
TL;DR?
Here’s a quick comparison table of the best email warm up tools on the market, along with information on:
- How many of our emails landed in the primary inbox,
- How many went to spam,
- The overall deliverability rate for each tool,
- And their pricing.
Updated on June 4th, 2025.
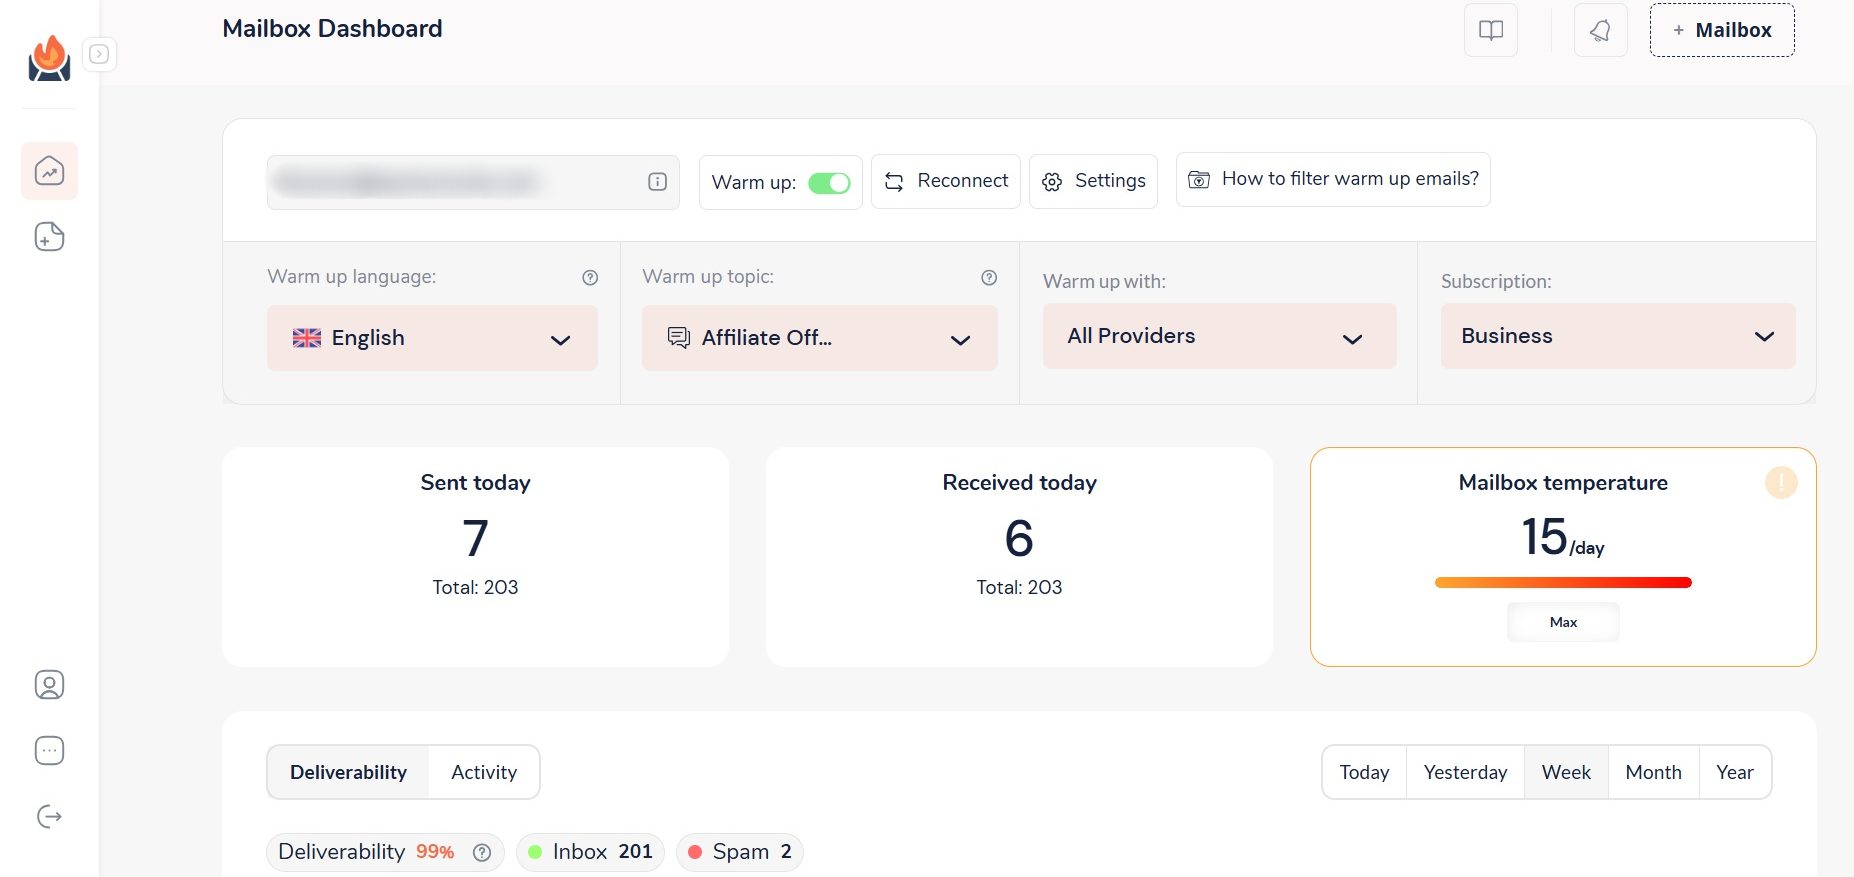
| Email warm up tool 🔥 | Email landed in primary inbox 📥 | Emails landed in spam 📥🚫 | Deliverability rate 📈 | Pricing 🏷️ |
| InboxFlare | 201 | 2 | 99% | Included with Skylead for free |
| Lemwarm | 199 | 8 | 96% | Starts from $29/mo |
| Mailivery | 200 | 13 | 94% | Starts from $29/mo |
| Warmbox | 200 | 21 | 90% | Starts from $19/mo |
| Mailwarm | 203 | 15 | 93% | Starts from $79/mo |
| Folderly | 196 | 5 | 95% | Starts from $120/mo |
| Instantly | 190 | 10 | 95% | Starts from $37/mo |
| Warm Up Your Email | 193 | 14 | 93% | Starts from $29/mo |
| MailReach | 187 | 14 | 93% | Starts from $25/mo |
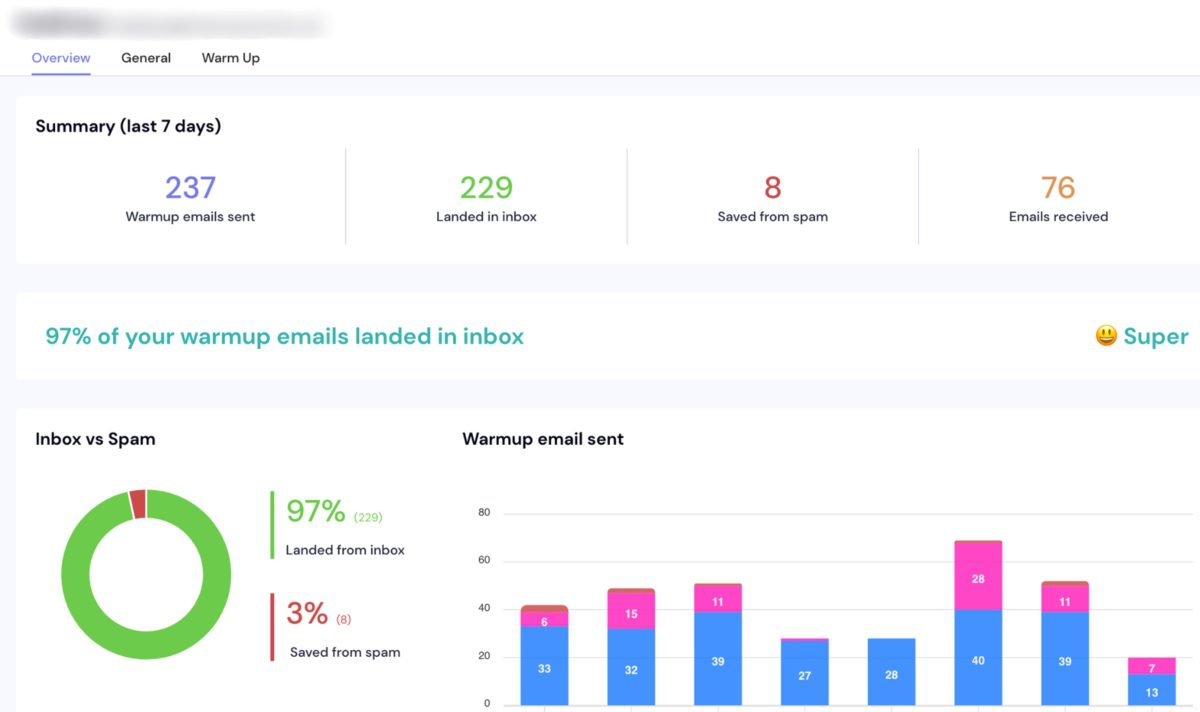
| Smartlead | 229 | 8 | 97% | Starts from $39/mo |
| Mailflow | 202 | 13 | 94% | Free plan available; paid plans start from $29/mo |
| Allegrow | 199 | 13 | 94% | Starts from $99/mo |
What is email warm-up?
Email warm-up is the process of gradually increasing the number of emails sent from a new or low-activity account, either manually or automatically, to build a positive reputation with email service providers (ESPs). This helps ensure that future emails land in the recipient’s inbox rather than the spam folder.
Benefits of email warm-up
In 2023, approximately 45.6% of all emails worldwide were marked as spam.
Want to make sure that doesn’t happen to yours? Start warming up your email accounts!
That said, here’s what you stand to gain from doing so!
1. Better deliverability
Warming up your account improves deliverability by building trust with email providers. When you start small and slowly increase your sending volume, providers recognize you as a reliable sender. This keeps your emails out of spam folders and makes sure they reach primary inboxes.
2. Lower bounce rate
When you warm up your account manually, you’ll probably take time to make sure you’re only sending emails to valid addresses likely to receive them. Email warm up tools, however, already have a database of active and valid email addresses, helping you avoid sending to inactive ones. As a result, your bounce rate becomes lower. With fewer bounces over time, your account maintains a stronger standing reputation, ultimately supporting your long-term outreach success.
3. Improved sender reputation
Sender's reputation is like the credit score of email outreach. It’s the measure ESPs use to decide whether to trust your emails. Email warm-up builds this reputation steadily through positive interactions like opens and replies. A stronger reputation means your emails are more likely to reach their destination, helping you maximize your results.
What are email warm up tools?
Email warm up tools are automation tools designed to simulate natural activity from an email account. They gradually send and receive emails, open them, mark them as important, and sometimes reply, all to show email service providers (ESPs) that the account is active and trustworthy. They are commonly used before launching outreach campaigns to improve sender reputation and increase deliverability.
How do email warm up tools work?
Most email warm up tools operate by sending emails from your account to a network of engaged contacts—often other users within the tool’s ecosystem. They also handle recipient interaction by opening emails, replying, and sometimes even marking them as ‘’Not spam.’’ This simulated engagement is what ESPs look for in trusted senders, making email warm up tools a fast and reliable way to build credibility.
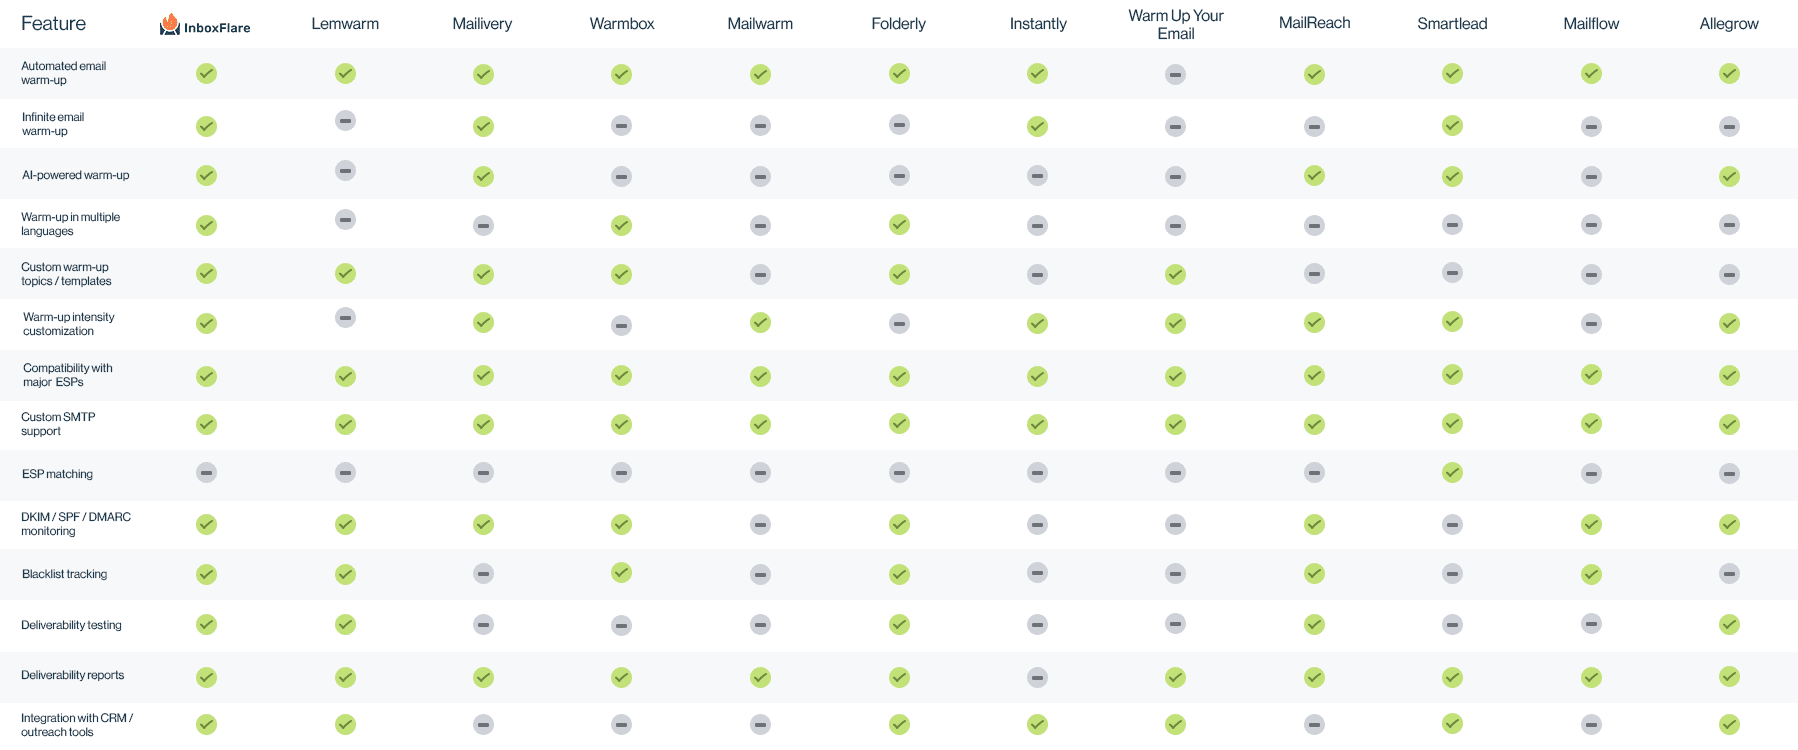
Common features of email warm up tools include:
- Automated sending and replying: The tool sends a controlled number of emails each day, gradually scaling up. They also engage with these emails from the recipients’ side, mimicking real interactions that ESPs expect from reputable senders.
- Spam recovery: If any of your emails end up in spam, many tools can help pull them out to reinforce your sender's reputation.
- Customizable settings: Most tools offer flexibility, allowing you to adjust daily limits, warm-up duration, and engagement targets to align with your outreach goals.
Simply put, email warm up tools make it easy to scale up safely. They handle the warm-up process automatically to allow you to run email campaigns that actually find their way to your audience.
Pros and cons of email warm up tools
As you can see, email warm up tools are pretty handy. But just like anything else, they are not perfect.
Let’s break down their pros and cons to get a full sense of what they offer and where they fall short.
Pros of email warm up tools
1. Automated process
Email warm up tools take the manual work out of the equation. They automate the sending, replying, and engagement needed to build up your reputation, which saves you time and ensures a consistent process.
2. Improved deliverability
By gradually increasing your sending volume and facilitating positive engagement between you and other tool users, email warm up tools help you avoid spam filters and boost deliverability. As a result, your emails are more likely to land in your leads’ inboxes, which means more of them will actually see them.
3. Reputation building
Warm-up tools make it easier to build and maintain a good sender’s reputation. Many of these tools simulate human interactions, which ESPs recognize as positive signals. This reputation-building function is particularly important for new accounts or accounts that have experienced deliverability issues in the past.
4. Customizable settings
Most email warm up tools offer settings you can adjust according to your requirements. This may include making adjustments to daily sending limits or setting the warm-up duration.
Cons of email warm up tools
1. Subscription costs
Email warm up tools can come at a hefty price. This cost may feel like a barrier to some, specifically when other expenses are also in play.
2. Potential for over-reliance
While great for warming up new accounts or improving deliverability, email warm up tools don’t have the same quality. Moreover, relying solely on one without considering email content quality, frequency, or list hygiene could lead to issues down the road.
3. Lack of instant results
Building a reputation takes time, and even with automated assistance, it may take weeks for a new account to reach full-scale sending. So, if you’re looking for a quick fix, a warm-up tool might not be the immediate solution you need.
4. Varying success across providers
Some email service providers are more receptive to warm-up techniques than others. Depending on the ESPs you’re targeting, you may see different levels of success.
12 best email warm up tools to boost deliverability and stay away from spam
So, you know what email warm-up is all about. But now it's time to find the right tool for the job.
Lucky for you, we’ve curated a list of 12 email warm up tools, all so we can help you improve deliverability, reduce bounce rates, and stay clear of those pesky spam filters.
1. InboxFlare
Deliverability rate: 99%
Best for: AI-powered, infinite email warm-up
InboxFlare is an email warm up tool that is only integrated with partnership tools like our Skylead. As a result, you get everything you need for outreach without paying extra!
Skylead has long been your ultimate sales engagement tool and cold email software.
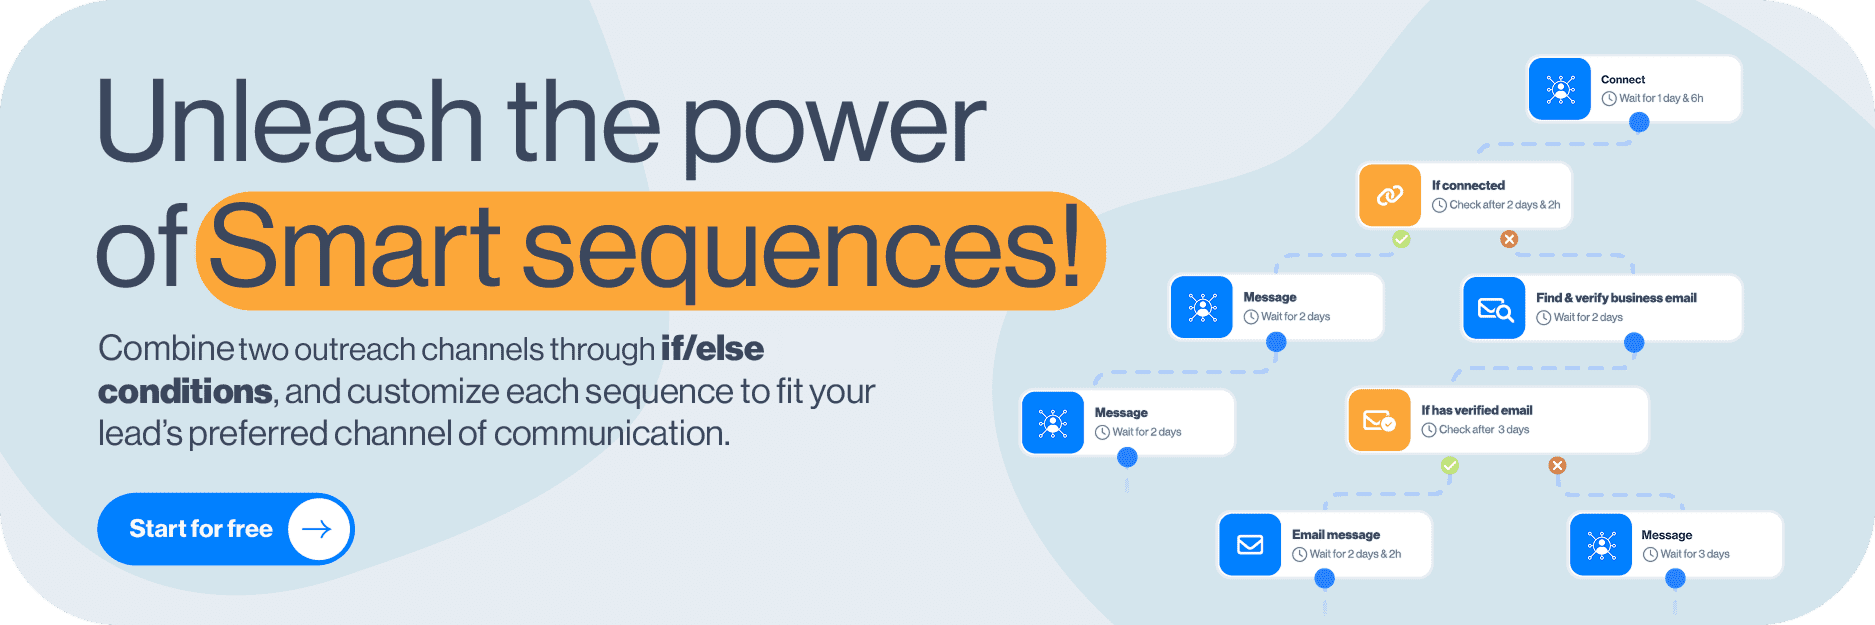
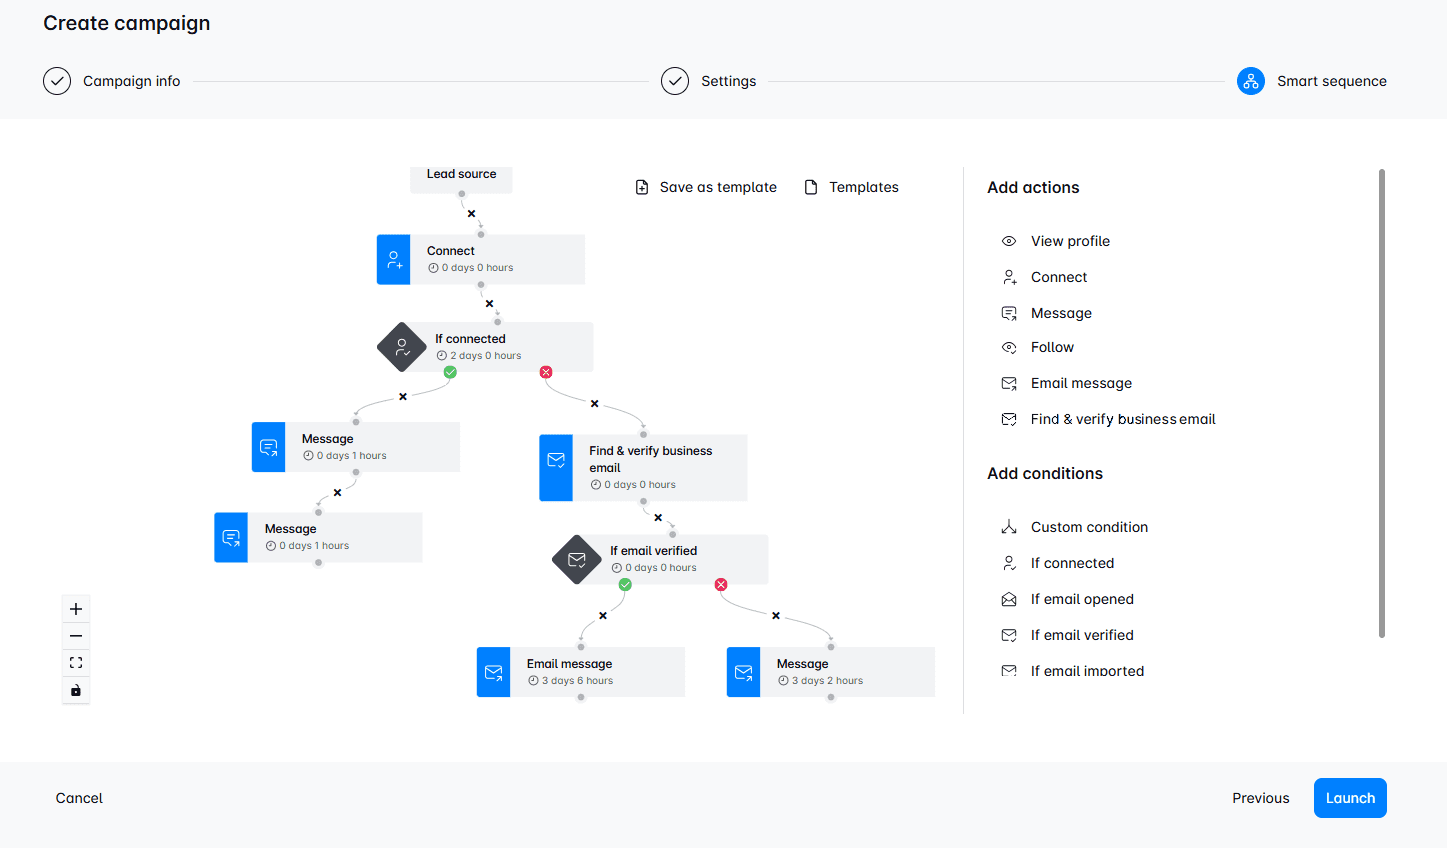
In fact, we were the 1st tool on the market to introduce Smart sequences—ground-breaking algorithms that let you take advantage of multichannel outreach to reach your leads wherever they are.
Smart sequences combine two channels to form coherent outreach sequences that Skylead will follow to get in touch with your leads. This way, it makes sure you find the fastest path to your leads!
Now, thanks to our partnership with InboxFlare, we’ve taken Skylead to a whole new level!
We've become a real one-stop-shop solution that lets you:
- Harness the full power of unlimited email outreach,
- Discover & double-verify leads' emails to reduce bounce rates and protect your domain,
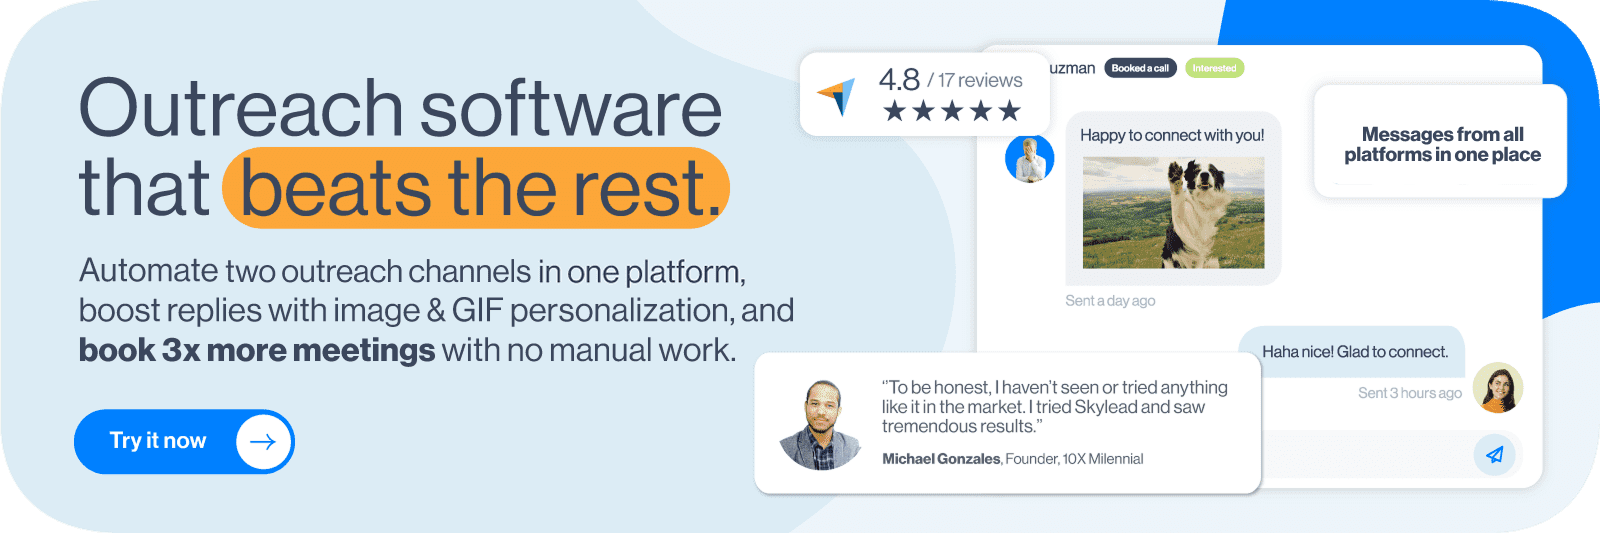
- Hyper-personalize GIFs and images to increase your response rate to over 76%,
...but also warm up infinite email accounts to keep your emails away from spam—forever!
That's right! You get all of this at one cost!
All Skylead users can create InboxFlare accounts to start warming up their emails in 30+ languages.
Once you’ve created the account, just add your email and let InboxFlare handle the rest. It's compatible with all major email providers, including Gmail, Outlook, and Zoho, and also supports custom SMTP.
InboxFlare’s AI crafts a warm-up strategy customized to your domain’s unique needs, improving your sender reputation on autopilot.
But it doesn’t send just any generic warm-up emails—you can choose specific topics, and it will generate and send customized messages on your behalf, making the warm-up process even more authentic.
In addition to building reputation, InboxFlare continuously monitors your email health by checking blacklists, domain configurations, and inbox settings.
Plus, you can run deliverability tests to assess whether your mailbox server is blacklisted, see where your emails land in different inbox providers, and adjust warm-up accordingly.
Pros
- Included free with Skylead
- Supports unlimited warm-ups and all major ESPs
- AI-personalized warm-up messages
- Warm-up in 30+ languages
- Continuous monitoring of domain health and blacklist status
Cons
- Requires some technical know-how to connect custom SMTP
Pricing
InboxFlare comes at no extra cost! With a Skylead subscription, you can warm up an infinite number of emails and unlock every other feature Skylead offers—all for just $100 a month.
That means full power to boost your deliverability, use multichannel outreach, and manage leads in one package.
2. Lemwarm by Lemlist
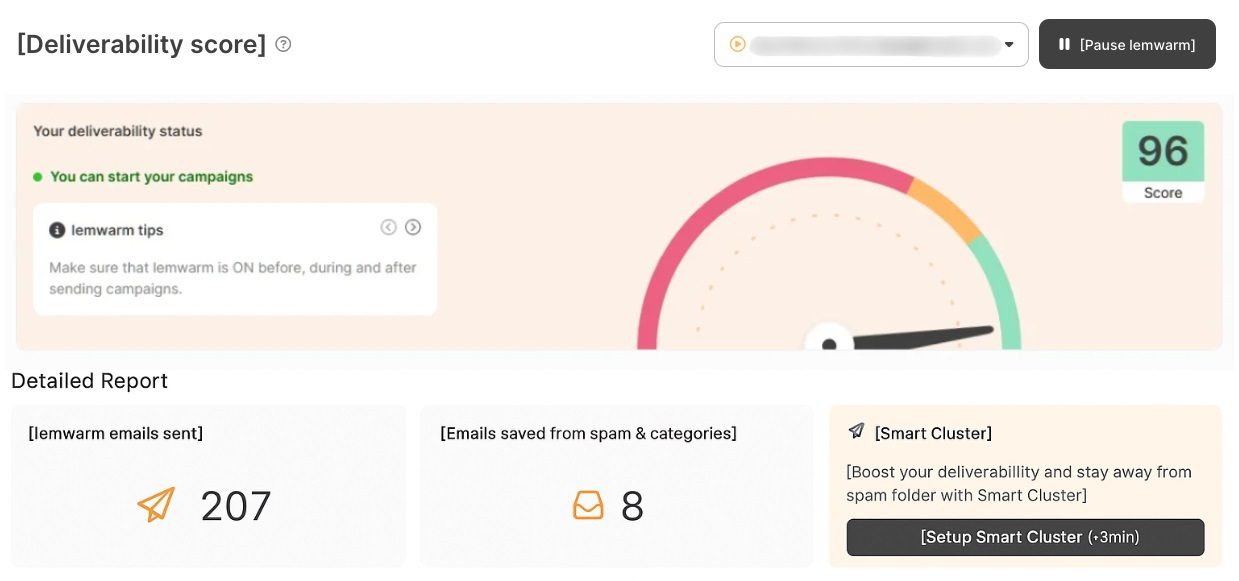
Deliverability rate: 96%
Best for: Detailed deliverability insights
Lemwarm is an email warm up tool developed by Lemlist. But since it’s an add-on rather than integrated into the platform, it’s available for standalone usage.
It works by sending automated emails to a network of over 20,000 users, gradually boosting your deliverability.
The tool also offers alerts on your deliverability score, spam risk detection based on your email content, and daily insights with expert tips to optimize performance.
Moreover, detailed deliverability reports help you stay on track and keep your emails landing in the right place.
However, the pricing structure is based on the number of emails you warm up, meaning costs can quickly add up.
Not to mention, while our testing ran smoothly, one reviewer, Vinayak G., noted:
‘’All our warm-up emails were going to the spam and categories section, which was really frustrating.’’
So, while Lemwarm proved effective to us, specific cases suggest it’s not ideal.
Pros
- Provides daily deliverability reports and spam risk alerts
- Large sending network (20,000+ users) for engagement
- Can be used standalone or as part of Lemlist
Cons
- Cost scales with the number of email accounts
- Some users report that warm-up emails still land in spam
Pricing
Lemwarm is free for Lemlist users.
If you’d like to use it alone, you can, but expect to pay the following amount:
| Essential Plan | $29/mo per email account |
| Smart Plan | $49/mo per email account |
3. Mailivery
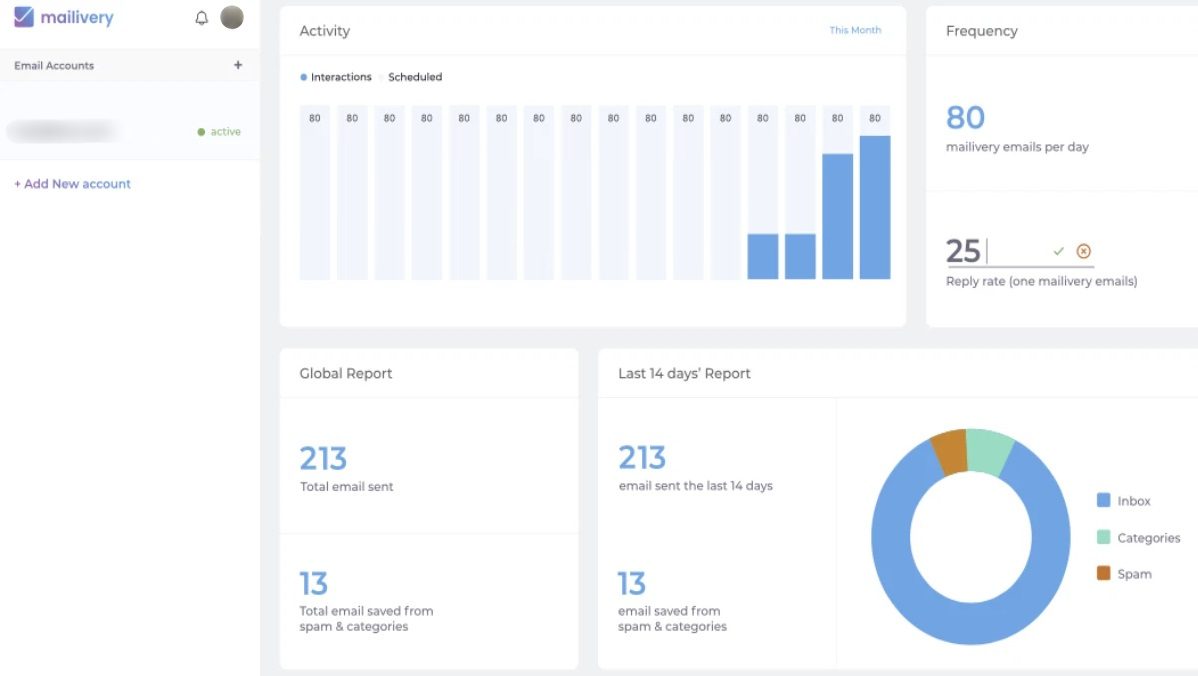
Deliverability rate: 94%
Best for: Domain reputation tracking
Mailivery is an AI-driven email warm up tool designed to boost deliverability by interacting with real emails behind the scenes.
It removes emails from spam, generates positive replies, like Lemwarm, and works with a network of over 20,000 real users to simulate authentic engagement.
Its intuitive dashboard provides real-time insights into spam placement and detailed analytics to track your domain reputation. What’s more, you can check if you're blacklisted and get personalized recommendations for improvement.
While Mailivery offers full customization of warm-up volume and timing, which we liked, some users report there’s a bit of a learning curve to it.
Additionally, the tool limits the number of warm-up emails sent daily despite allowing you to warm up unlimited mailboxes.
Pros
- Advanced analytics and real-time insights
- Works with a network of real users for authentic interaction
- Offers customizable warm-up volume and timing
Cons
- Daily email sending limits even on higher plans
- Some learning curve for new users
Pricing
| Free *1 email account / up to 10 interactions a day | |
| Starters | $29/mo *Unlimited email accounts / up to 100 interactions a day |
| Professional | $79/mo *Unlimited email accounts / up to 600 interactions a day |
| Business | $199/mo *Unlimited email accounts / up to 2,000 interactions a day |
4. Warmbox
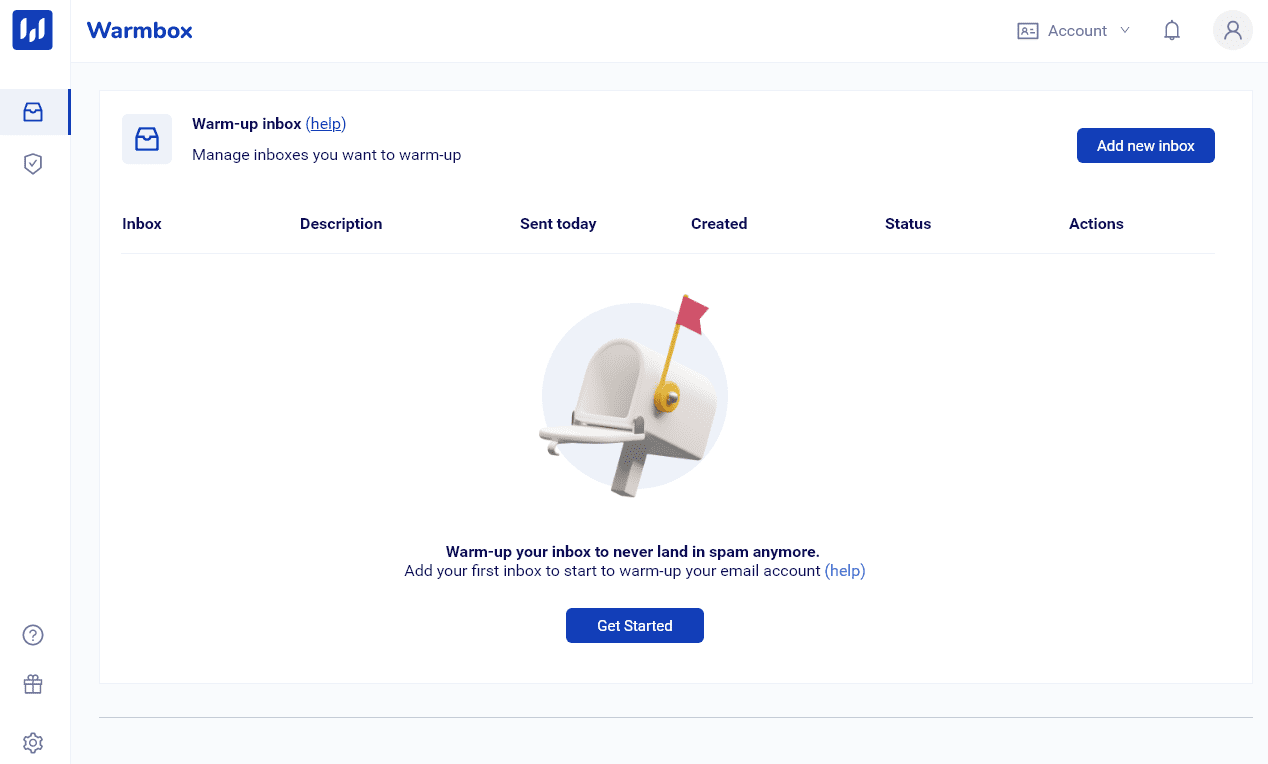
Deliverability rate: 90%
Best for: Simple self-setup
Warmbox is one of the easiest email warm up tools to use and is great for those who want a simple, self-setup experience.
The software automates the whole email-warm-up process using inboxes from real users and doesn’t interfere with your email routine.
Beyond improving deliverability, Warmbox also calculates your Reputation Score, compares it against a community benchmark, and suggests ways to improve. It even sends you alerts if your score drops below a certain percentage, so you can pause campaigns before things get worse.
However, it can get pricey, especially since you’re charged per inbox, and there’s no free trial available.
Pros
- Easy to set up and fully automated
- Uses real inboxes for more natural interaction
- Reputation Score tracking with benchmark comparisons
- Alert system to warn you of deliverability issues
Cons
- Pricing can get expensive per inbox
- Limited reporting features compared to others
Pricing
| Basic | $19/mo per inbox *Up to 75 warm-up messages a day |
| Pro | $59/mo per inbox *Up to 250 warm-up messages a day |
| Max | $99/mo per inbox *Up to 1,000 warm-up messages a day |
5. Mailwarm
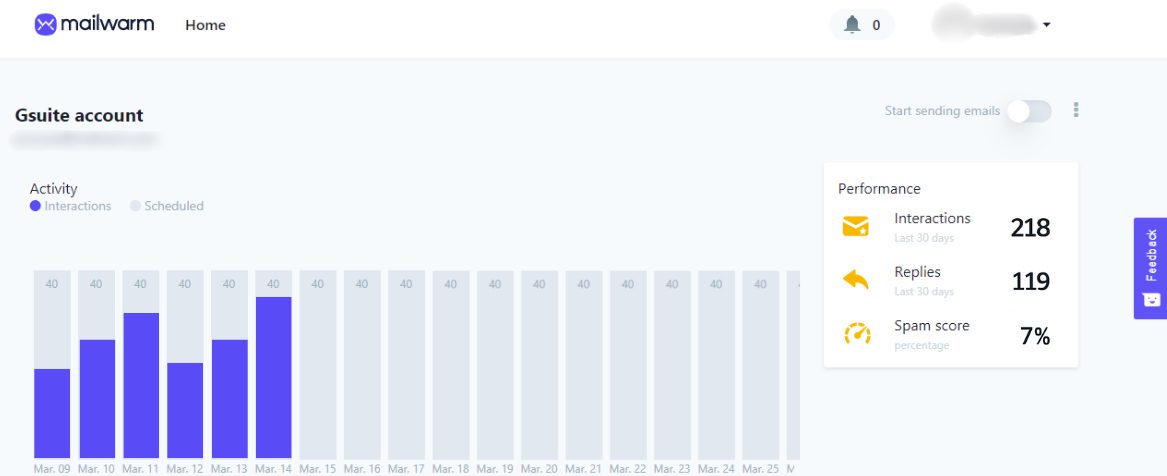
Deliverability rate: 93%
Best for: Flexibility in warm-up intensity
Mailwarm helps raise your sender reputation by interacting with your emails daily.
It automatically sends dozens of emails to over 1,000 Mailwarm accounts, where they get opened, marked as important, replied to, and pulled out of spam.
You can track everything through a dashboard that gives you insights into your email activity. You also have the flexibility to adjust Mailwarm’s intensity or pause the warm-up process if and when necessary.
Nevertheless, the major limitation we found is that even with the highest subscription plan, you’re capped at warming up a maximum of 10 inboxes. And considering its hefty price, you may be better off choosing a different email warm-up software.
Pros
- You control how aggressive the warm-up process is
- Daily interactions with 1,000+ internal accounts
- Clean interface and basic tracking features
Cons
- Pricey for the number of inboxes supported
- Maxes out at 10 inboxes, even on the highest plan
Pricing
| Starter | $79/mo per user with 1 email account |
| Growth | $189/mo per user with up to 3 email accounts |
| Scale | $549/mo per user with up to 10 email accounts |
6. Folderly by Belkins
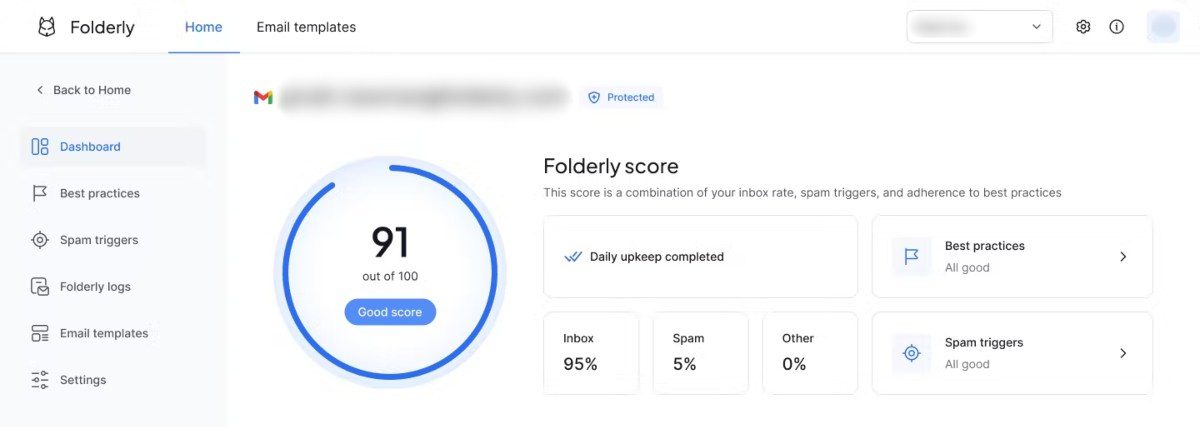
Deliverability rate: 95%
Best for: Domain reputation analytics
Folderly is developed by Belkins, a company known for its B2B lead generation and outreach services.
Its main promise is to keep your emails out of spam and promotions folders with an impressive 99% inbox placement rate. It offers insights on why emails end up in spam, helps you optimize templates, checks your DNS records, and integrates with the most popular ESPs like Gmail and Outlook.
We haven't experienced major issues while testing Folderly, but multiple users have complained about it doing more harm than good.
And after reading this review left by Oguzhan U., in particular, we are seriously starting to question the tool’s reliability:
‘’Folderly sent 42,000 undelivered emails in 2 days (Saturday and Sunday) using 8 email addresses in our domain. Our team didn't realize the issue until Monday. Our email domain reputation is completely destroyed. That is completely the opposite of why we wanted to use Folderly.’’
Pros
- Offers diagnostics for email content, DNS, and spam triggers
- Supports Gmail, Outlook, and custom SMTP
Cons
- Expensive compared to most tools
- Reports of deliverability issues or oversending bugs
Pricing
Folderly doesn’t have pricing plans, per se.
Instead, their rates depend on the number of mailboxes you’re warming up and are structured like this:
| 1-9 mailboxes | $120/mo per mailbox |
| 10-24 mailboxes | $90/mo per mailbox |
| 25-99 mailboxes | $70/mo per mailbox |
| 100+ mailboxes | Custom / Contact sales |
7. Instantly
Deliverability rate: 95%
Best for: Automated cold emailing with the built-in warm-up
Instantly isn't a standard email warm up tool but one of the best cold email software with built-in warm-up functionality that can be activated with a click.
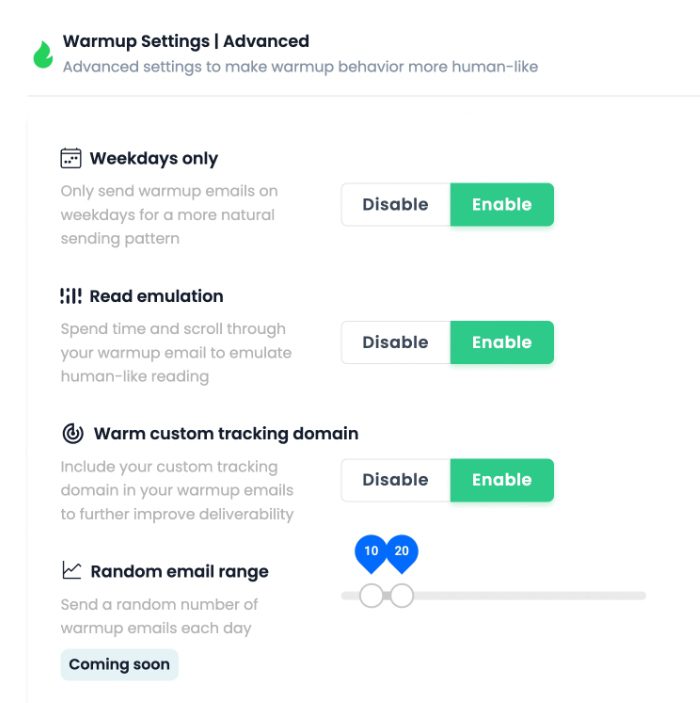
The software allows you to monitor your deliverability score, showing exactly how many emails land in the inbox or spam. You can also emulate human-like reading by enabling the read emulation feature, which scrolls through emails to simulate authentic interaction.
The tool sends a random number of warm-up emails daily, and you can choose specific open and response rates.
Moreover, with a pool of over 550,000 real email accounts for warm-up, Instantly.ai's coverage is vast.
The price is reasonable, considering that, starting at $37, you can warm up unlimited emails.
Nonetheless, some users have reported that its warm-up can blacklist your domain with certain ESPs, so exercise caution if you decide to use it.
Pros
- Warm-up for unlimited inboxes
- Offers deliverability score monitoring and read emulation
- Massive warm-up pool (550K+ inboxes)
Cons
- Reports of blacklisting issues with some ESPs
- Limited control over message content
Pricing
Instantly doesn’t have a dedicated email warm-up plan.
Nonetheless, unlimited email warm-up is included in their following Outreach plans, along with email outreach.
| Growth | $37/mo per seat |
| Hypergrowth | $97/mo per seat |
| Light Speed | $358/mo per seat |
8. Warm Up Your Email by Mailshake
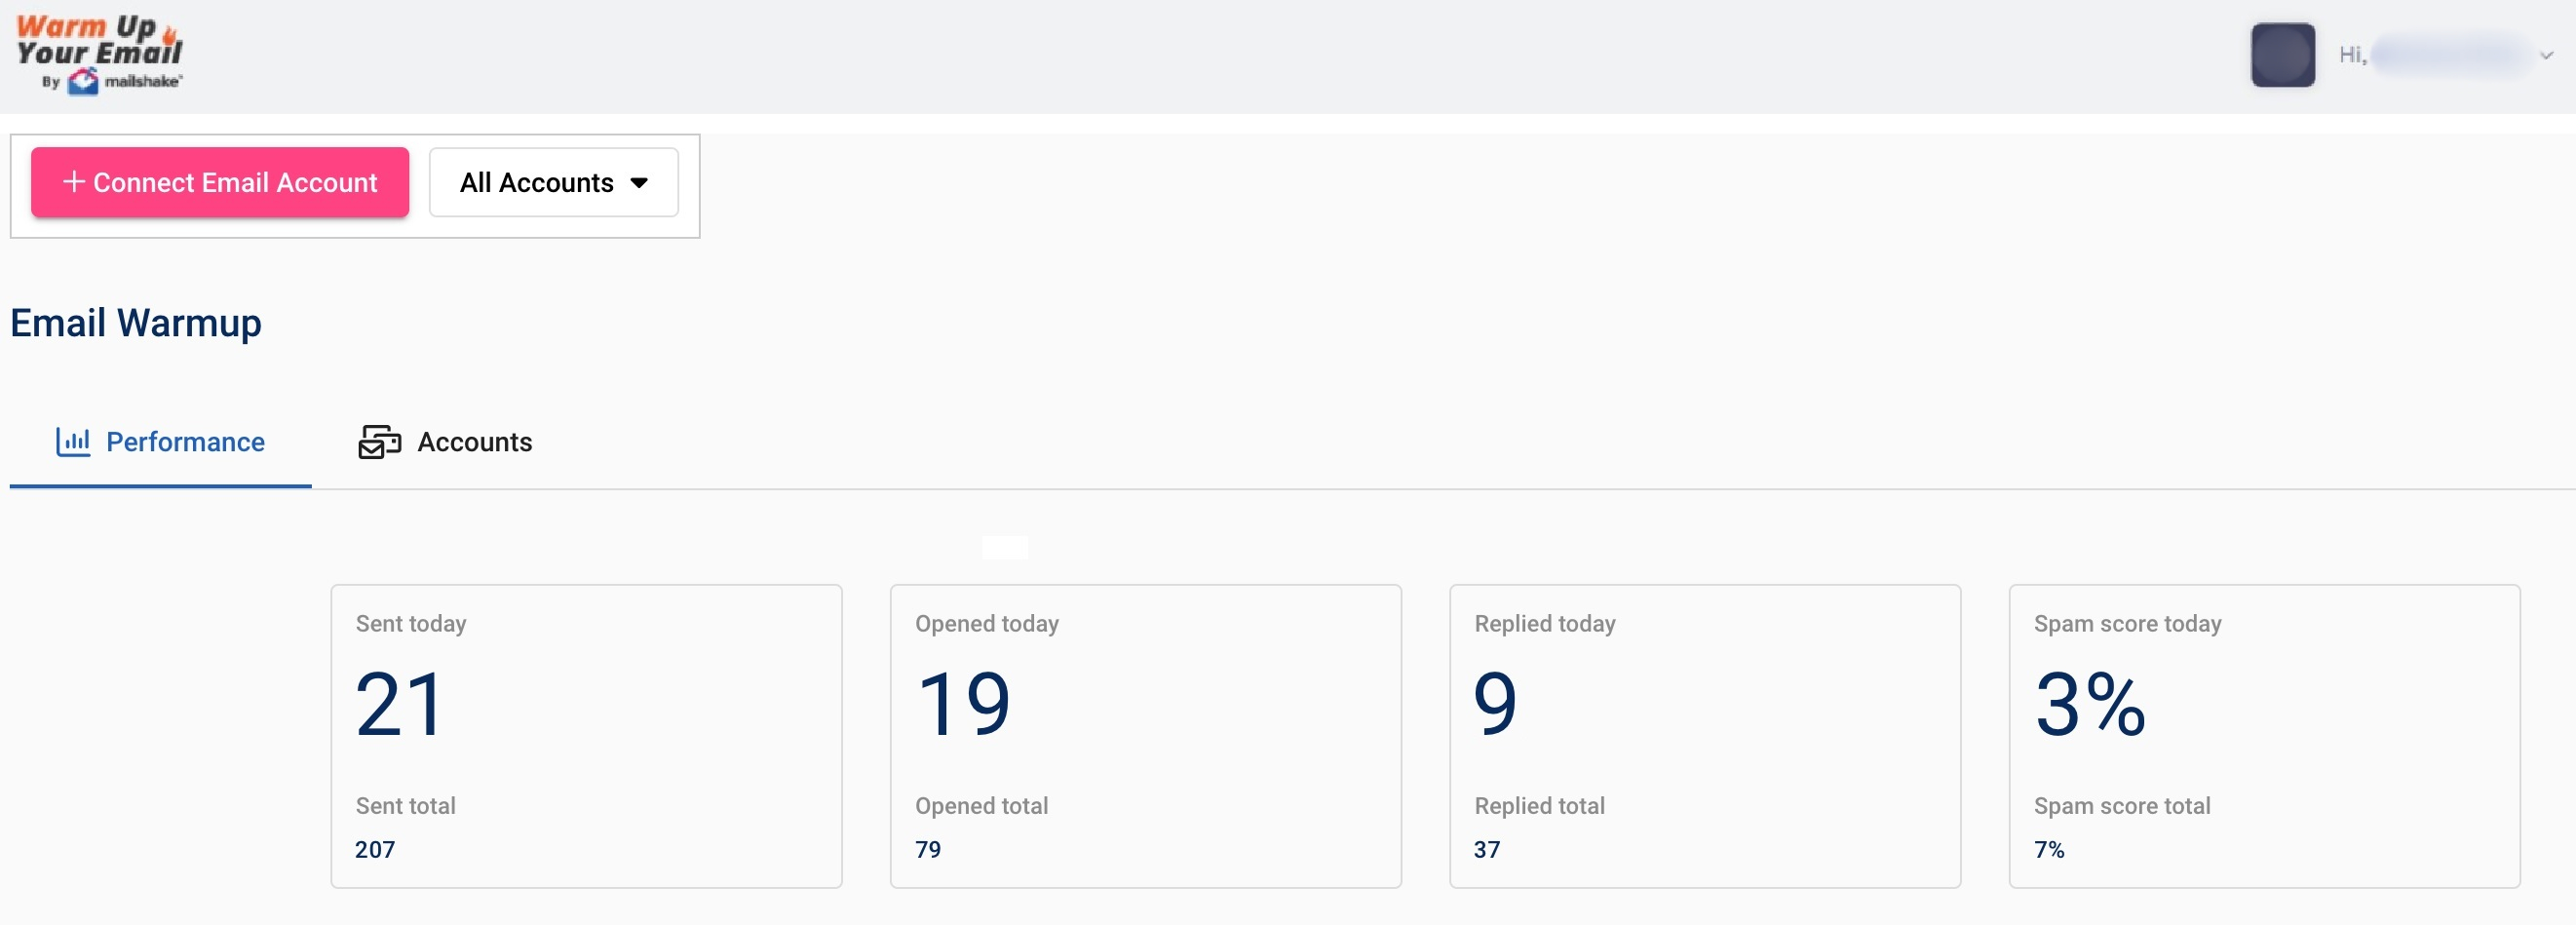
Mailshake, a popular cold email software, acquired the email warm up tool ‘’Warm Up Your Email’’ in 2024 to ensure its customers' emails hit the inbox, not the spam folder.
The team at Warm Up Your Email manually interacts with your emails by opening them, replying, and pulling them out of spam. This interaction helps signal ESPs that you’re a trusted sender.
All you have to do is connect your email account and set your daily send volume while they handle the rest. You’ll get insights on how many of your emails land in spam and track your progress with a 10-day spam pattern report that shows your account’s improvement over time.
The downside? The process isn’t fully automated—it’s done manually by the Warm Up Your Email team. This can feel a bit counterproductive if you’re looking for full automation.
Additionally, their top plan caps the number of email accounts you can warm up at 8.
Not to mention, replies are sent as separate messages, not within the same thread, which might limit the natural conversation flow.
Pros
- Managed manually by a dedicated team
- Offers spam pattern tracking over time
Cons
- Not fully automated and, thus, slower to scale
- Replies are sent in new threads, not existing ones
- Limited to 8 inboxes, even on the top plan
Pricing
Mailshake users can use Warm Up Your Email free of charge.
As for those who’d like to use it separately, the available plans are as follows:
| Sole Sender | $29/mo per user *1 email account / up to 50 interactions a day |
| Pro Sender | $49/mo per user *3 email accounts / up to 50 interactions a day |
| Agency Sender | $99/mo per user *8 emails accounts / up to 100 interactions a day |
9. MailReach
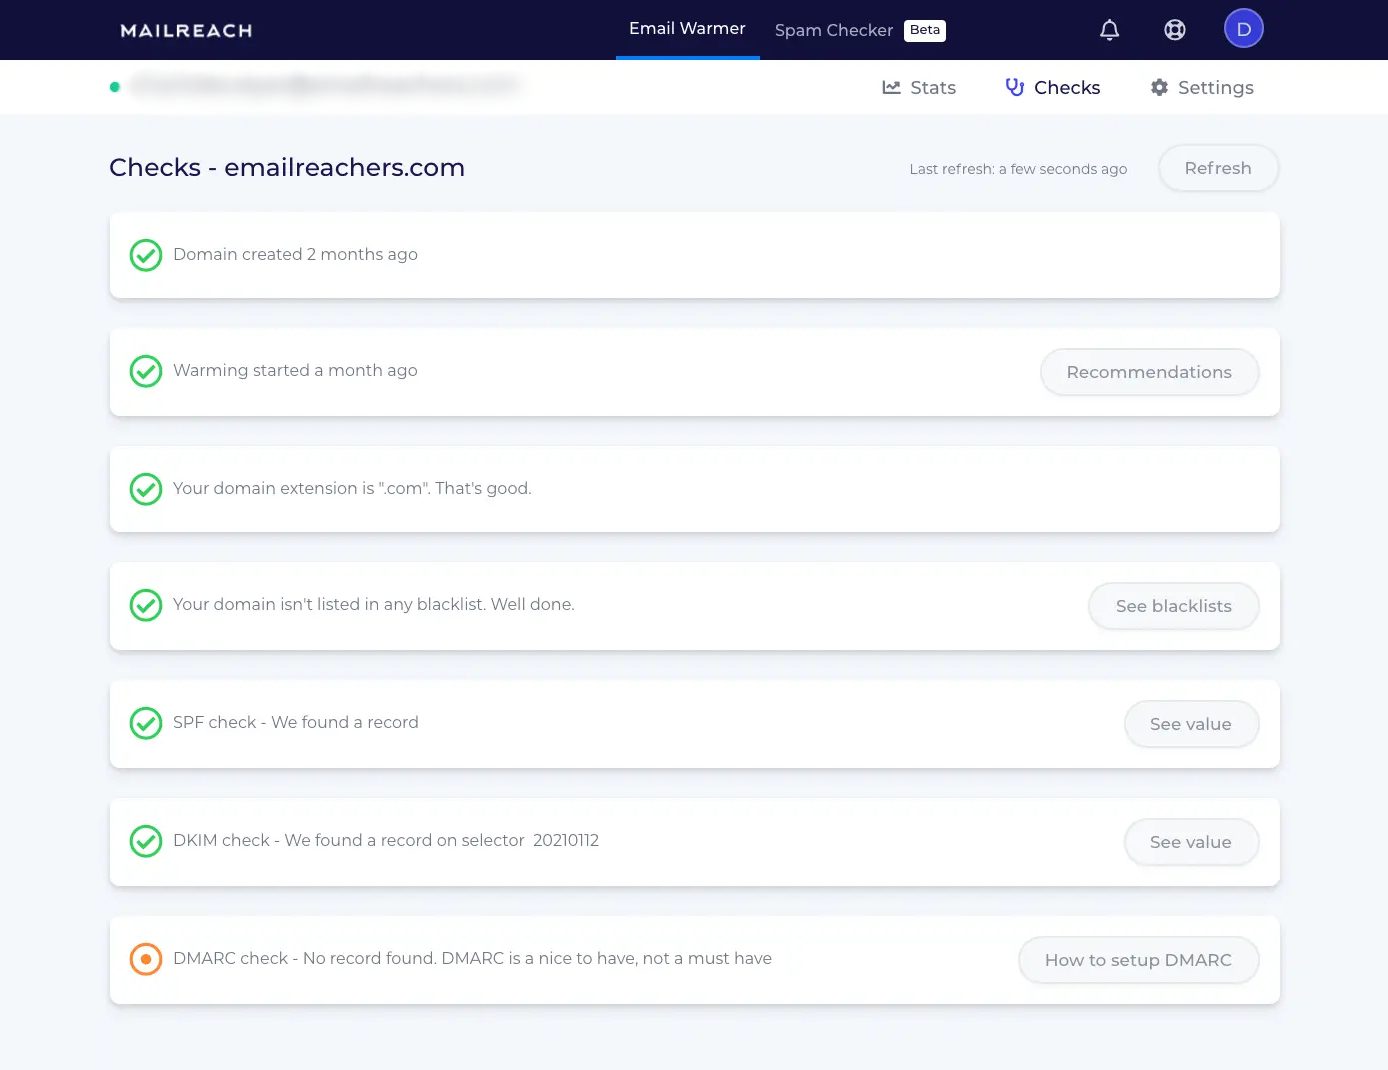
Deliverability rate: 93%
Best for: Real-time reputation tracking
MailReach is an email warm up tool designed to enhance your email deliverability, helping you hit more inboxes and land more deals.
It automatically repairs, improves, and maintains your sender reputation by facilitating genuine, positive interactions with a network of high-reputation accounts.
Its main feature is consistent spam checking, which allows you to track inbox placement and measure deliverability performance. You can run these tests manually or automate them based on your preferred frequency.
MailReach comes with a Smart AI warming algorithm that makes sure your account is properly warmed up before hitting full-scale outreach. At the same time, the Reputation Tracking Dashboard gives you real-time insights into your email performance, allowing you to fine-tune your campaigns as needed.
MailReach works with any email service provider that supports SMTP. However, the setup process can be tricky, especially when connecting emails for the first time.
Downsides-wise, since pricing is inbox-based and spam checker credits aren’t included in the base cost, you’ll need to account for those extras when budgeting.
Pros
- Smart AI algorithm adapts warm-up strategy
- Real-time reputation and deliverability dashboard
- Frequent spam placement checks
- Compatible with all SMTP-based ESPs
Cons
- Setup can be tricky for first-time users
- Spam test credits are not included in base pricing
- Costs increase with the number of mailboxes
Pricing
MailReach prices are based on the number of mailboxes you’re warming up, starting at $25 per mailbox.
Spam credits are sold separately, starting at $28 for 100, though you get 20 free credits to start you off.
10. Smartlead
Deliverability rate: 97%
Best for: Email provider matching
Smartlead is another tool that bundles email warm-up into its larger cold outreach infrastructure.
Its AI-powered warm-up emulates human conversations, allowing emails to appear natural and avoid automation detection. In addition to authentic AI conversations, the system delivers a gradual ramp-up for safe email sending.
One feature we really liked is how Smartlead automatically matches your email provider with that of your recipient. So, for instance, if you have both Gmail and Outlook accounts, and your recipient is using Gmail, Smartlead will use your Gmail account for optimal deliverability.
One downside, however, is the lack of customization—you can’t choose the topics or content for the warm-up messages. For this reason, and the fact that other warm-up tools offer more functionalities, you may be better off opting for one of the Smartlead alternatives.
Pros
- AI-generated warm-up conversations
- Matches sender and recipient ESPs for better deliverability
- Unlimited warm-up included in all plans
- Built-in outreach capabilities
Cons
- No control over warm-up content or topics
- Fewer warm-up-specific features than standalone tools
- May be overkill if you only need warm-up
Pricing
Much like Skylead and Instantly, Smartlead doesn’t have a sole email warm-up plan.
Instead, this functionality is included in their standard plans, which also give you access to email outreach.
| Basic | $39/mo per user *Unlimited email warm-up / Up to 2,000 active leads |
| Pro | $94/mo per user *Unlimited email warm-up / Up to 30,000 active leads |
| Custom | $174/mo per user *Unlimited email warm-up / Up to 12M active leads |
11. Mailflow by QuickMail
Deliverability rate: 94%
Best for: Blacklist tracking
Mailflow is QuickMail's email warm up tool, primarily aimed at its users. Nevertheless, it can also be used separately.
The tool is designed to improve your email deliverability with features like a real-time auto-warmer score for each inbox, SPF and DKIM monitoring, and blacklist tracking across nearly 100 lists. The latter makes it easy to act quickly if any blacklist flags your domain.
Unfortunately, its analytics are somewhat limited for our taste. In addition, the support team is only accessible via email, which can delay issue resolution.
Pros
- Built-in SPF, DKIM, and blacklist monitoring
- Tracks warm-up progress through an auto-warmer score
- Offers a free plan with basic functionality
- Supports up to 100 inboxes
Cons
- Limited analytics compared to other tools
- Customer support only available via email
Pricing
The tool is free for all QuickMail users.
Nevertheless, those who’d like to use it separately can expect to pay the following amounts:
| Free Pool *Up to 100 email accounts / maximum 5 warm-up emails a day | |
| Silver Pool | $49/mo per user *Up to 100 email accounts / maximum 30 warm-up emails a day |
| Gold Pool | $99/mo per user *Up to 100 email accounts / maximum 50 warm-up emails a day |
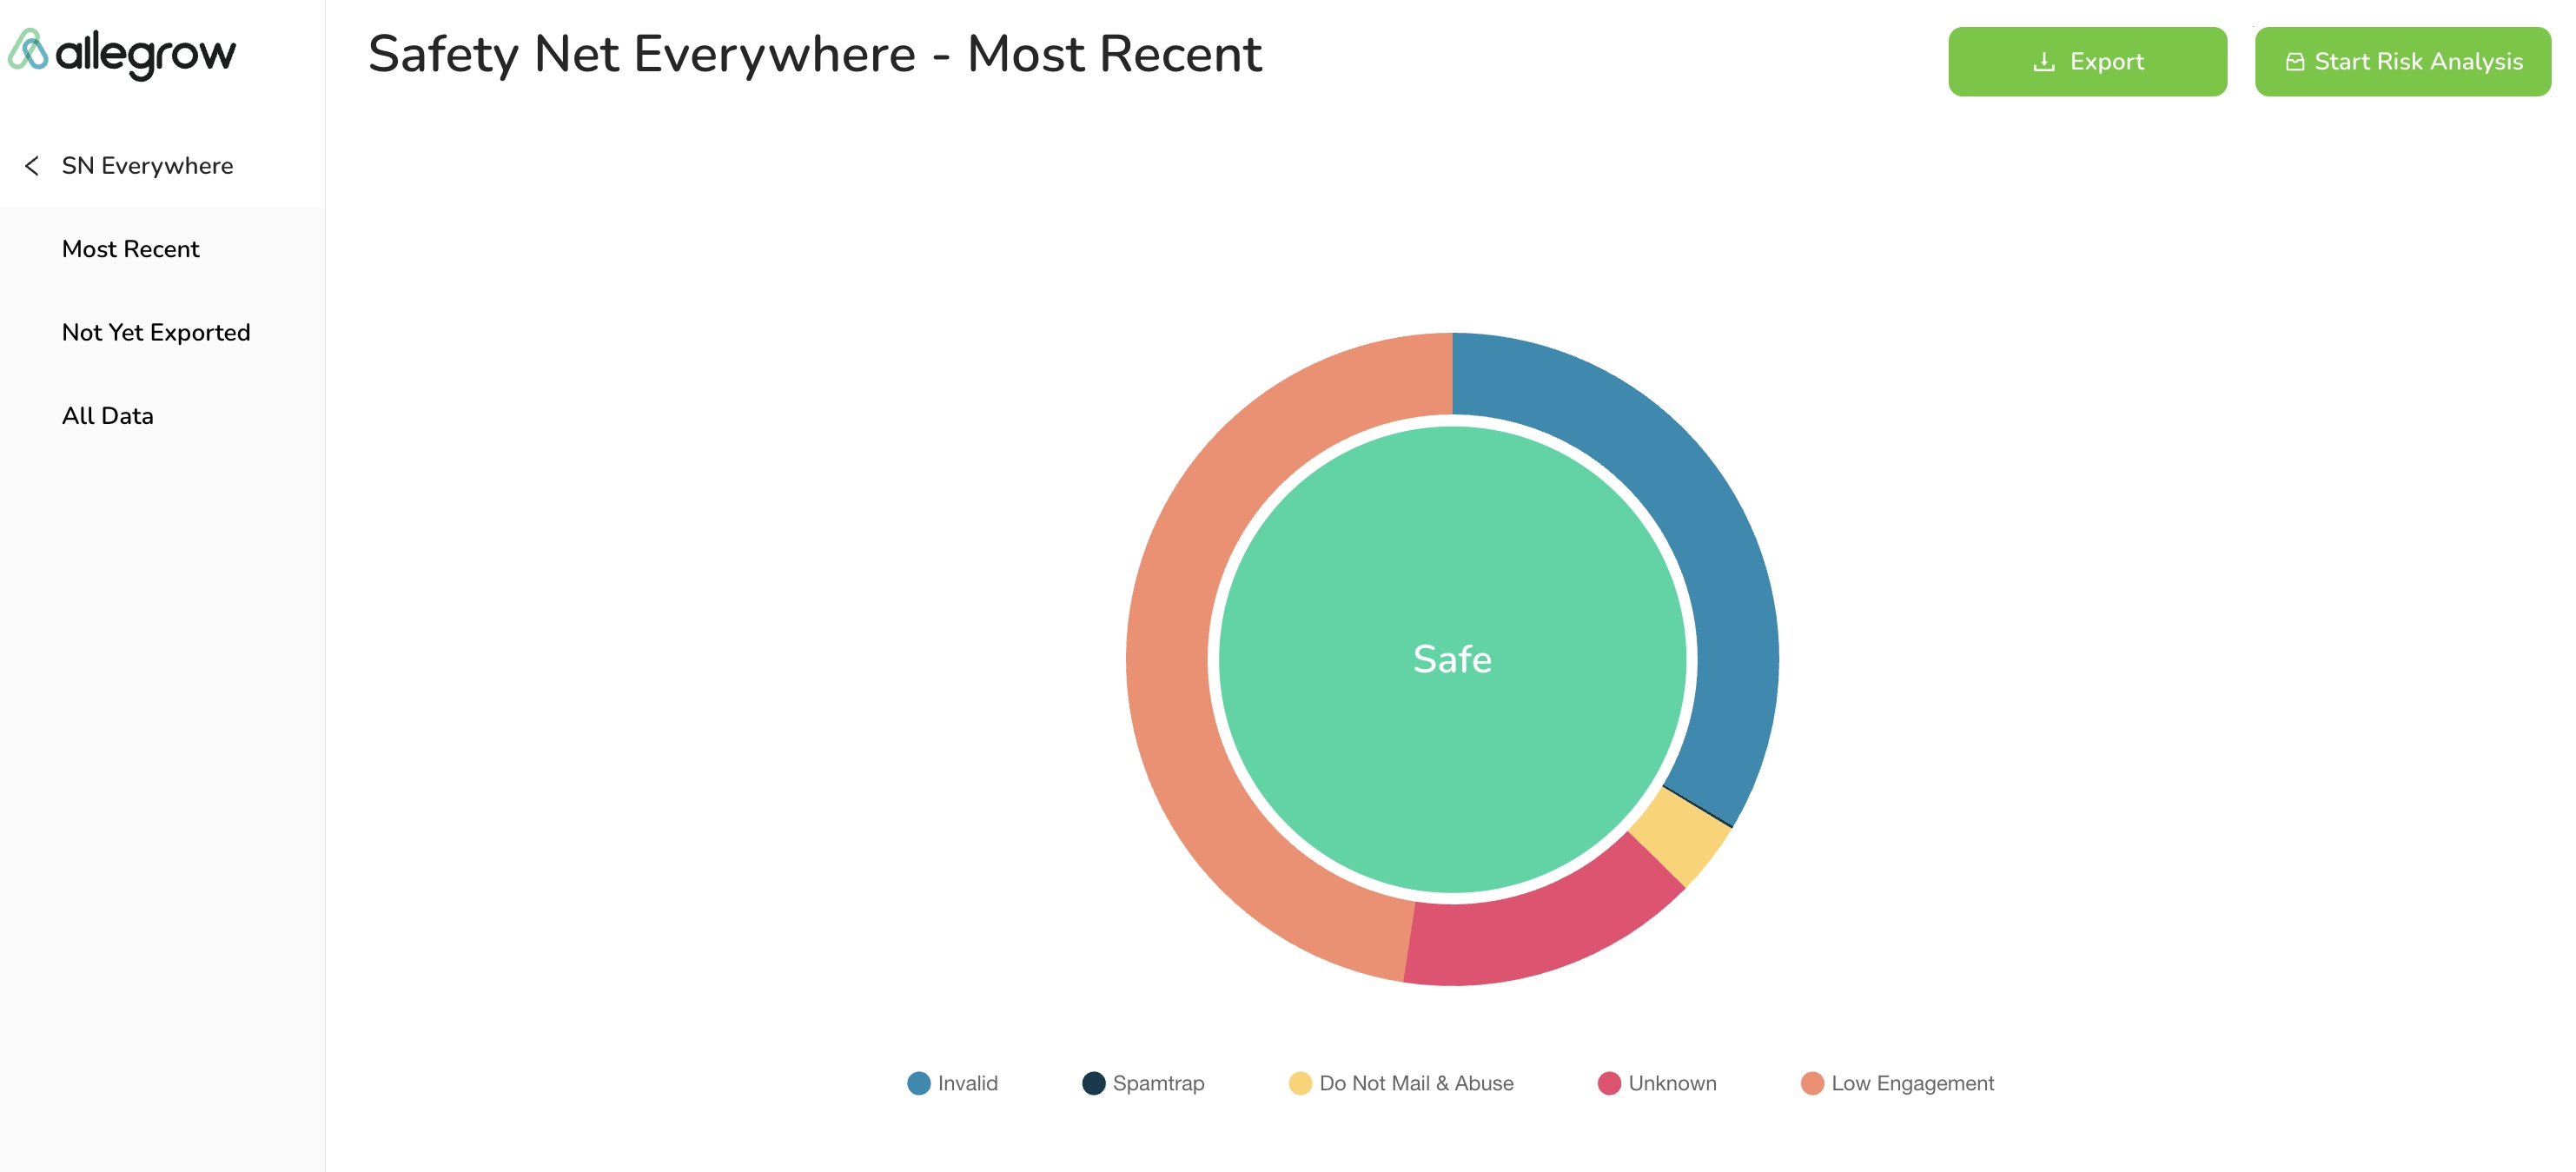
12. Allegrow
Deliverability rate: 94%
Best for: Integrating with CRM and outreach platforms
Allegrow is an email warm up tool focused on delivering in-depth insights to help optimize your deliverability.
It offers unique features like Spam Rate Analysis, allowing you to see exactly how much of your email traffic ends up in spam. Also, there’s the Safety Net™, which automatically stops emails that could damage your sender's reputation.
With continuous DKIM, SPF, and DMARC testing, like InboxFlare in Skylead has, you’re also covered in authentication. At the same time, the Deliverability Leaderboard ranks users by spam rate to prevent one bad sender from affecting the whole team.
Another plus is that Allegrow natively integrates with popular CRM and outreach tools like Outreach.io and SalesLoft.
Not everything is ideal about Allegrow, though. For example, the customization of warm-up messages is rather limited.
Pros
- Spam Rate Analysis and Safety Net™ features protect domain reputation
- Native integrations with tools like Outreach.io and SalesLoft
- Ongoing DNS and authentication checks (SPF, DKIM, DMARC)
Cons
- Higher pricing compared to most warm-up tools
- Limited customization of warm-up message content
Pricing
| Starter Unlimited | $99/mo |
| Premium Unlimited | Starts from $540/mo |
| Scale Plus Unlimited | Starts from $1,340/mo |
How to choose an email warm up tool
You’ve seen the top email warm up tools—now let’s show you how to pick the best one for your workflow.
1. Look for features you need
Not all email warm up tools are created equal, meaning they come with different features. With that in mind, start by identifying the ones that matter most to you.
Do you need automated sending and replying?
Customizable warm-up settings?
Or perhaps spam recovery features?
Either way, the tool you choose should have the functionality you need. Otherwise, what’s the point of paying for it?
2. Verify ESP compatibility
Before you invest in a tool, check that it’s compatible with your ESP. Some tools are specifically suited for Gmail, while others are optimized to work better with Outlook, Zoho, or more specialized ESPs. This step saves you from potential headaches down the line.
3. Assess ease-of-use and setup
Your ideal warm-up tool shouldn’t have a steep learning curve. Instead, it should be simple to set up and easy to navigate.
That said, look for intuitive dashboards, straightforward settings, and clear instructions. The less time you spend figuring out the tool, the sooner you’ll start seeing results.
4. Confirm support for multiple accounts and team usage
Running campaigns across multiple accounts and teams? You’ll want a tool that can handle it. So, make sure the tool supports multi-account use and includes team collaboration features. That way, you can streamline your efforts and keep everything organized.
5. Gauge the quality of customer support
Customer support can make or break your experience with any tool. After all, if things go sideways, you’ll need reliable help.
But how do you know the support quality if you haven’t used the tool yet? Check out reviews from real users. Their feedback usually reveals how responsive and helpful the support team is and whether they’re truly invested in resolving issues.
Ideally, the support team should be reachable 24/7 through multiple channels—live chat, email, phone, you name it.
6. Evaluate cost vs. feature ratio
Finally, consider whether the cost is appropriate for what you’re getting. Some tools are pricey but lack crucial features. Meanwhile, others offer everything you need at a reasonable rate. Compare pricing plans and weigh the cost against features to make sure you’re getting the best quality you can afford.
Frequently asked questions (FAQs)
Is email warmup necessary?
Yes, if you want your emails to reach inboxes instead of spam folders. Skipping this step can result in poor deliverability and a damaged reputation. Both of these can seriously hurt your outreach.
How can I warm up my email?
You have 2 options: manually or with an email warm up tool.
To warm up manually, start by sending a small number of emails each day to trusted contacts—people who will open, reply, and engage with your messages. Gradually increase the volume over several weeks, allowing email providers time to recognize your account as trustworthy.
For a faster and more efficient approach, consider using an email warm up tool. These tools automate the process by sending emails to a network of engaged users who interact with your messages, helping to quickly build your sender reputation and improve deliverability with minimal effort.
What is the best email warm up tool?
One person's best may be another person's worst. So, the best email warm up tool for you is the one that has the features you need, all while fitting within your budget.
Did Google ban email warmup?
Google didn’t ban email warm-up outright. However, they have restricted the use of third-party tools that access the Gmail API, which is often used for email warm-up. However, this move is about enforcing their policies against unauthorized API access, not banning the concept of warm-up itself.
That said, this doesn’t mean you can’t use email warm up tools altogether. Many tools offer warm-up services that comply with Google’s policies by avoiding direct API access or by using methods that align with Gmail’s guidelines. So, if you’re using Gmail, just make sure you choose a tool that follows these regulations to avoid any issues.
Email warm up tools: Final comparison [+ our top picks by use case]
| Use case | Recommended tool | Why? |
| Best overall value | InboxFlare | Free with Skylead, infinite warm-up in 30+ languages, AI-powered warm-up strategy |
| Best standalone warm-up | MailReach | Real-time tracking, compatible with any SMTP |
| Best for cold email + warm-up combo | Instantly | Unlimited warm-up + outreach in one |
| Best for large teams or agencies | Allegrow | CRM integrations, team-focused features |
| Best manual approach | Warm Up Your Email | Human-managed warm-up and clear progress tracking |
| Best for domain reputation analytics | Folderly | Diagnostic tools and spam prevention systems |
Your search for effective email warm up tools ends here!
By now, you should understand just why you should warm up your emails.
And sure, there are plenty of email warm up tools out there. But here’s the bottom line: your emails deserve to be seen. So, why mess around testing each tool when there’s already one that does it all—Skylead?
Skylead is a one-stop-shop tool that can help you warm up an infinite number of emails, discover and verify your leads' emails, and use multichannel outreach—all at a single price!
Sounds too good to be true?
Take it for a spin with our 7-day free trial to see the results yourself and start getting your emails exactly where they belong: in front of your audience!
Disclaimer: Skylead is not affiliated, endorsed by, or connected with LinkedIn in any way.
Gone are the days of going through business cards, calling prospects left and right, only to close a deal. Over the years, numerous sales outreach tools have emerged, all aimed at streamlining prospecting and lead generation.
Yet, because there are so many of them, today's sales reps are often at a crossroads, wondering which tool they would benefit the most from.
To help you choose, we've tested the top cold outreach solutions on the market and are sharing our two cents.
So, if you are looking for the perfect outreach software for sales, brace yourself—the ultimate breakdown of tools is coming!
Sales outreach tools overview
TL;DR? Here’s a quick comparison table to help you pick your ideal tool complete with what each is best for, its pros and cons, starting price, and user rating.
Updated on 14.5.2025.
| Sales outreach tool 📨🗣️💻 | Best for 🥇 | Pros 👍 | Cons 👎 | Pricing 🏷️ | Rating 🌟 |
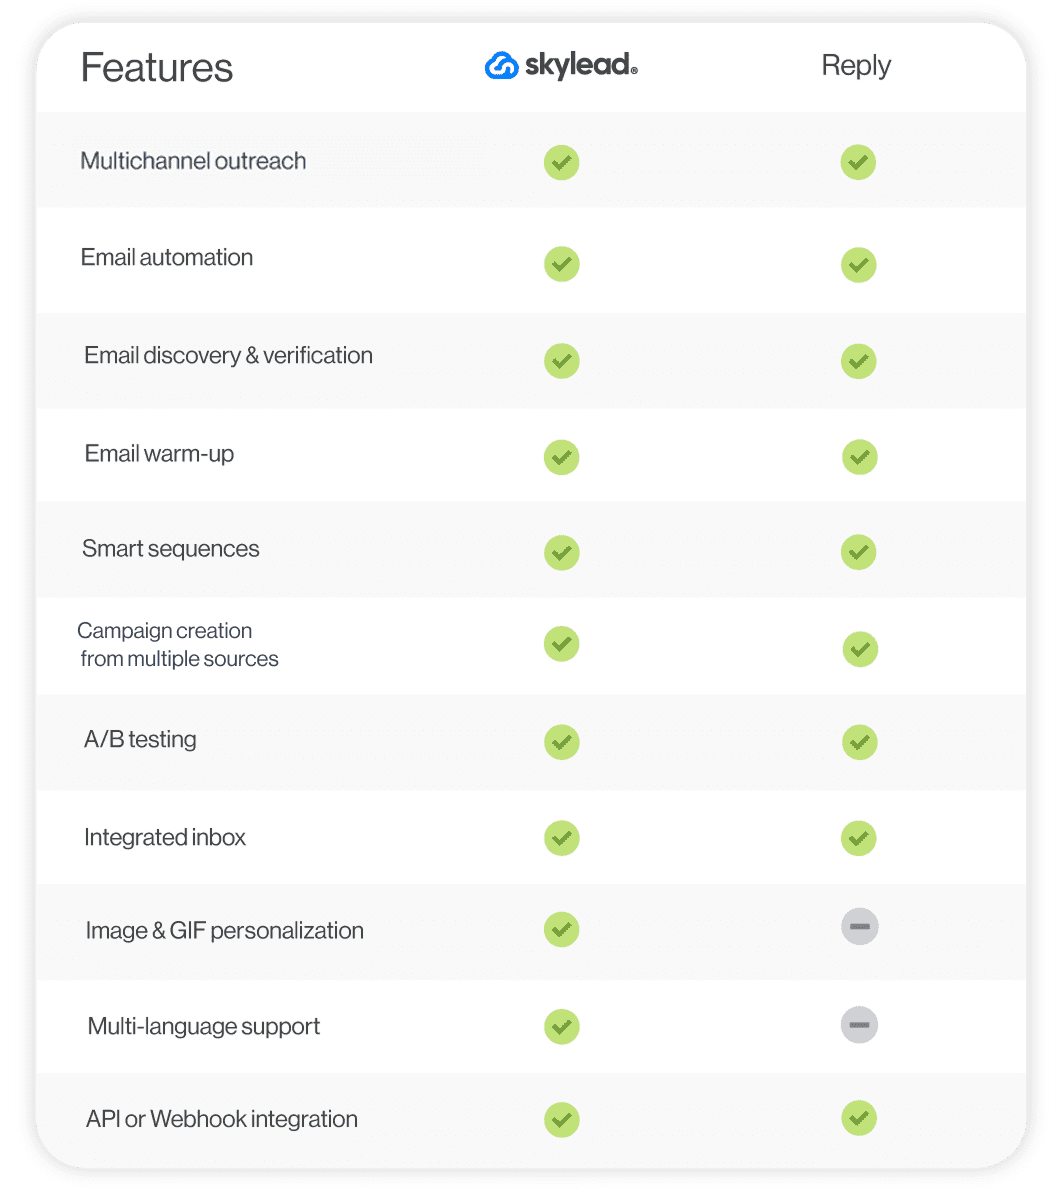
| Skylead | Smart, hyper-personalized multichannel outreach | - Smart sequences that combine two channels - Precise email discovery & verification - Image & GIF personalization - Email warm-up at no extra cost -Smart inbox - Available in 7 languages | - No native video personalization | $100/mo per seat | Capterra: 4.8 |
| Expandi | Automated LinkedIn profile engagement | - Auto-post likes and endorsements - Smart sequences | - No image personalization - No paid inMails or full email finder | $99/mo per seat + $69 for Image & GIF personalization (through Hyperise) | Capterra: 4.4 |
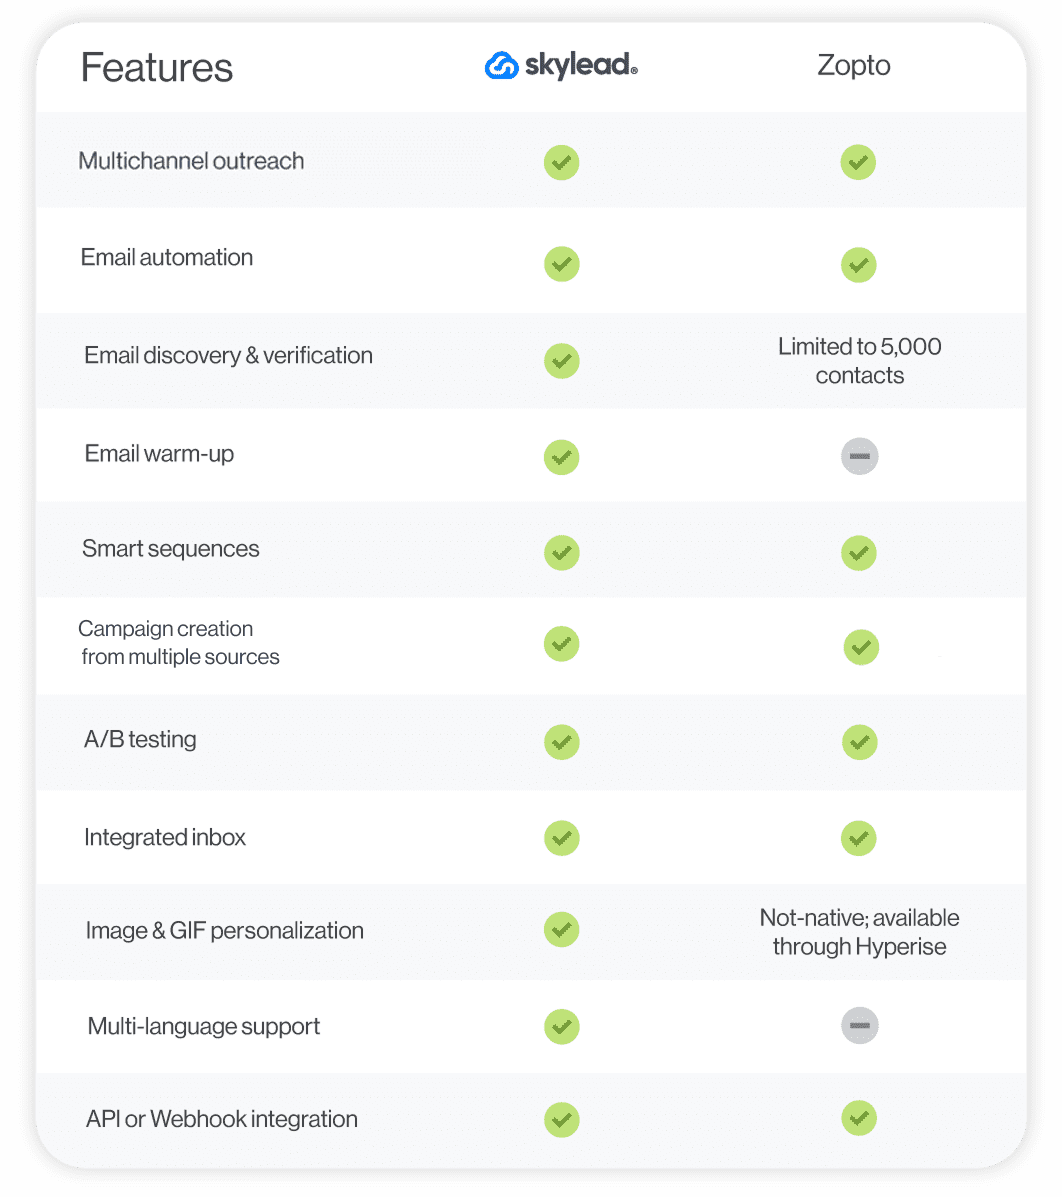
| Zopto | Automating likes & greetings on LinkedIn | - AI assistant for message generation - Automates greetings & endorsements | - Free inMails only - No analytics exports | Starts from $156/mo | Capterra: 4.3 |
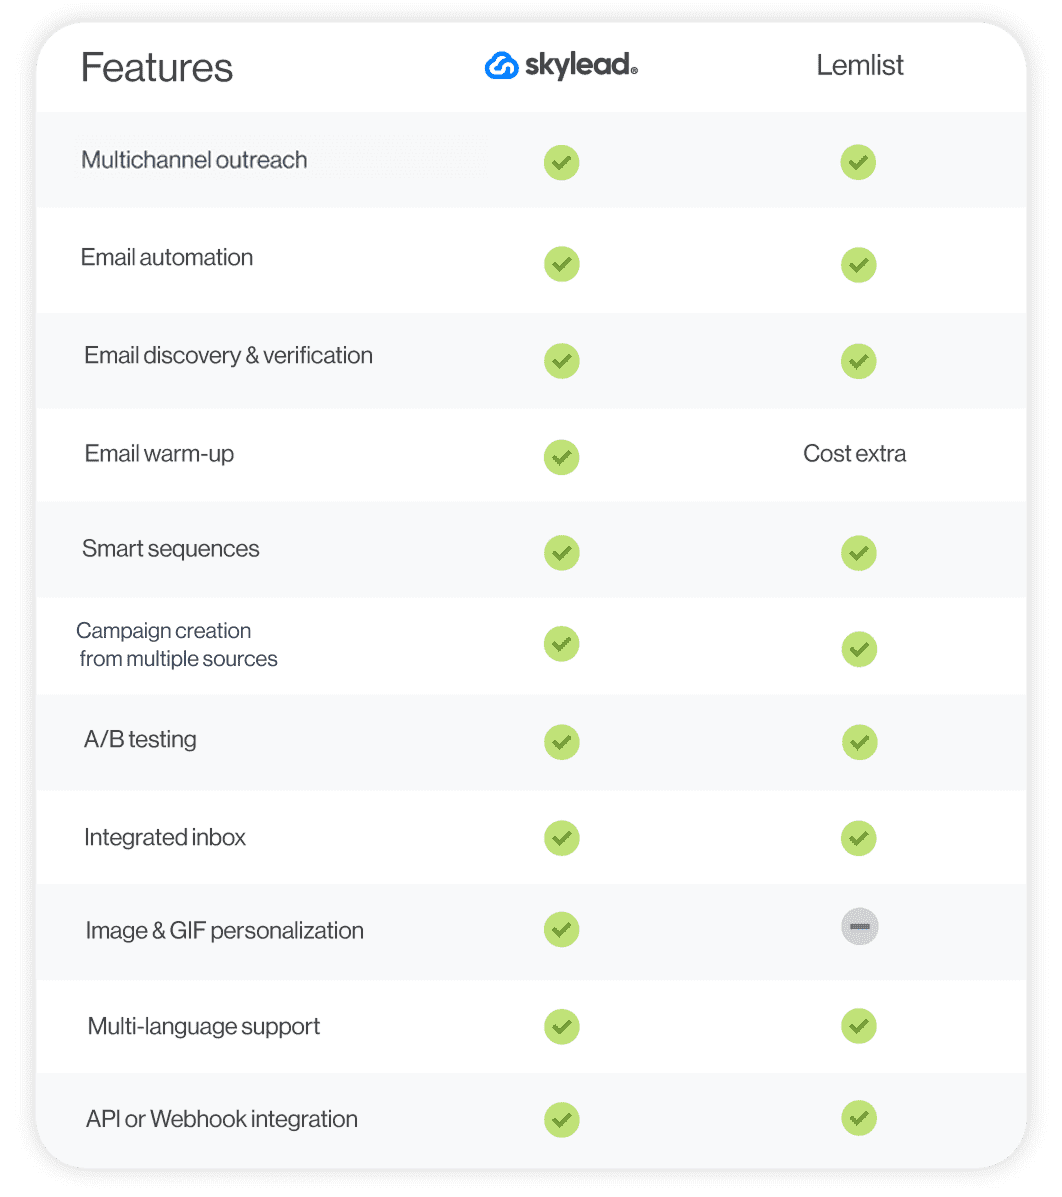
| Lemlist | Ensuring email deliverability | - Advanced personalization (landing pages, images) - Email warm-up via Lemwarm | - Chrome extension compromises safety - Extra fees for mailboxes, warm-up & email finder | Starts from $69/mo | Capterra: 4.6 |
| Reply | Semi-automated multichannel outreach | - Multi-channel support (email + LinkedIn) - AI SDR automates replies and bookings | - LinkedIn actions can’t be fully automated - Chrome extension for enrichment | Starts from $59/mo | Capterra: 4.6 |
| Snov.io | Email enrichment | - Built-in CRM - Support for multiple LinkedIn accounts | - Chrome extension makes it unsafe - Overpriced at scale | Starts from $39/mo | Capterra: 4.5 |
| Closely | Campaign tracking | - Built-in AI SDR agent - Advanced campaign tracking | - No inMails - Active campaign limit (25 max) | Starts from $189/mo | Capterra: 4.4 |
| Waalaxy | Beginners to multichannel outreach | - Easy-to-use for beginners - Works with multiple lead sources | - Pre-built templates only - Inbox costs extra | Starts from $43/mo | Capterra: 4.4 |
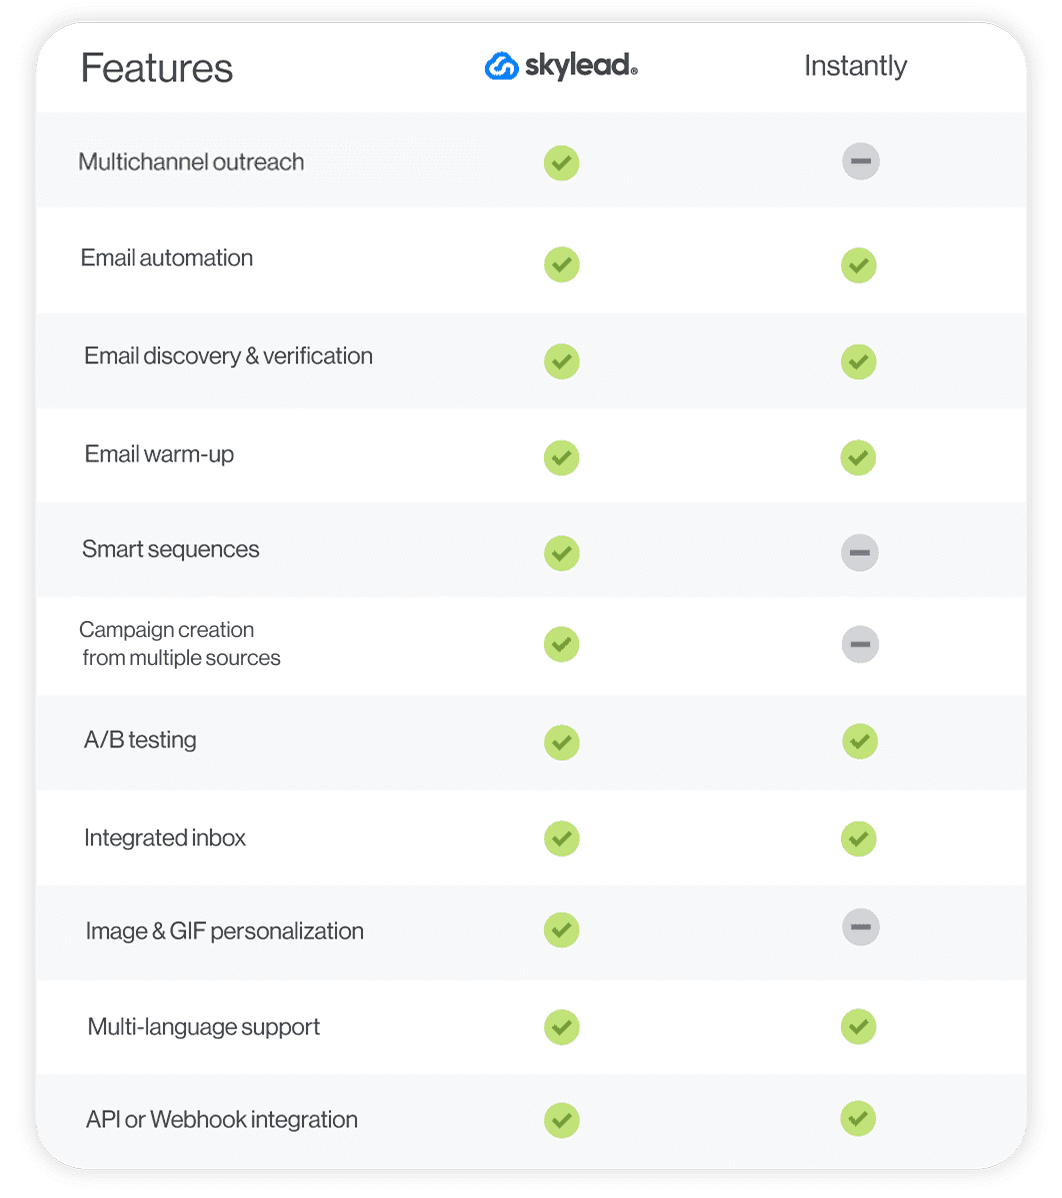
| Instantly | Straightforward email outreach | - Unlimited inboxes + rotation - B2B lead database + CRM | - No multichannel support - Requires 3 separate subscriptions to unlock full capabilities | Starts from $37/mo | G2: 4.8 |
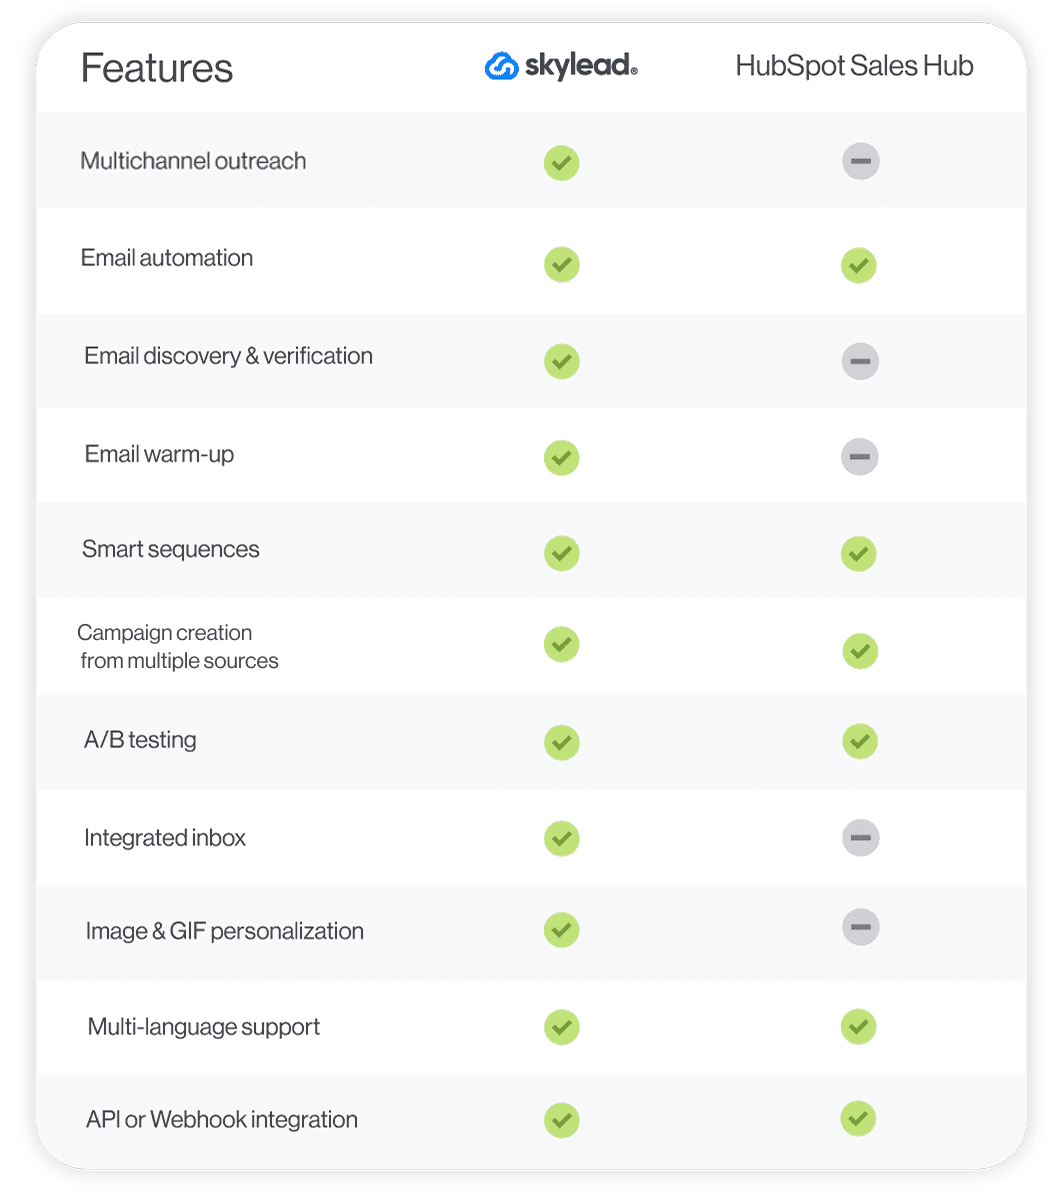
| HubSpot Sales Hub | Building personalized email sequences | - Strong A/B testing support - Native CRM integration | - No multichannel outreach - No email warm-up | Starts from $15/mo | Capterra: 4.5 |
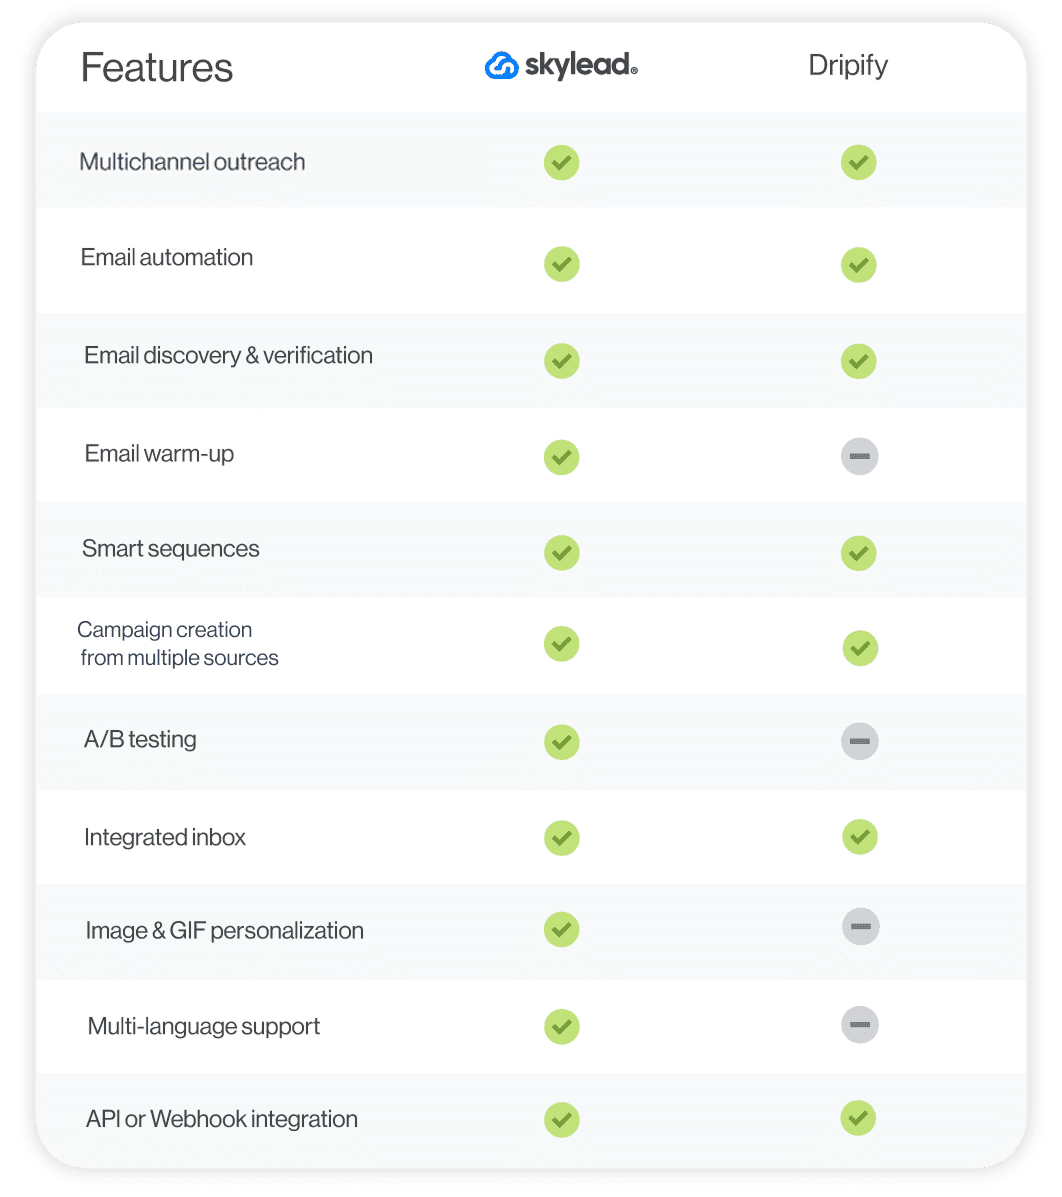
| Dripify | Its ability to integrate with various software | - Email + LinkedIn outreach - Built-in email finder & verifier | - No A/B testing - No image personalization | Starts from $59 | Capterra: 4.7 |
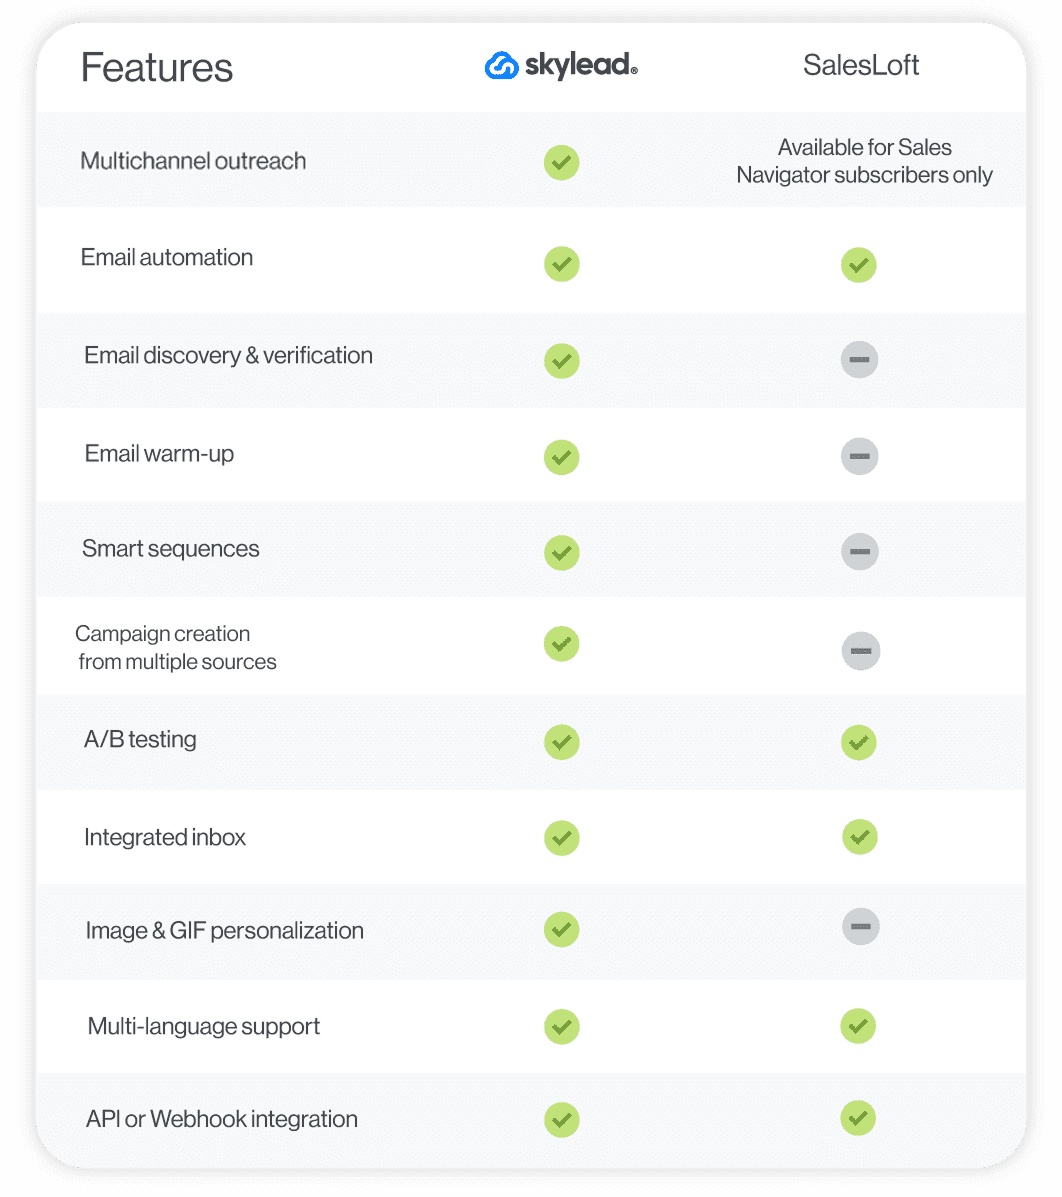
| SalesLoft | Building and managing pipelines | - Robust pipeline tools - Customizable email templates | - No Smart sequences - Only for Sales Navigator | Custom | Capterra: 4.3 |
| Yesware | Gmail & Outlook outreach | - Real-time email & attachment tracking - Calendar integration | - No integrated inbox - Manual LinkedIn tasks | Starts from $19/mo | Capterra: 4.3 |
| Hunter | Finding and verifying professional emails | - High email verification accuracy - Native integrations | - No in-email enrichment flow - No social scraping | Starts from 49€/mo | Capterra: 4.6 |
| Mailshake | Setting up simple drip campaigns | - Easy-to-use interface - Built-in A/B testing | -No smart sequences - No image & GIF personalization | Starts from $29/mo | Capterra: 4.5 |
| SalesBlink | AI-powered email outreach | - AI-generated sequences - Unified inbox + email warm-up | - Email-only automation - Manual multichannel actions | Starts from $29/mo | Capterra: 4.7 |
| Saleshandy | A-Z testing | - Large lead database - A-Z email testing (up to 26 versions) | - No LinkedIn support - Email verification costs extra | Starts from $36/mo | Capterra: 4.5 |
| Woodpecker | Coming up with email copy quickly | - AI email writer - Unlimited inboxes + email rotation | - Dependent on 3rd-party tools (Dux-Soup) for LinkedIn automation - Poor email verification probability | Starts from $29/mo | Capterra: 4.7 |
| Wiza | Extracting lead information from LinkedIn, Sales Navigator & Recruiter | - Instant email verification - Syncs lead data to CRM | - No outreach capability - Unsafe LinkedIn enrichment | Starts from $49/mo | Capterra: 4.3 |
| GrowMeOrganic | Automating hyper-personalized follow-ups | - Native image personalization | - No LinkedIn outreach - Limited export options | Starts from $49/mo | Capterra: 4.2 |
| Lusha | Prospecting around the Web | - AI Playlists, a.k.a. lead lists powered by AI that automatically get updated - Prospect extraction from anywhere | - Only 1 inbox allowed - Limited database outside EU/NA | Starts from $29.90/mo | Capterra: 4.0 |
| MeetAlfred | X (Twitter) outreach | - Supports multi-channel outreach across LinkedIn, email, and Twitter - User-friendly interface suitable for beginners | - Message sequences may require time to optimize for best results | Starts from $59/mo | Capterra: 2.8 |
| LeadConnect | Following up on LinkedIn | - Native HubSpot integration - Forever free plan | - Email automation isn’t supported - Works with Basic LinkedIn accounts and Sales Navigator only | Starts from $25.95/mo | Capterra: 4.4 |
| Evaboot | Scraping leads from Sales Navigator | - Supports CSV lead list exports from Sales Navigator - Email discovery & verification | - Compatible with Sales Navigator only - Uses a Chrome extension for scraping | Starts from $9/mo | Capterra: 4.6 |
| Dux-Soup | Sending free and paid inMails | - Supports sending free & paid inMails - Integrates natively with popular CRM (HubSpot, Pipedrive, etc.) | - Cloud-based LinkedIn automation is available on the highest-tier plan only - Lacks multichannel support | Starts from $14.99/mo | Capterra: 4.0 |
| Salesloop | Expanding your LinkedIn network on autopilot | - Works with all LinkedIn account types - Downloadable CSV reports | - LinkedIn automation only - Doesn’t integrate with other tools | Starts from $49/mo | G2: 3.5 |
What are sales outreach tools?
Sales outreach tools are software or platforms designed to facilitate and streamline the sales outreach process. These tools automate repetitive tasks, such as sending connection requests on LinkedIn and follow-up emails, leaving you with more time to focus on researching and nurturing your leads to conversion.
To clarify, with sales outreach tools, sales teams can:
- Get to more prospects faster,
- Maximize touchpoints through multichannel outreach,
- Personalize communication,
- Segment prospects according to their stage in the sales funnel,
- and close more deals.
Benefits of using outreach tools for sales
Why are sales teams increasingly turning to outreach tools? Because of the evident benefits of doing so. For example, McKinnsey’s research confirms that about a third of all sales tasks can and should be automated.
And we agree, but here are other benefits we’ve discovered using sales outreach tools.
Firstly, there's the increased productivity. With an outreach aid that automates manual tasks, sales reps can shift focus to high-value activities like nurturing leads.
Secondly, sales outreach software can often integrate with various platforms. As a result, you get a centralized hub for all sales activities. This reduces the time spent switching between tools and streamlines the entire sales process—from prospecting to conversion.
Lastly, we cannot discuss the benefits of using a sales outreach solution without mentioning scalability. With features like A/B testing, sales teams can optimize their outreach strategies based on data-driven insights. This leads to improved results, as teams can quickly identify what works best and scale with their winning approach accordingly. As a result, you get an influx of leads and customers, all without a drop in performance.
26 Best sales outreach tools
You're sold on using sales outreach tools but aren't sure which one(s) to choose. We've spent extensive time testing top-tier software, so you don't have to! Now, let's review our top picks to bring you closer to the answer!
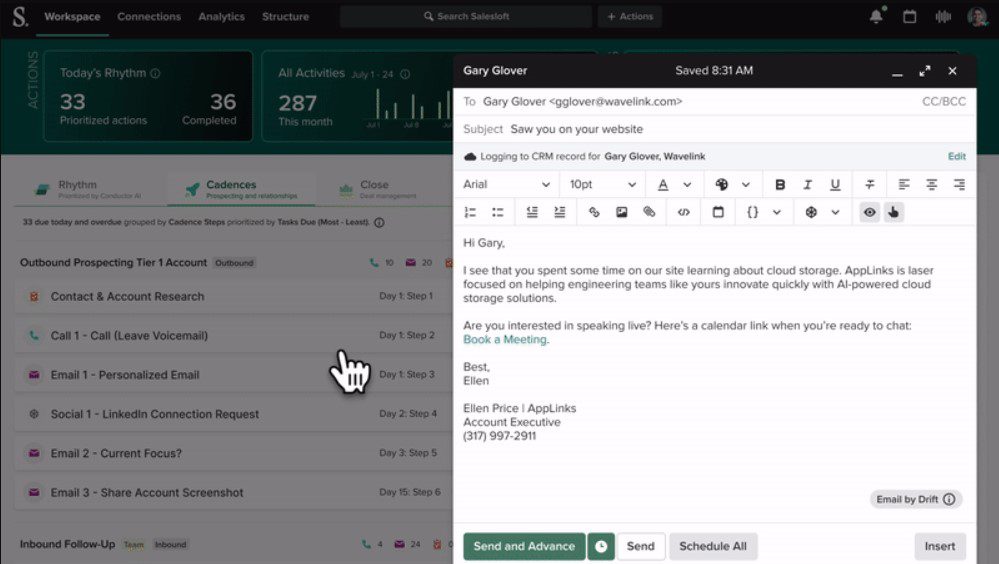
#1 Skylead - Best overall sales outreach tool for smart, hyper-personalized multichannel outreach
That’s us! Hi! 🙂
Skylead is a cloud-based sales engagement tool, the first on the market to introduce Smart sequences. It's the outreach software for sales teams looking to book 3x more meetings and save +11 hours weekly on manual work.
Pros
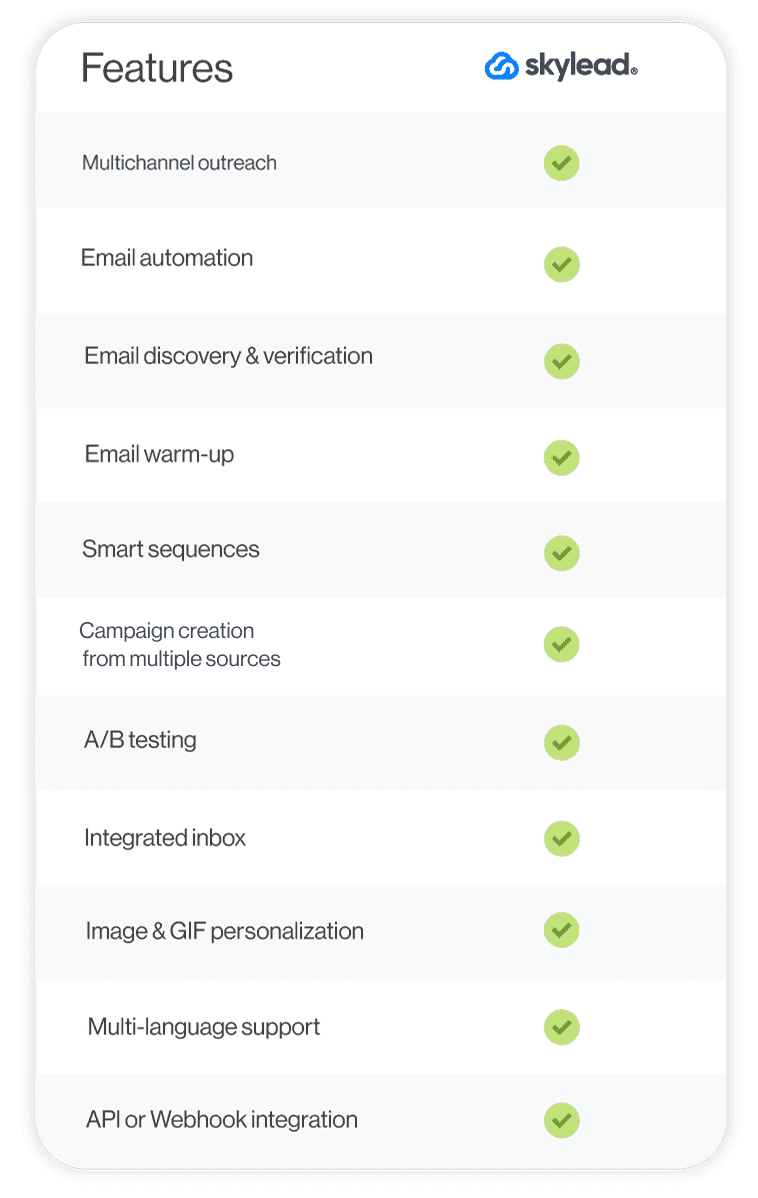
Skylead is a one-stop-shop sales outreach tool, meaning it has everything a salesperson might need — in one place! That said, it comes with solutions for:
- Multichannel outreach
- Unlimited email automation
- Email discovery & verification
- Image & GIF personalization
- Email warm-up
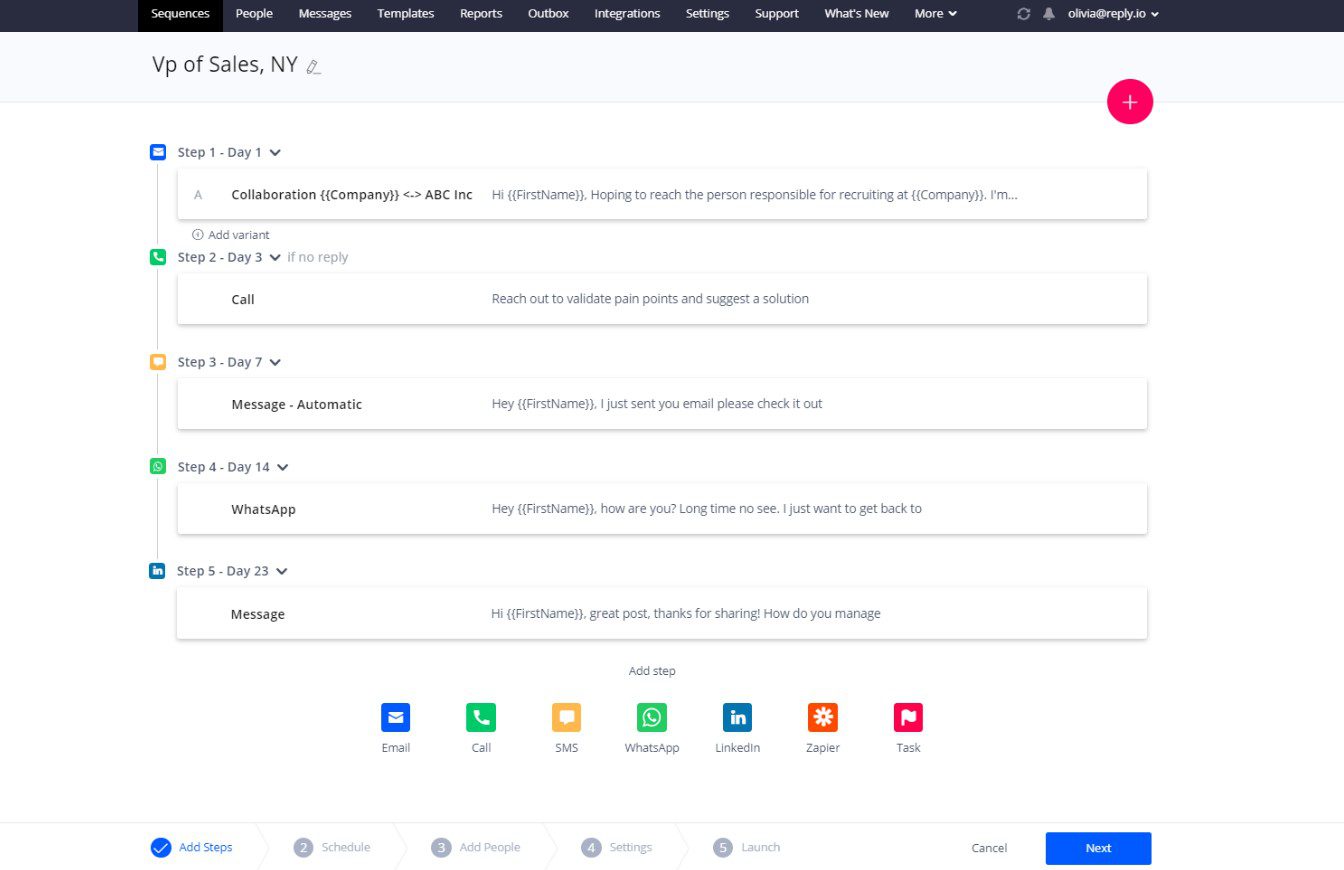
Its highlight feature is Smart sequences, a revolutionary algorithm that allows you to take full advantage of multichannel outreach. With Smart sequences, you can combine two-channel outreach actions and if/else conditions. The sequence unfolds based on the prospect's behavior, adapting as it goes to find the fastest path to them.
Speaking of email outreach, Skylead lets you connect unlimited email accounts at no extra cost. Moreover, the software supports inbox rotation, which means that you can send tens of thousands of emails per month with it. And to make sure these land in the primary inbox (not spam), we've partnered up with InboxFlare - a leading email warm-up tool - to bring you infinite email warm-up. And guess what? It’s completely free for all Skylead users!
Skylead also consolidates all your communications into one Smart inbox, allowing you to manage all messages seamlessly. Furthermore, it lets you organize chats with labels to keep track of conversions and measure ROI.
The software also stands out due to its native image & GIF personalization feature and variables for personalizing messages. We've run the numbers, and as it turns out, these two combined have brought our response rate to 76%!
In addition, this outreach solution lets sales reps in on in-depth analytics and allows for A/B testing of different subject lines and messages. Thanks to these, you'll surely find something that strikes a chord with your target audience!
Also, if you want to push lead or campaign data to your CRM, you can! Skylead integrates with any software via webhooks or API.
Lastly, if you're working with an international sales team, you'll love that our tool is available in 7 different languages, including:
- Spanish
- Portuguese
- French
- German
- Italian
- Dutch
- Arabic
…making it even easier to collaborate globally.
Cons
It's not that it's ours, but we truly haven't found any "real" cons to using Skylead. Why, yes, Skylead doesn’t have a video customization feature. Nonetheless, our users can use Sendspark's AI-powered Dynamic Video Functionality to personalize videos on top of images. Moreover, all Skylead users can get 50% off their first month with Sendspark. Just create your account on their platform and use the promo code ''SKYLEAD50'' to claim the offer.
What others said about Skylead
Allen F. shares our enthusiasm for the platform and mentions how Skylead revolutionizes your campaigns! He is particularly fond of the library of campaign templates that are easy to tweak. He even says you can have your first campaign running in about 15 minutes!
Alex S. has also had nothing but good things to say about Skylead. He even went so far as to say that this product has literally changed the way he works! He praises the interface and notes how building detailed LinkedIn sequences with the tool is incredibly easy.
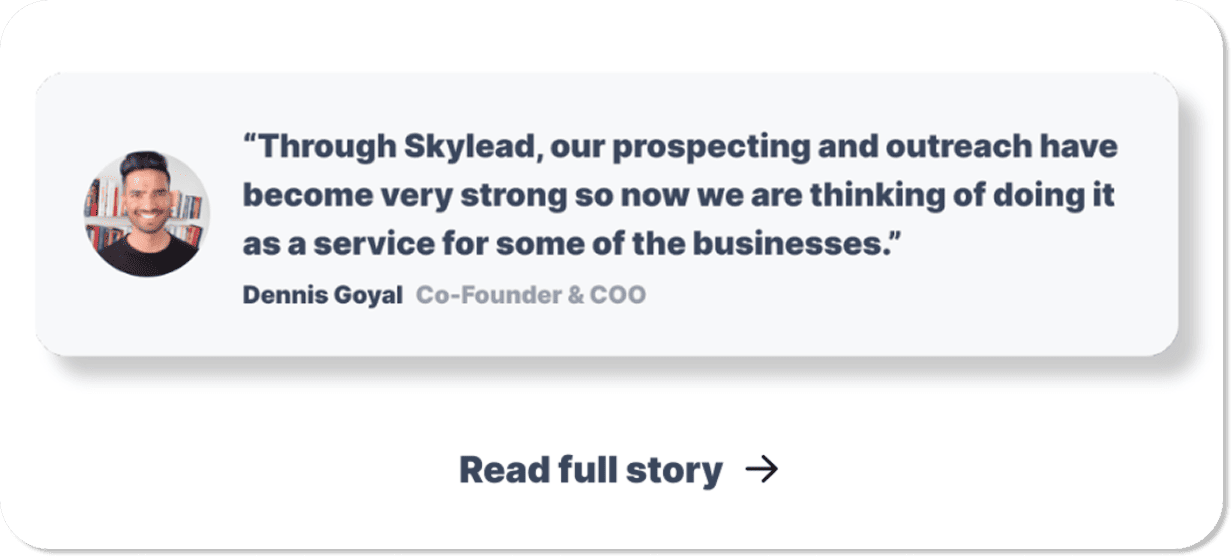
Still wondering whether Skylead can deliver results? Check out everything that our client, Dennis Goyal, had to say about using it! 👇
Pricing
Skylead offers an all-in-one solution priced at $100 per seat per month. If you've got a steady seat count, though, you can also opt for our annual plan, which gives you 2 months free.
And if you’re an agency looking to white label Skylead, reach out to our sales team to get more details on how that can be done.
Rating
Skylead overview
Now, let’s compare Skylead to the rest 25 sales outreach tools!
#2 Expandi - Best for automated LinkedIn profile engagement
Expandi is another cloud-based sales outreach platform designed for LinkedIn and email automation.
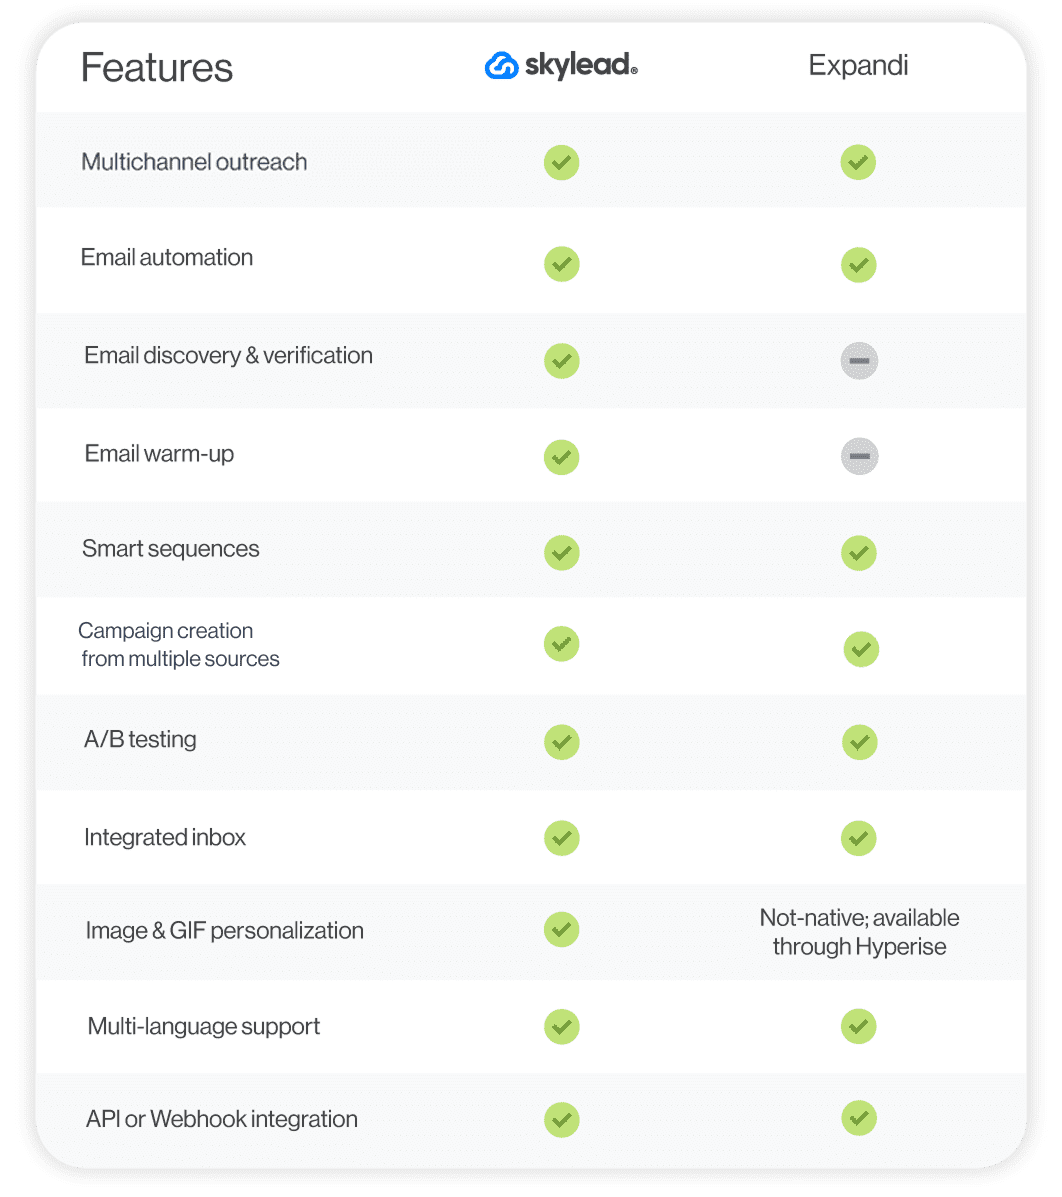
Pros
We discovered that, much like Skylead, Expandi comes equipped with Smart sequences. These allow for multichannel outreach and support additional LinkedIn actions that engage users’ profiles, such as auto-post likes and auto-endorsements.
Expandi automates sending personalized LinkedIn messages, emails, and free inMails. There are also a variety of templates to choose from, many of which can be extremely useful.
Cons
While playing around with Expandi, we noticed that it lacks a native image and GIF personalization feature. Although we were able to personalize images thanks to their integration with Hyperise, we had to pay extra for it.
Finally, the tool cannot discover and verify email addresses unless they are publicly available on someone's LinkedIn profile. In other words, this makes it an incomplete tool for seamless email outreach and positions Expandi alternatives as superior.
What others said about Expandi
Overall, the reviews are somewhat similar to our conclusions. For example, Adi R. notes that Expandi is easy to use, intuitive, and good for automating tasks. However, he isn't overly happy about having to perform certain tasks manually since the tool doesn't handle them.
Pricing
- Business: $99/mo per seat + $69/mo per seat for image & GIF personalization (via Hyperise)
- Agency: Custom
Rating
- Capterra: 4.4 (31)
Skylead vs. Expandi
#3 Zopto - Best for automating likes & greetings on LinkedIn
Zopto falls into the category of cloud-based multichannel sales outreach tools.
Pros
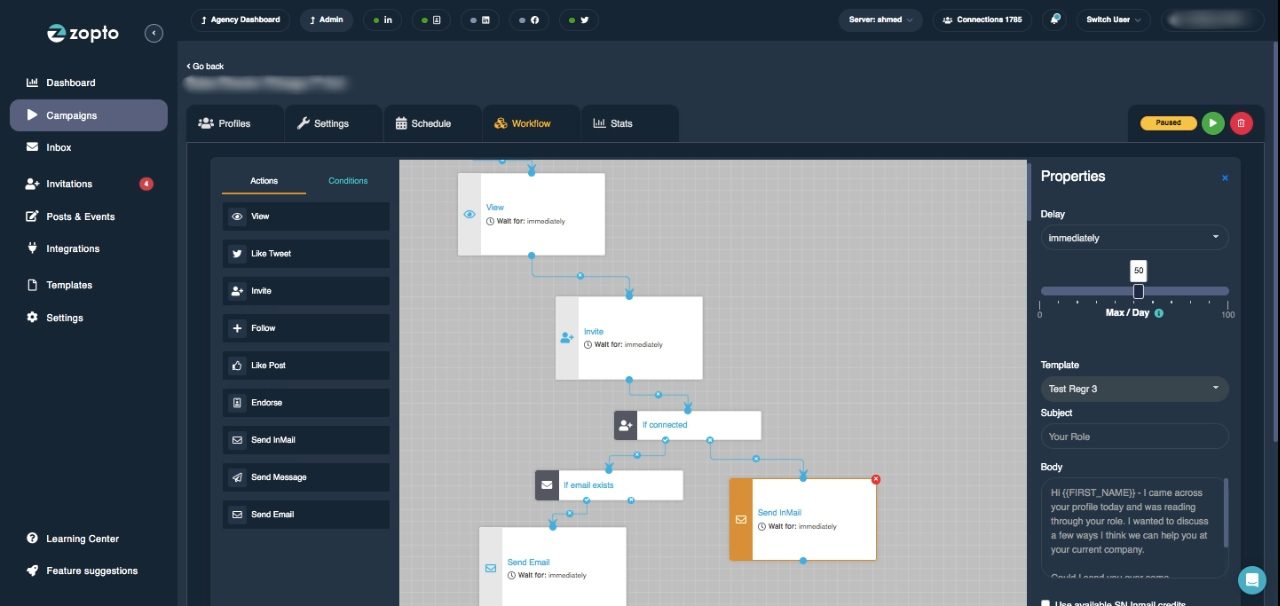
Zopto has a Smart sequences feature, which is fairly new to the market. We tested it out and noticed that we can form outreach flows from different LinkedIn and email actions and conditions.
Speaking of LinkedIn actions, in addition to automating standard ones (e.g., View profile, Follow, Invite to connect, etc.), the tool can also automate likes, endorsements, and even greetings (birthdays, anniversaries, job changes).
Cons
Despite its email enrichment capabilities, Zopto is limited to discovering 5,000 contacts a month, as compared to Skylead, which has an unlimited email discovery feature. Additionally, the latter has a higher success rate in finding verified emails.
One of Zopto's main selling points is Zhoo, its AI assistant. Yes, it sounds innovative, but it's essentially just a ChatGPT 4 integration used for generating emails and messages. We found it more cost-effective to use a different sales outreach tool and simply pay for a ChatGPT Plus subscription.
But do you truly need one? It depends. Our sales team has compared GPT-generated sales copy against our own and saw better results with the latter. However, we're not opposed to using ChatGPT for sales—it can be quite helpful, especially when the inspiration is lacking.
As Zopto’s final con, when we wanted to analyze our campaign results, we found no option to export a report.
What others said about Zopto
Eldar L. mentions that Zopto makes creating and running several campaigns at a time easy. Nevertheless, he finds it inconvenient that the tool lacks detailed analytics. And he’s right. We noticed that statistics are only presented as pie charts, which, frankly, don't offer much clarity on the campaign's performance.
Pricing
- Basic: $197/mo per seat
- Pro: $297/mo per seat
- Agency & Enterprise Basic: Starting at $156/mo per seat (minimum 2 users)
- Agency & Enterprise Pro: Starting at $237/mo per seat (minimum 2 users)
Rating
- Capterra: 4.4 (66)
Skylead vs. Zopto
#4 Lemlist - Best for ensuring email deliverability
Lemlist is a cloud-based email outreach tool. However, when we tested it, we noticed that it has a Chrome extension for LinkedIn prospecting and outreach.
Pros
Lemlist is primarily an email outreach tool that sales teams can use to set up unlimited email campaigns. It also supports multichannel campaign creation, making it possible to incorporate LinkedIn actions and calls (through AirCall integration) into your outreach flow.
This tool allows for advanced personalization thanks to custom intro lines, images, and engaging landing pages.
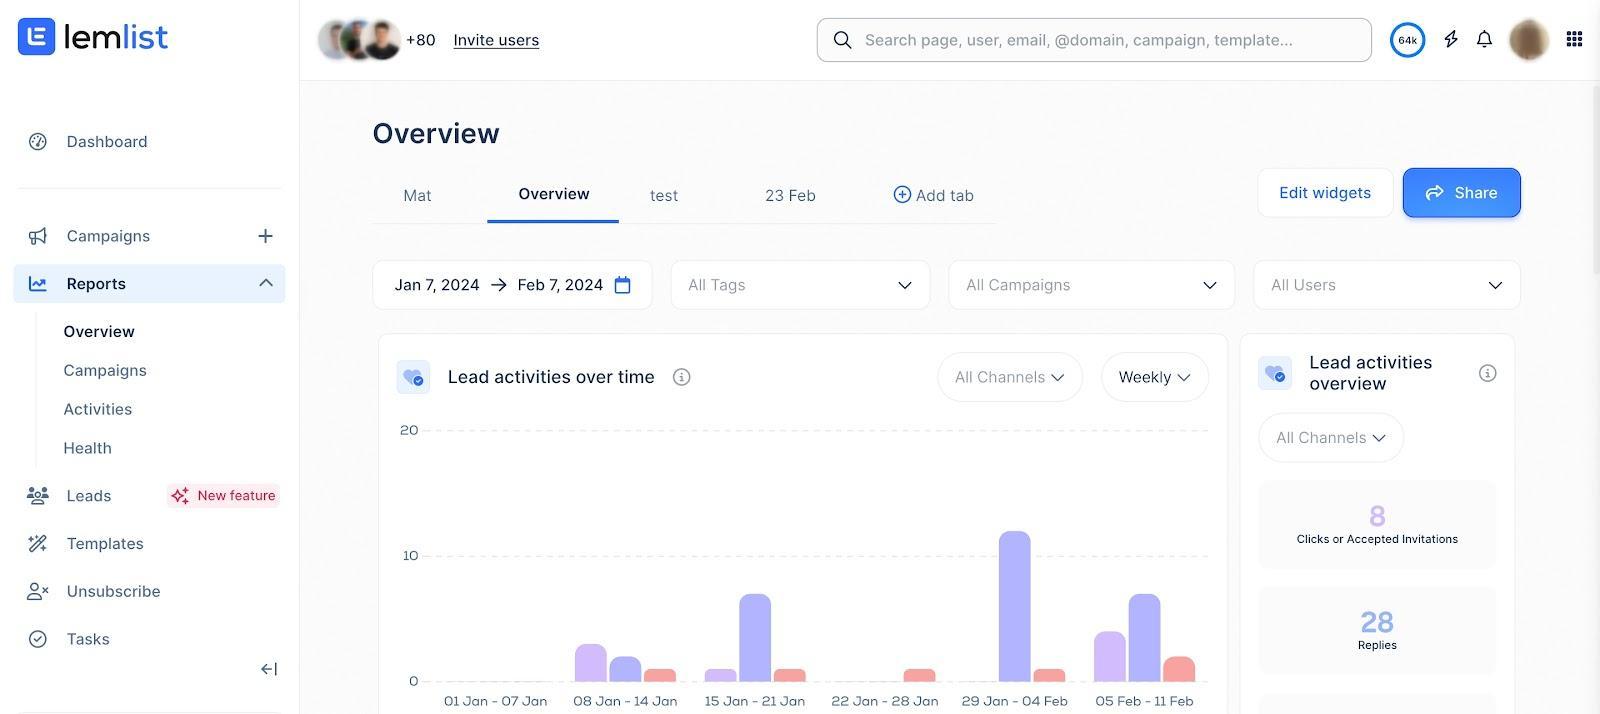
Lemlist also has Lemwarm, a warm-up and deliverability booster designed to prevent your emails from ending up in spam.
What we found particularly interesting is their integration with the website tracking tool, Snitcher. This means you can identify company-level traffic on your website and, based on that, send relevant prospects to a Lemlist campaign.
They’ve also recently added an AI helper to their offerings, which helps users segment leads, create outreach sequences, write messages, and analyze replies.
Cons
We don't like how Lemlist uses a Chrome extension to scrape information from LinkedIn. Chrome extensions inject code into LinkedIn that this platform can easily detect and penalize you for. Therefore, it compromises the safety of your LinkedIn account.
Also, Lemlist can indeed find and verify leads’ email addresses. However, it’s worth noting that the highest plan includes only 1,000 credits. If your requirements exceed this limit, you’ll need to pay extra to have the tool find and verify additional emails. The same goes for using Lemwarm, as it’s not included in the pricing.
The last thing we didn’t like is that we needed to pay per email account (mailbox), compared to Skylead, which supports adding unlimited email accounts at no extra charge. With it, you just need to pay per LinkedIn account.
What others said about Lemlist
Darpan C. thinks Lemlist is a complete email outreach tool. He loves the interface, variables, and A/B testing capabilities. Nonetheless, he believes analytics could be more extensive.
Pricing
- Free Plan: $0 (available as Chrome extension / LinkedIn scraper)
- Email Pro: $69/mo per 3 mailboxes
- Multichannel Expert: $99/mo per 5 mailboxes (billed annually)
- Enterprise: Custom
If you require additional mailboxes, you can add them to your plan at $9 per mailbox.
You can also purchase additional email verification credits, where 1 credit costs $0.01. Keep in mind that you can’t purchase fewer than 5,000 credits, though.
Contrary to InboxFlare - which Skylead users get access to for free - Lemlist’s email warm-up feature, Lemwarm, is also billed separately and starts at $29 per mailbox per month.
Rating
- Capterra: 4.6 (388)
Skylead vs. Lemlist
#5 Reply - Best sales software for semi-automated multichannel outreach
Reply is a multichannel, cloud-based outreach software. Nonetheless, it also has a Chrome extension for contact enrichment and outreach automation.
Pros
We’ve discovered that Reply can handle tasks across multiple channels, both automated and semi-automated.
When it comes to automated actions, it can:
- Send emails
- Like recent posts (LinkedIn)
Meanwhile, actions like:
- Profile views,
- Connection requests,
- LinkedIn messages,
- And inMails.
…can be both automated and semi-automated, depending on how you set them up.
Setting a campaign with Reply is straightforward: you decide on the steps, then add your prospects. You can also add triggers to your sequence, similar to the conditions you’d find in Skylead. Plus, every mailbox you connect gets email warm-up included, which helps improve deliverability.
It's also worth mentioning that Reply supports A/B testing for email copy and offers pre-made email and sequence templates, like Skylead. Alternatively, you can create sequences from scratch or have AI generate them for you.
Speaking of AI, their new SDR feature, Jason AI, can even identify your ideal leads, write your initial outreach messages, handle replies, and book meetings. Though, this is part of AI SDR plans only.
Finally, Reply also lets you track your campaign performance step-by-step, supports integrations via Zapier, and natively integrates with Pipedrive and HubSpot.
Cons
Reply’s smart inbox allows users to manage their emails efficiently. However, it doesn't support the management of messages received from other platforms like Skylead does.
At the beginning, we mentioned that Reply has a Chrome extension for discovering and enriching contacts. While this may seem like a pro, it's not particularly useful, especially when enriching contacts via LinkedIn. As already said, Chrome extensions inject code into LinkedIn, which the platform can detect, making them unsafe to use.
What others said about Reply
Terry L. loves Reply's multi-step campaign builder that can automate the email-sending process and semi-automate LinkedIn actions. Although the platform was buggy initially, he admits the team quickly resolved issues.
However, Terry wasn’t the only one to report issues with the platform. Multiple users had the same complaints. Some have even said that the support team isn’t equipped to handle them.
Pricing
- Email Blast: Starts from $59/mo per user / 1 mailbox
- Multichannel: Starts from $99/mo per user / 5 mailboxes
- AI SDR Starter: Starts from $300/mo
- AI SDR Growth: Starts from $1,500/mo
- Agency Starter: Starts from $166/mo
- Agency Advanced: Tailored
Reply also charges extra for its add-ons:
- LinkedIn automation: $69/month per account
- Calls & SMS: $29/month per account
- AI & Live Data: Starts at $39/month for 200 credits
- Email Validation: Starts at $20/month for 5,000 validations
Rating
- Capterra: 4.6 (96)
Skylead vs. Reply
#6 Snov.io - Best for email enrichment
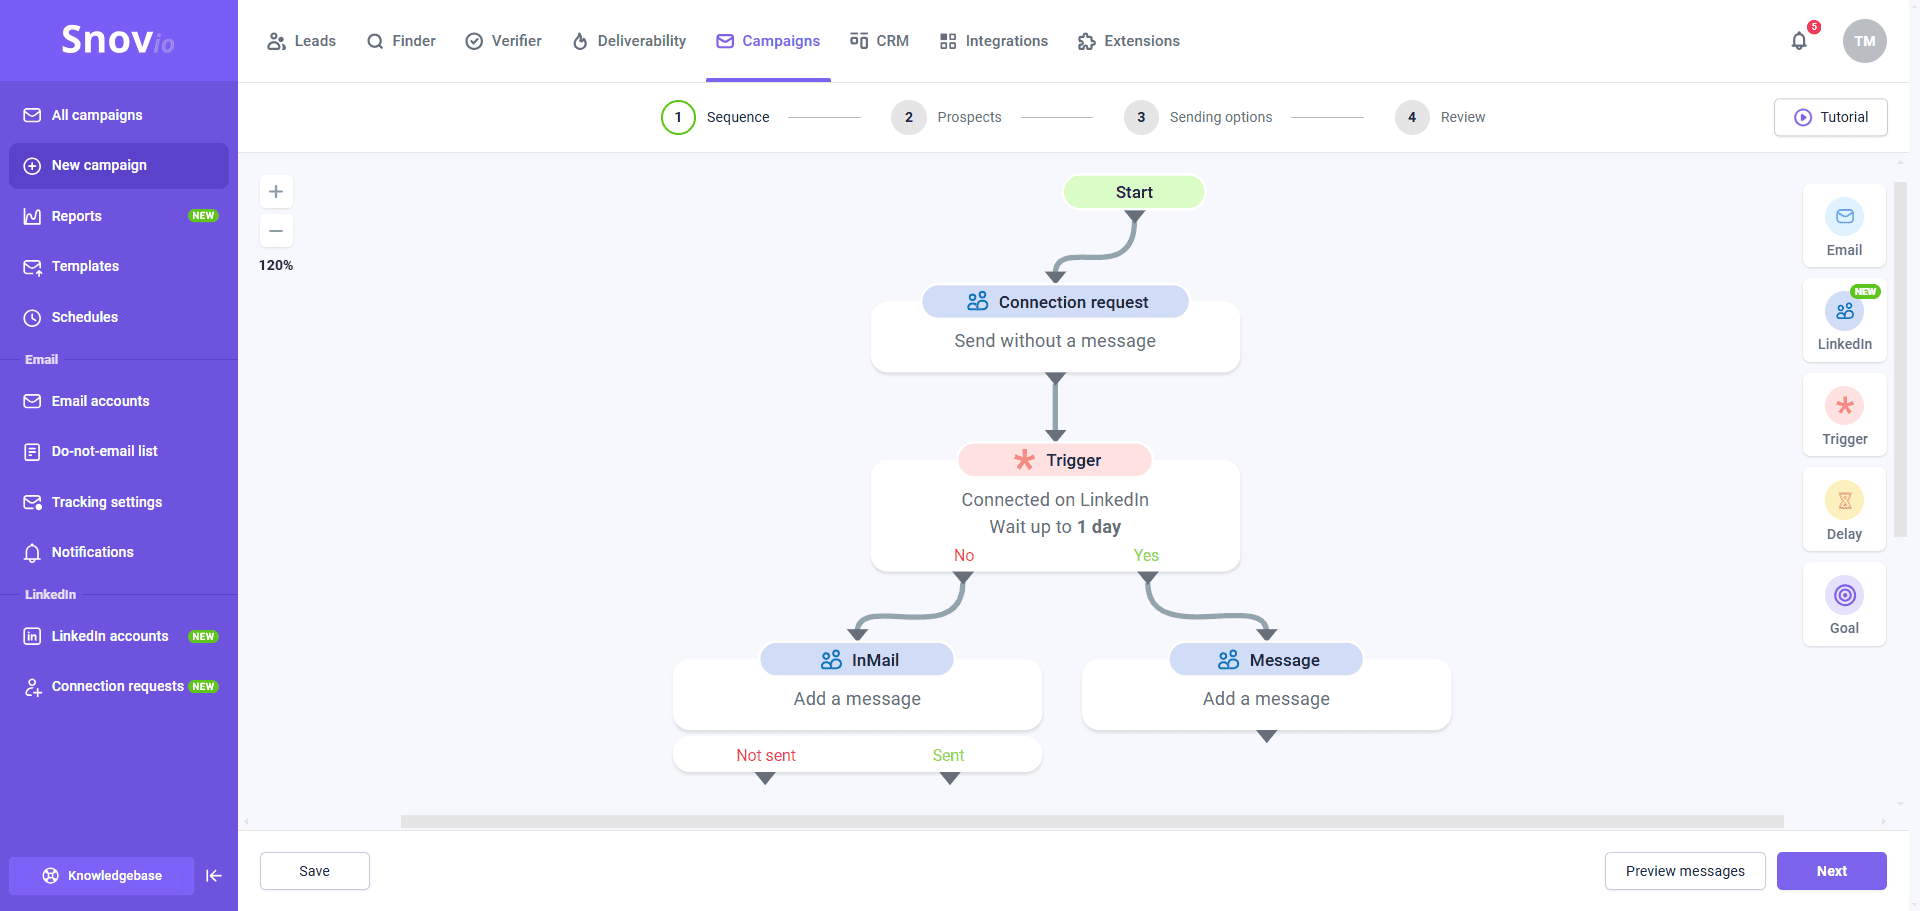
Snov.io is a cloud-based multichannel outreach tool, though it started as an email-only platform.
Nonetheless, it comes with a Chrome extension, a.k.a. LinkedIn prospect finder.
Pros
While testing Snov.io, we've concluded that its email verifier produces fairly accurate data.
Snov.io also eliminates the need for email warm-up tools. Namely, the tool has an email warm-up feature, like Lemlist and Reply.io, which automatically initiates realistic email conversations on your behalf. Furthermore, it marks emails as important, reads them, and moves them from spam to inbox to enhance your sender’s reputation.
We also liked that it’s conditional, multichannel campaigns are easy to set up, and you can play around with different variables and email templates while doing so. Like Skylead, the software lets you connect as many email accounts as you want and supports mailbox rotation.
Snov.io recently added LinkedIn account rotation, as well, making it possible to distribute actions across multiple LinkedIn accounts (up to 5).
It even has a built-in CRM, which saves you money by eliminating the need to pay for additional software.
Cons
Since the tool uses a Chrome extension to find prospects on LinkedIn, it isn't the safest to use.
What’s more, if you're looking to discover a large number of emails or contact many leads, this tool might not be the best fit. Their top-tier subscription offers 100,000 email finder credits and lets you reach out to 100,000 recipients. However, we found it overly expensive — especially when compared to Skylead, which allows for unlimited email discovery and sending at a cost 7x lower.
What others said about Snov.io
Yevhen B. praises Snov.io’s drip campaigns and the ability to track open, click, and reply rates. Nonetheless, he says that the interface can overwhelm new users and that the email enrichment process can be slow.
Pricing
- Trial: $0
- Starter: $39/mo per seat
- Pro: $99 / $189 / $369 / $738/mo per seat, depending on the number of credits (1 credit = 1 prospect found, 1 email found, or 1 email verified).
- Managed Service: Starting at $3,999/mo
Rating
- Capterra: 4.5 (215)
Skylead vs. Snov.io

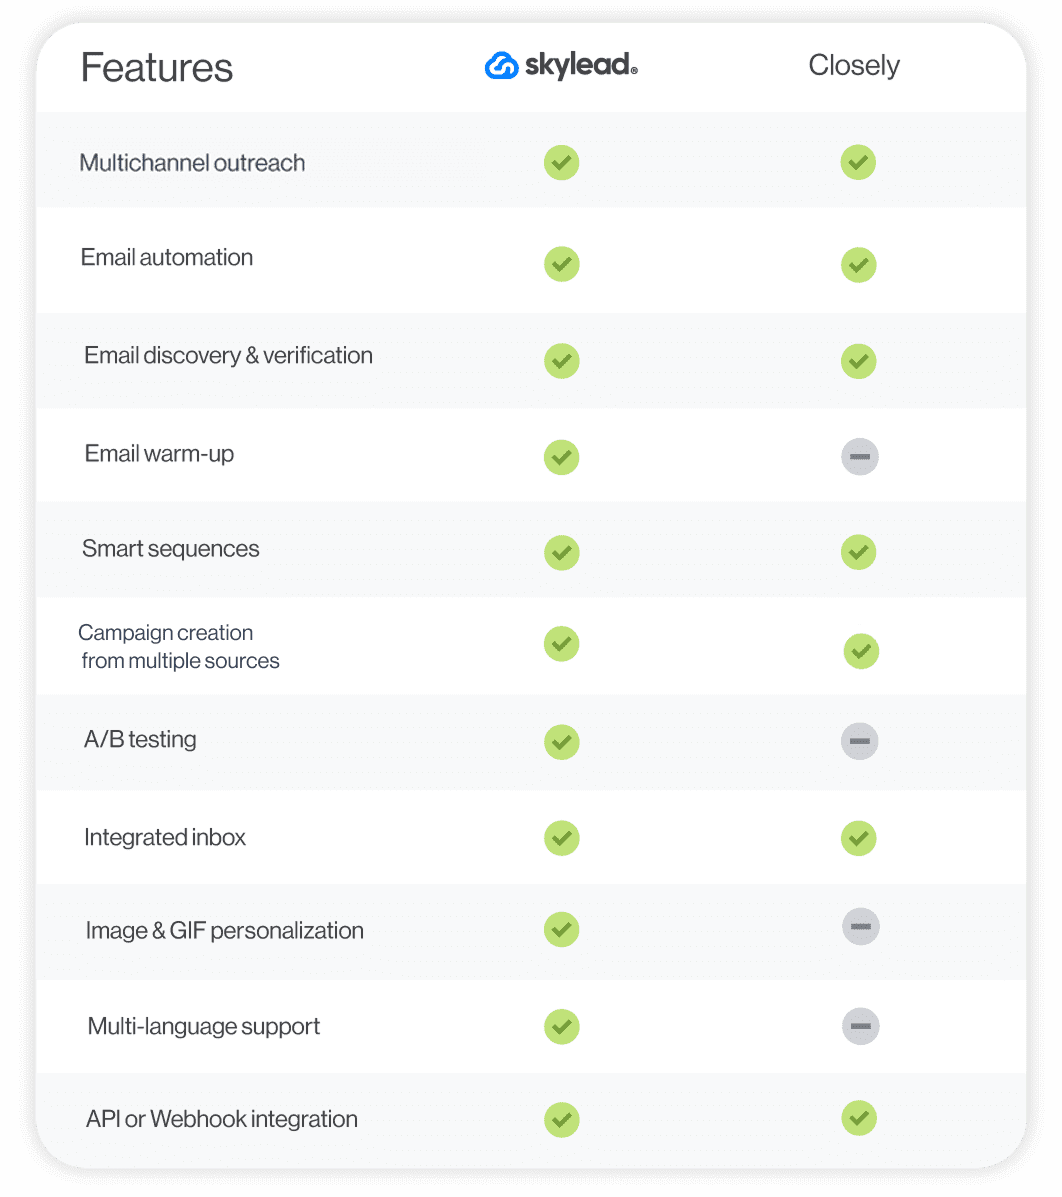
#7 Closely - Best sales outreach tool for campaign tracking
Closely is another cloud-based multichannel sales outreach tool with a Chrome extension for finding emails on LinkedIn and data scraping.
Pros
We liked its intuitive dashboard. From there, it’s easy to navigate to the multichannel campaign builder, where you can combine different LinkedIn actions and emails into a Smart sequence.
The tool also comes with an AI agent that acts like a virtual SDR. It can qualify your leads, perform company research, and personalize your message automatically.
Moreover, Closely makes campaign tracking effortless thanks to its streamlined stats page. It also makes it possible to export stats to a CSV file. In the meantime, if you wish to send the data to another software, you can do it via webhooks.
Cons
As opposed to Skylead, the lead source for email outreach campaigns can only be a CSV file with leads’ information. Speaking of CSV files, while the tool enables you to export statistics in this format, it does not support PDF exports like Skylead does.
Yes, the software can automate profile views, post likes, endorsements, connection requests, and messages on LinkedIn. Still, the crucial outreach component is missing: inMails.
We also noticed you can have no more than 25 campaigns running simultaneously.
Lastly, since a Chrome extension is involved, the safety of your LinkedIn account can be compromised when using the tool.
What others said about Closely
Muhammad Abdullah A. believes Closely is easy to set up, like us. The only problem is he can’t use it to contact his 1st LinkedIn connections.
Pricing
- Starter: $189/mo for 1 sender*
- Growth: $389/mo for 3 senders + 15,000 credits**
- Essential: $769/mo for 10 senders + 50,000 credits
- Enterprise: Custom
*1 sender = 1 LinkedIn + 1 email account
**Credits can be used for finding emails, LinkedIn enrichment, or AI-powered tasks.
Rating
- Capterra: 4.4 (155)
Skylead vs. Closely
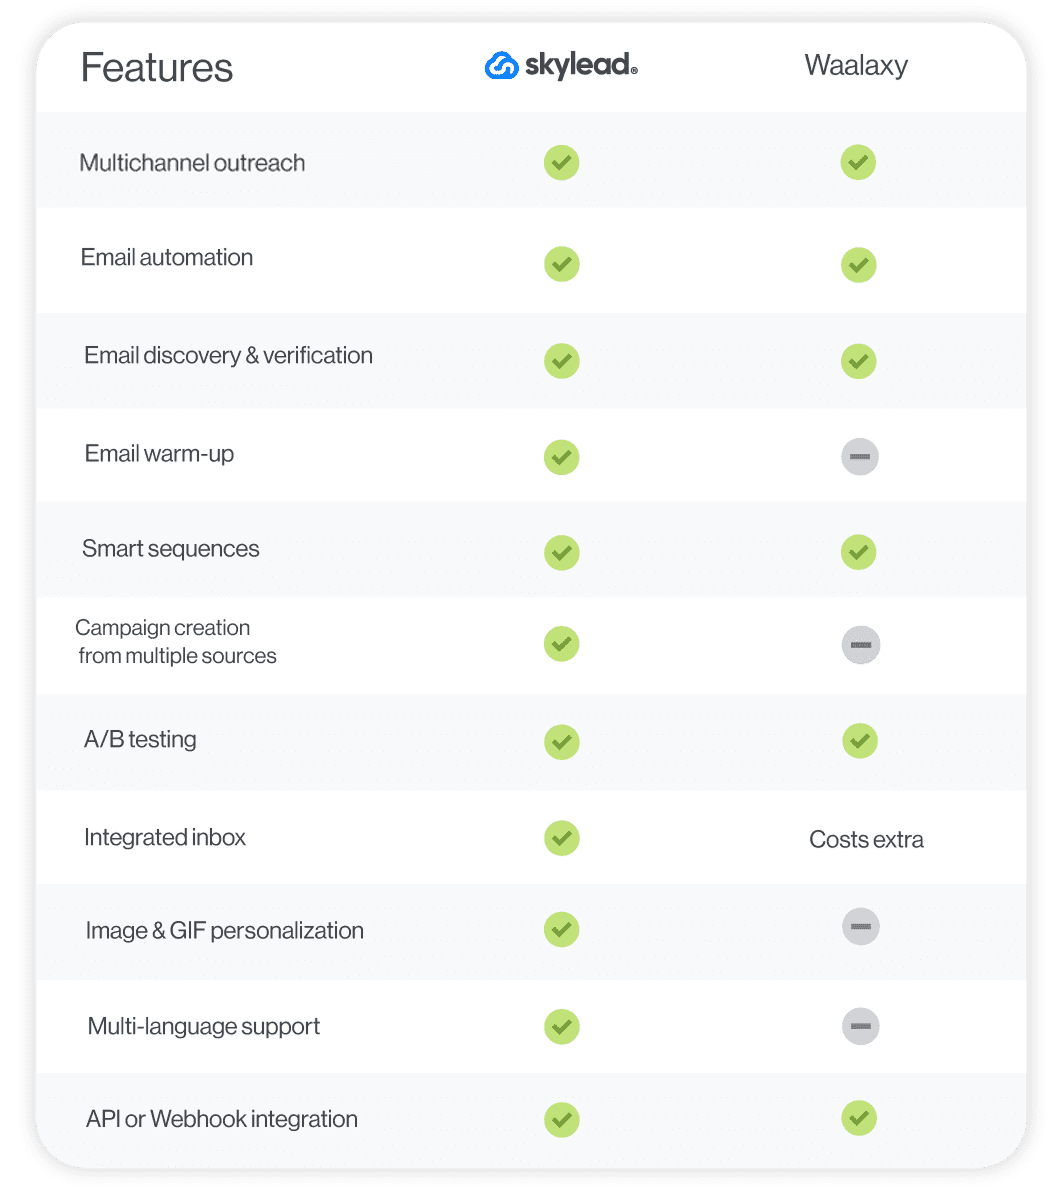
#8 Waalaxy - Best tool for beginners to multichannel outreach
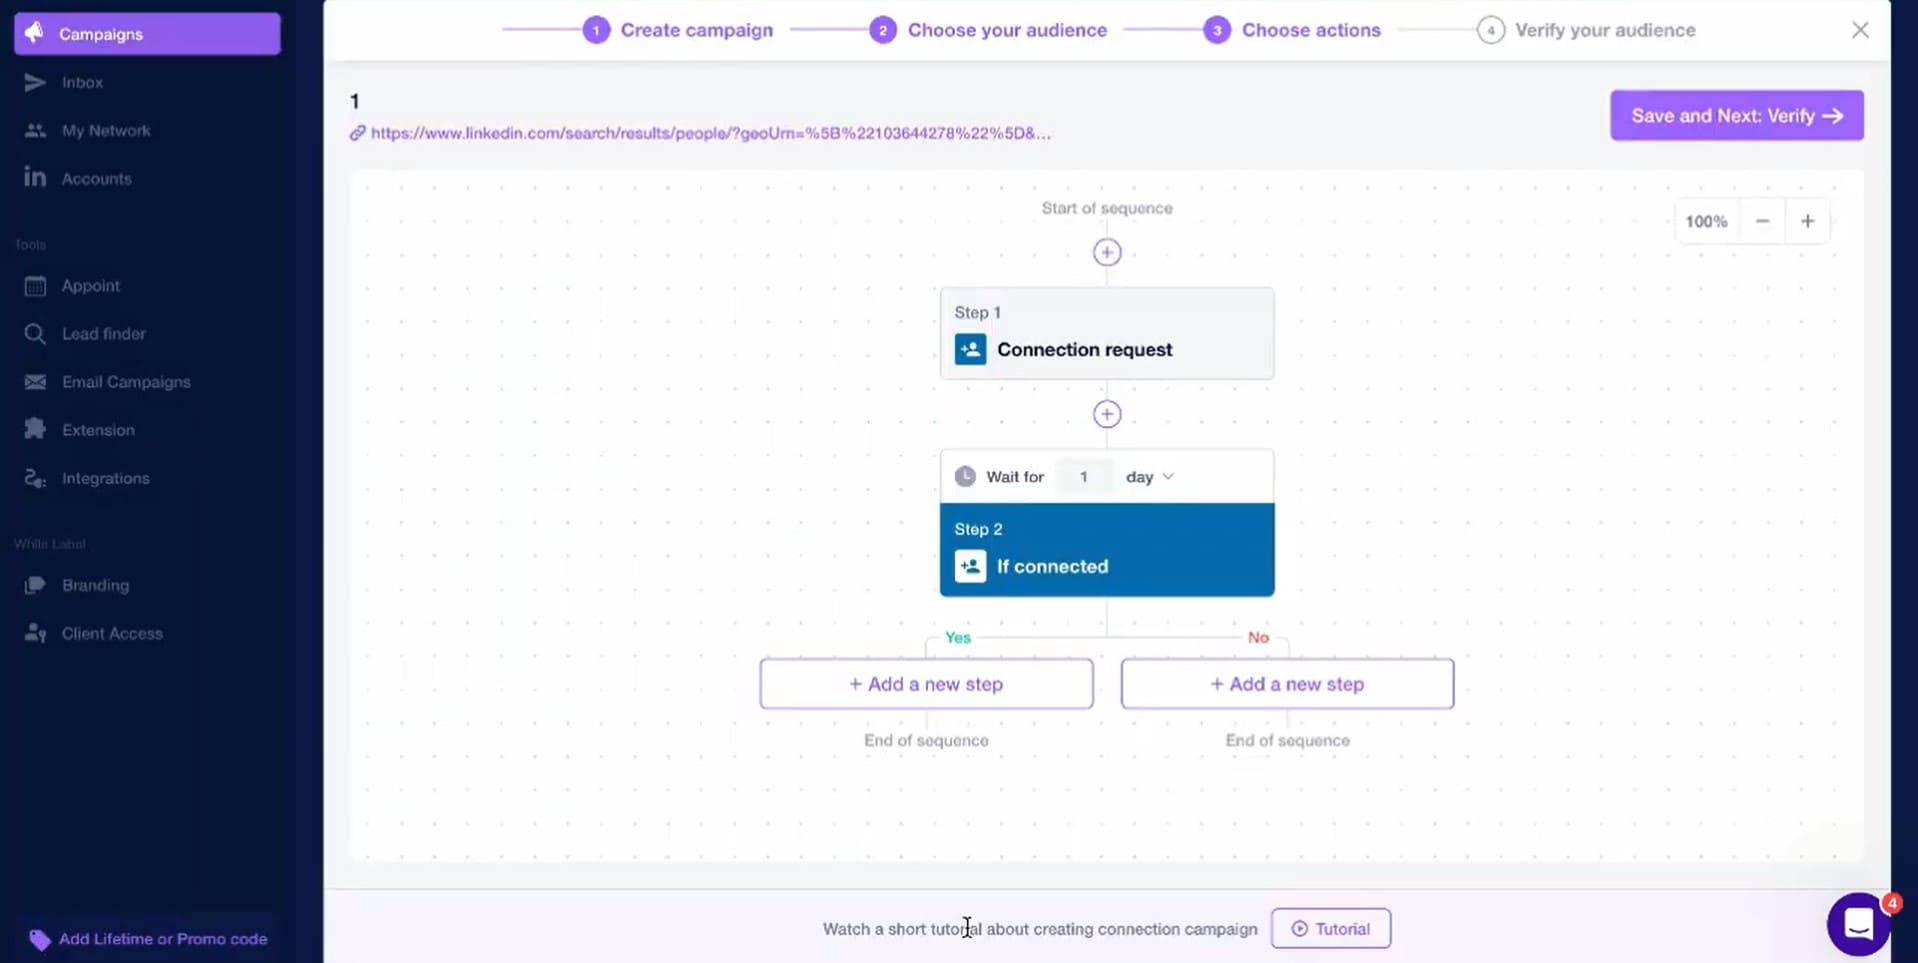
Waalaxy is a cloud-based software with a LinkedIn Chrome extension, aimed at automating sales teams’ LinkedIn and email outreach.
Pros
Waalaxy is great for beginners to outreach who don’t have much technical knowledge. With it, you can create a multichannel campaign from a:
- LinkedIn search URL
- Sales Navigator search URL
- Recruiter search URL
- LinkedIn post URL
- Sales Navigator lead list
- CSV file
The tool also supports A/B testing and message personalization, courtesy of variables. Plus, it has customizable pre-filled message templates and an AI writing assistant, Waami.
Additionally, we found pushing leads from Waalaxy to a CRM using Zapier webhooks straightforward.
Cons
Unlike Skylead, which offers customizable sequence templates and the opportunity to create a sequence from scratch, Waalaxy limits users to pre-built options.
Waalaxy charges extra for the inbox, too, which makes it less cost-effective.
Finally, the tool connects via a Chrome extension to your LinkedIn account. Naturally, we don’t recommend using it if you want to keep your LinkedIn account restriction-free.
What others said about Waalaxy
Shekh Riazul I. swears Waalaxy's UI is extremely easy to use and navigate. Nonetheless, the software sometimes has a hard time detecting the account. He also frequently has to wait for the Dashboard to load.
Pricing
- Pro: $43/mo per seat
- Advanced: $88/mo per seat
- Business: $131/mo per seat
- Elite: $538/mo per seat
- Enterprise: Custom
Waalaxy also charges $34/month for access to the LinkedIn inbox.
Rating
- Capterra: 4.4 (252)
Skylead vs. Waalaxy
#9 Instantly - Best for straightforward email outreach
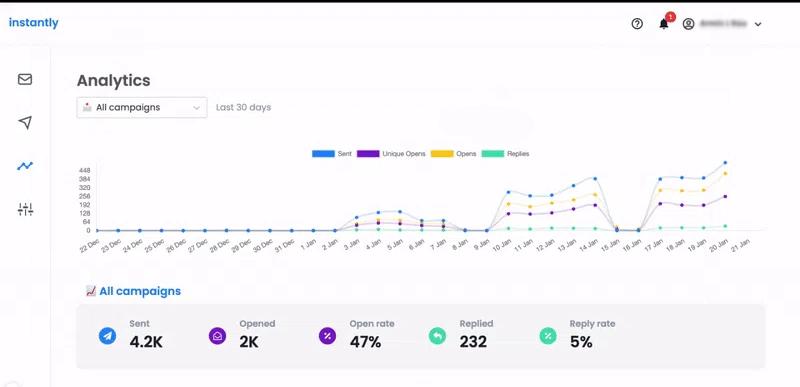
Instantly is a cloud-based software for email outreach at scale.
But it actually offers more than that. Namely, it comes with a built-in B2B lead database of over 160 million contacts and a lightweight CRM that includes a Unibox, where you can manage conversations across all your connected inboxes.
Pros
Instantly allows you to connect unlimited email accounts and supports inbox rotation, like Skylead, which helps safeguard and protect your domain.
Moreover, it features an unlimited email warm-up function to guarantee email deliverability. The tool also enables you to personalize your emails with variables and schedule them as needed.
We couldn’t help but notice how straightforward Instantly.ai is. And if you aren’t interested in leveraging LinkedIn outreach, this might just be one of the best tools.
Cons
Instantly isn't designed for multichannel outreach.
Why, yes, the tool can verify email addresses. However, verification credits aren’t part of the subscription plan. As such, they incur an additional cost.
What others said about Instantly
James O. states that Instantly helped him increase his outreach at a low price compared to other sales tools. However, he thinks the software is a bit limited in terms of salesflow customization, and we agree.
Pricing
Instantly has 3 different pricing categories depending on the solutions offered. This means that, if you want to access their full suite, you’ll need to subscribe to each category separately.
Sending & Warmup plans (for email warm-up and outreach):
- Growth: $37/mo per seat
- Hypergrowth: $97/mo per seat
- Light Speed: $358/mo per seat
Leads plans (grant access to the B2B lead database):
- Growth Leads: $47/mo per seat
- Supersonic Leads: $97/mo per seat
- Hyperleads: $197/mo per seat
- Light Speed: $492/mo per seat
CRM plans:
- Growth CRM: $47/mo per seat
- Hyper CRM: $97/mo per seat
Rating
- G2: 4.8 (3,668)
Skylead vs. Instantly
#10 HubSpot Sales Hub - Best for building personalized email sequences

HubSpot Sales Hub is HubSpot’s powerful, cloud-based outreach solution for sales teams.
Pros
The tool is great for building personalized email sequences. With it, you can automate emails and follow-ups. However, you can also set reminders to send emails or inMails manually, make calls, or send invites to connect on LinkedIn.
In addition, the software lets you run multiple A/B tests on your email sequences.
Cons
Building multichannel campaigns with HubSpot Sales Hub isn’t possible at this time.
At the same time, this isn’t a complete sales outreach software. You could use it if you’re a complete novice to outreach. But why not subscribe to Skylead and integrate it with HubSpot instead?
Hungry for multichannel sales tactics, Smart sequence blueprints, and tried-and-tested outreach templates you can use alongside Skylead and HubSpot? Grab the free Sales Playbook packed with the exact recipes we used to grow our user base from 2,500 to 10,000+ in just 9 months!

What others said about HubSpot Sales Hub
Fernando P. finds HubSpot's interface and customer support great. He loves having all leads and customer journeys under one system. Still, he notes the tool could be improved with AI so as to provide more valuable insights.
Pricing
HubSpot Sales Hub divides its plans into 2 categories based on company size:
For individuals & small teams
- Sales Hub Starter: Starts at €15/mo per seat
- Starter Customer Platform: Starts at €15/mo per seat
- Sales Hub Professional: Starts at €90/mo per seat
For businesses & enterprises
- Sales Hub Professional: Starts at €90/mo per seat
- Sales Hub Enterprise: Starts at €150/mo per seat
Rating
- Capterra: 4.5 (481)
Skylead vs. HubSpot Sales Hub
#11 Dripify - Best sales outreach tool for its ability to integrate with various software
Originally a cloud-based LinkedIn automation tool, Dripify has since evolved into a full-blown multichannel sales outreach platform by adding the email channel into the mix.
Pros
Dripify is a great tool for anyone interested in social selling on LinkedIn.
The software can connect to LinkedIn Premium, Sales Navigator, and Recruiter Lite accounts. It can extract leads from LinkedIn search URLs, LinkedIn events, LinkedIn groups, CSV files, or your network.
It now also supports email outreach, making it a more well-rounded solution. What’s more, you can find and verify email addresses directly inside the platform without the need for external tools.
Its notable feature is drip campaigns, which rely on a sequence of different actions, conditions, and delays. It’s also praised for its ability to integrate with numerous software thanks to webhooks.
Cons
While Dripify now supports multichannel outreach, in contrast to Skylead, it’s still missing some important features. For one, it doesn’t offer A/B testing, which limits your ability to experiment with different subject lines and message/email copy.
Furthermore, you can’t bring your A-game to personalization with it since no image personalization feature is there.
At the same time, the tool doesn’t support campaign creation from LinkedIn posts or Sales Navigator lead lists, as some Dripify alternatives do. And while you can automate it to send free inMails, the same doesn’t apply to paid ones.
Finally, Dripify’s team doesn’t provide one-on-one onboarding, so you’re left to figure out the tool’s functionalities on your own.
What others said about Dripify
Don F. believes Dripify is a solid communication platform for keeping in touch with LinkedIn connections.
Pricing
- Basic: $59/mo per user
- Pro: $79/mo per user
- Advanced: $99/mo per user
- Enterprise: Custom
Rating
- Capterra: 4.7 (475)
Skylead vs. Dripify
#12 SalesLoft - Best sales outreach solution for building and managing pipelines
SalesLoft isn’t your typical sales outreach tool. It’s a cloud-based sales engagement platform.
Pros
The platform combines multiple tools that help salespeople increase and manage pipelines. As such, it goes beyond outreach. Nevertheless, SalesLoft's cadences (campaigns, if you will) that combine email, phone, and Sales Navigator steps make it one of the best sales outreach tools.
We have found the tool’s email tracking, analytics, and A/B testing a boon! We were also happy to find out that the software comes with nifty email templates that can be customized for added personalization. There’s also an option to save new ones!
Cons
The tool only integrates with Sales Navigator, no LinkedIn Premium and/or Recruiter accounts.
Furthermore, unlike Skylead, Salesloft lacks Smart sequences. Consequently, its users are unable to maximize touchpoints with leads, resulting in less personalized outreach flows and lost opportunities for lead generation.
What others said about SalesLoft
James W. is absolutely sold on the customer support that the SalesLoft team provides. However, he admits the platform can become slow.
Many people have also mentioned that the SalesLoft dialer isn’t up to par. Additionally, they've pointed out that the tool is quite expensive.
Pricing
- Advanced: Available upon contact
- Premier: Available upon contact
SalesLoft doesn’t publicly disclose its pricing because it’s tailored to each company based on its size and requirements. We’ll respect their decision and won’t say how much we’ve paid during our short time with them. However, the word on the street is that people are paying anywhere from $120 to $165 per account.
Rating
- Capterra: 4.3 (221)
Skylead vs. SalesLoft
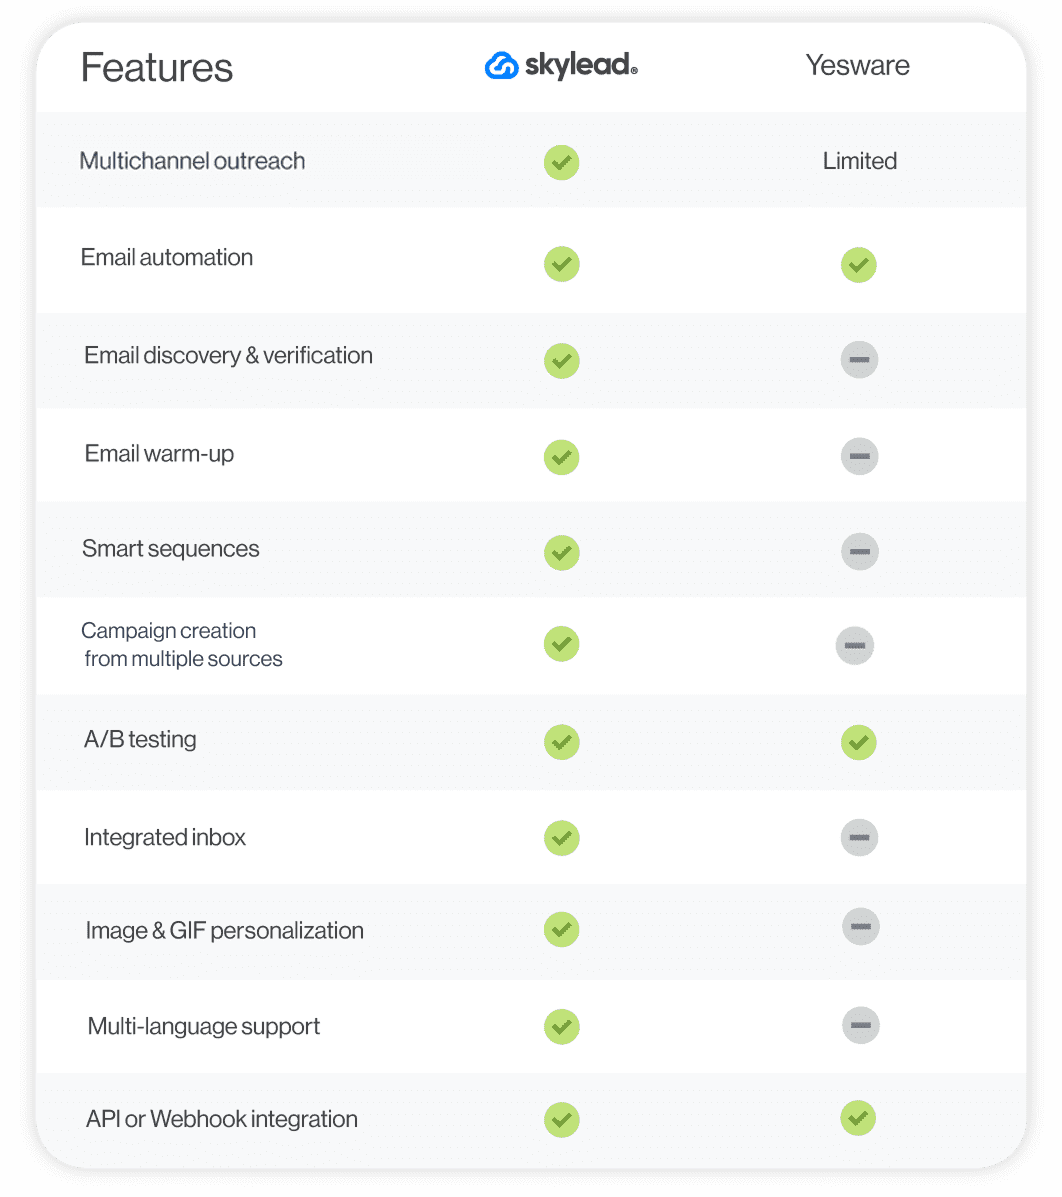
#13 Yesware - Best sales software for Gmail & Outlook outreach
Yesware is a sales outreach platform that integrates directly with Gmail & Outlook through a Chrome extension.
Pros
Yesware, like Skylead, allows for:
- Multichannel campaign creation (you can connect your Sales Navigator account to the tool),
- Automated follow-ups in case of no reply,
- Email & attachment tracking (open rate),
- Advanced email performance analysis.
Additionally, it supports:
- Scheduling meetings and calls,
- Setting follow-up reminders.
The platform also has email templates available to personalize as you see fit. We also like how it lets you save your own templates.
Cons
Based on our personal experience with the tool, we can tell you that Yesware doesn't track email deliverability rates.
In addition, its primary focus is email outreach, while LinkedIn outreach takes a backseat. This is clear because the tool only works with Sales Navigator accounts. LinkedIn Basic, Premium, and Recruiter users can’t do much with it—other than automate their cold emailing.
Also, when setting up a multichannel campaign with Yesware, you are limited to 2 Sales Navigator actions: sending a connection request and an InMail. The tool doesn’t perform these actions automatically, either! Instead, it simply alerts you when it's time to complete them manually.
What others said about Yesware
Kim R. believes Yeware is decent, easy-to-use software. She is happy with the customer support provided and likes its real-time reporting and analytics features. Yet, she thinks it’s expensive and not so easy to integrate with other programs. Also, she found some features too complex.
Pricing
- Free
- Pro: $19/mo per seat
- Premium: $45/mo per seat
- Enterprise: $85/mo per seat
- Custom Plan: Contact sales
Rating
- Capterra: 4.3 (175)
Skylead vs. Yesware
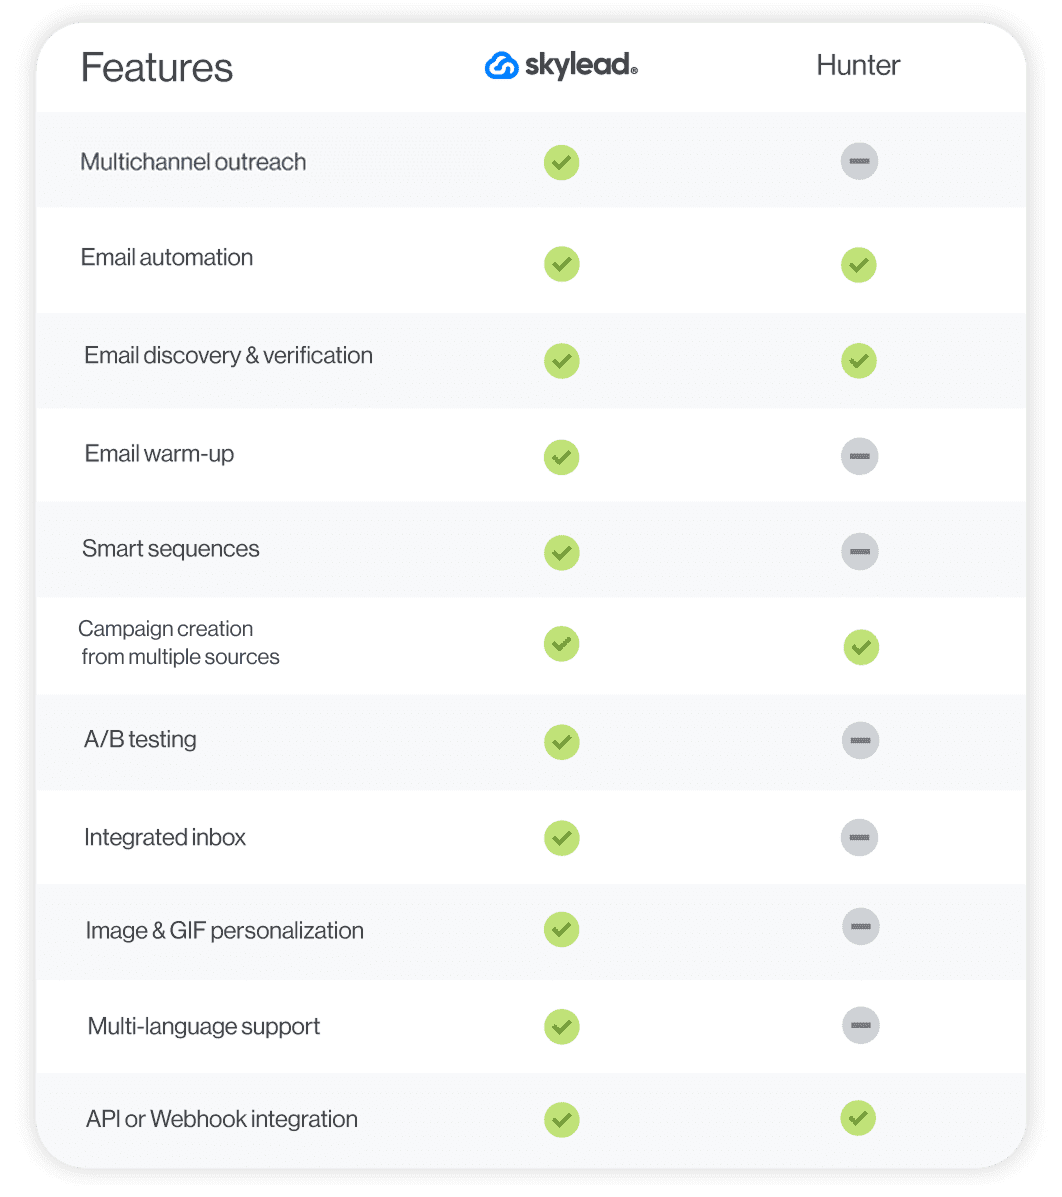
#14 Hunter - Best sales outreach tool for finding and verifying professional emails
Hunter is a well-known cloud-based prospecting, data enrichment, and email lead generation software.
Pros
Hunter is the outreach tool for you if you're a sales professional looking to find verified prospect data — in seconds! In doing so, it boosts email deliverability and protects the sender’s reputation.
With Hunter, we found out that setting up an email outreach campaign is straightforward. Meanwhile, readily available variables help you craft emails that feel highly personal and induce replies.
Finally, Hunter seamlessly fits into your workflow through native integrations with different tools and Google Sheets. Alternatively, you can send over data to a software of choice using Zapier webhooks or API.
Cons
Hunter is strictly an email outreach tool, which means it lacks features for social selling.
Although the tool can find and verify your leads' emails, these features are not integrated into the outreach flow as they are in Skylead. In other words, the tool needs to discover and verify emails first. Only once it returns results can you start an email outreach campaign.
Lastly, the tool can’t extract emails from social media profiles.
What others said about Hunter
Pedro A. believes that Hunter is one of the best sales outreach tools for email scraping. He's noticed a high accuracy in finding and verifying European email addresses. He thinks it'd be great if Hunter made it possible to enrich a person based on their LinkedIn URL, though.
Pricing
- Free: €0
- Starter: €49/mo / 3 email accounts
- Growth: €149/mo / 10 email accounts
- Scale: €299/mo / 20 email accounts
- Enterprise: Contact sales
Each plan comes with a limited number of email verification credits. You can purchase additional credits, but keep in mind that the cost will depend on your subscription plan.
Rating
- Capterra: 4.6 (687)
Skylead vs. Hunter
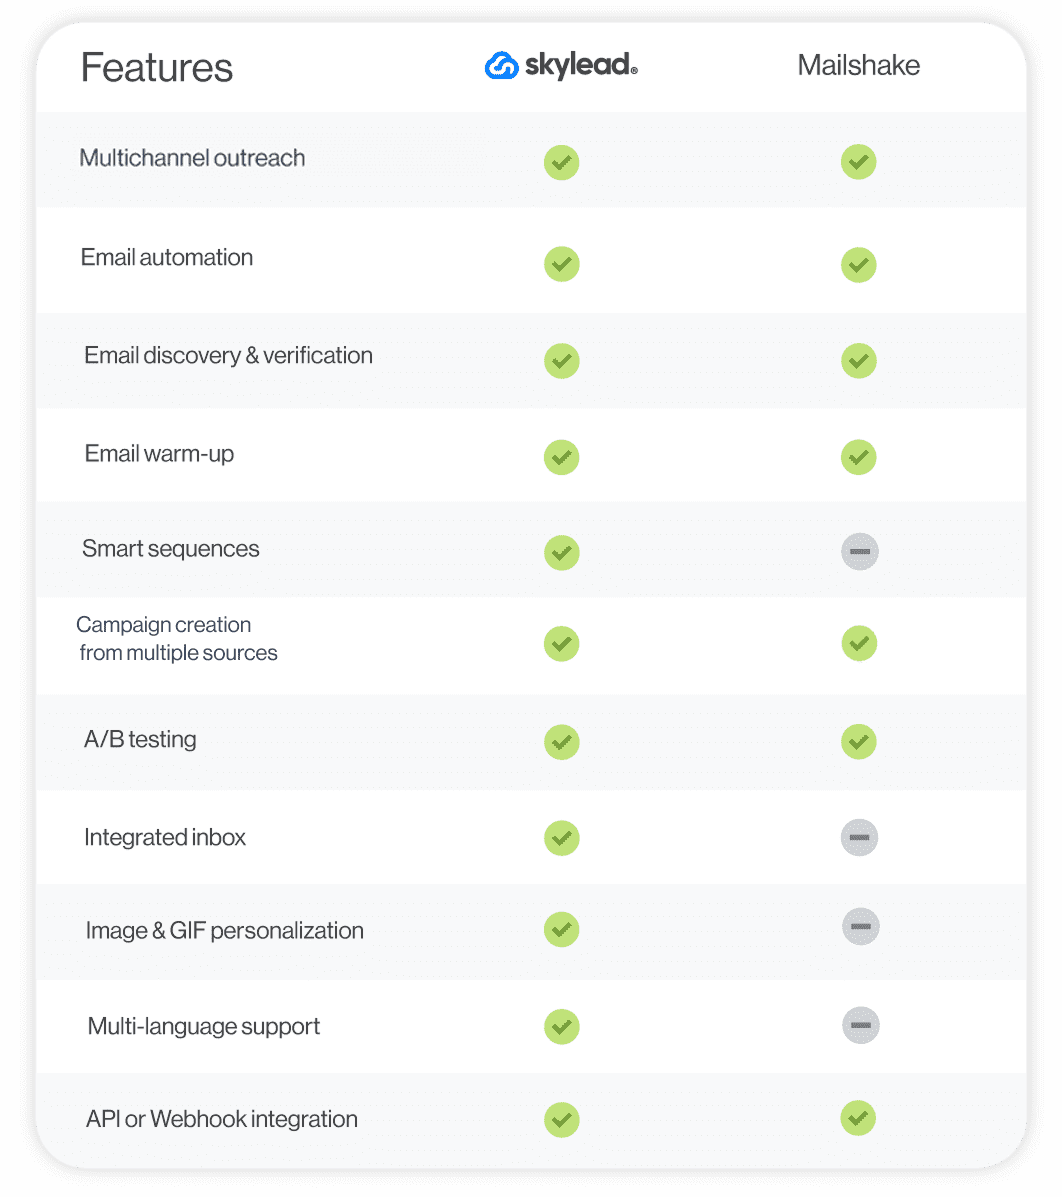
#15 Mailshake - Best outreach tool for setting up simple drip campaigns
Mailshake is a cloud-based sales engagement platform with a Chrome extension for LinkedIn automation and an AI email writer.
Pros
Mailshake has an intuitive sequence builder that you can use to automate sending cold emails and follow-ups. Unlike other tools, where sequences stop when the prospect responds, Mailshake has the option to continue its campaign even if the lead responds. In other words, other tools like Skylead have an option to manually get leads back to a campaign once they respond. However, if you wish that the sequence just continues despite your leads’ response, you’ll like this option.
You can also use Mailshake to automate profile views on LinkedIn, along with invites to connect and messages.
Clearly, Mailshake supports multichannel outreach, and it even makes it possible to add calls into the mix, courtesy of the built-in dialer. Although, this is a manual task.
Cons
LinkedIn automation, which isn’t even complete, and cold calling are exclusive to the highest-tier subscription.
Additionally, Mailshake automates LinkedIn actions through a Chrome extension, compared to Skylead, which is a cloud-based automation tool. That said, it may not be the safest option for your LinkedIn outreach.
What others said about Mailshake
Engin A. is impressed by how easy this sales outreach platform is to use. He is also satisfied with the onboarding process. However, he says that Mailshake can prove expensive for medium to large teams.
Meanwhile, more than one person has noted you have to be very careful about daily sending limits for email accounts connected to Mailshake, as Gmail tends to flag emails sent in bulk as spam. That’s why Skylead has inbox rotation—a feature that has caused many Mailshake users to turn to Skylead!
Pricing
- Starter: $29/mo per user / 1 mailbox
- Email Outreach: $49/mo per user / 2 mailboxes
- Sales Engagement: $99/mo per user / 10 mailboxes
Rating
- Capterra: 4.5 (123)
Skylead vs. Mailshake
#16 SalesBlink - Best sales tool for AI-powered email outreach
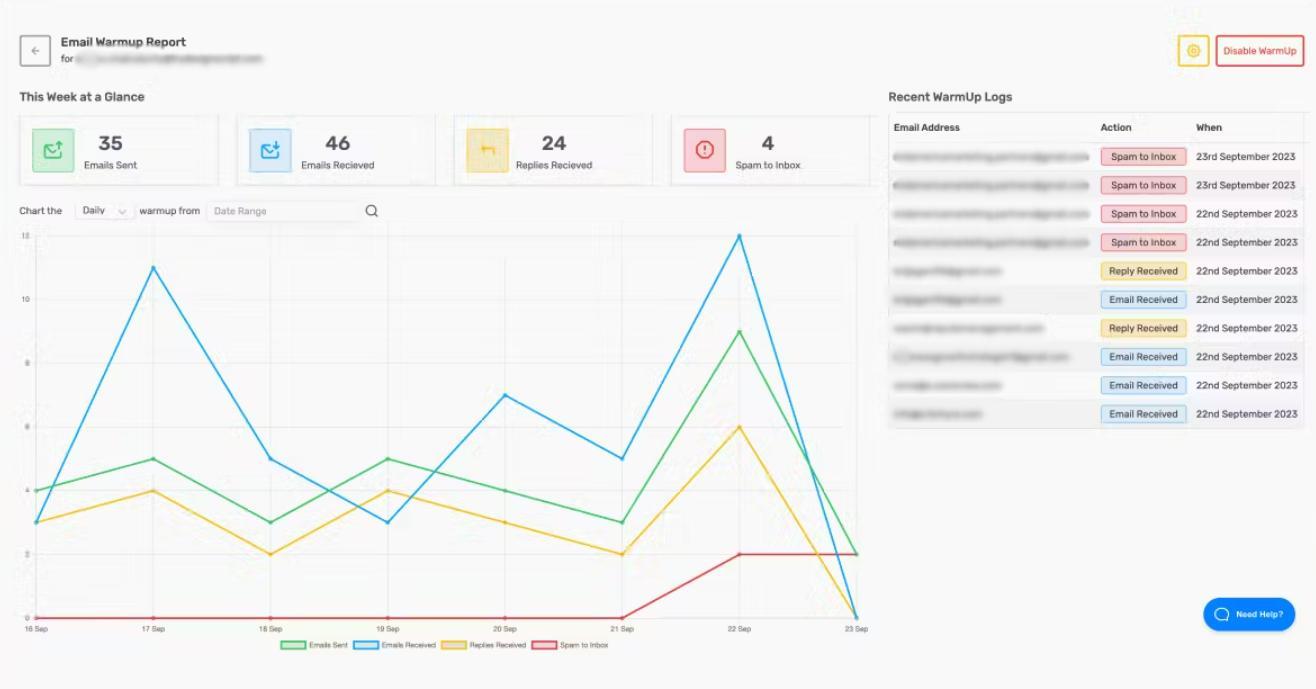
SalesBlink is a cloud-based sales outreach tool for cold emailing.
Pros
SalesBlink lets you take advantage of its AI, BlinkGPT, to create smart email sequences with follow-ups adjusted to the outcome. It also lets you enrich your emails with variables and personalized images.
What’s more, thanks to the software’s email warm-up feature, your emails are sure to land in your leads’ inboxes, not spam.
Additionally, SalesBlink allows you to connect multiple sender accounts and automatically rotates them while sending emails to ensure you stay within limits.
Finally, the tool makes managing conversations effortless, keeping them all in a unified inbox.
Cons
We found it inconvenient that the tool limits the number of emails you can send depending on your subscription plan. With the highest subscription, you can send up to 100,000 emails.
However, if you don’t want to pay the highest subscription for this, sales outreach tools like Skylead and Instantly, which allow you to send unlimited emails, may be better suited.
Moreover, while you can add multichannel tasks to your sequences, you have to complete them manually. Therefore, no real multichannel outreach is supported. Email sequences are smart, unfolding based on your prospect’s behavior. Nevertheless, Skylead is superior in this regard as well, as it comes with Smart sequences and support for multiple channels.
What others said about SalesBlink
SalesBlink is Alfred R.'s go-to tool for email outreach, and he proudly talks about it! The absolute best for him is its top-notch AI email assistant, which saves him immense time and optimizes his email management. The only downside he could think of is that you can't add a lot of information when describing a business to the AI, which tells us that the AI feature is not that complete.
Pricing
SalesBlink plans are split into 2 categories:
For Own Business
- Starter: $29 /mo per account
- Growth: $99 /mo per account
- Business: $199 /mo per account
For Lead Generation Agencies
- Agency Starter: $99 /mo / up to 3 clients
- Agency Growth: $199 /mo / up to 10 clients
- Agency Business: $299 /mo / up to 25 clients
Rating
- Capterra: 4.7 (223)
Skylead vs. SalesBlink
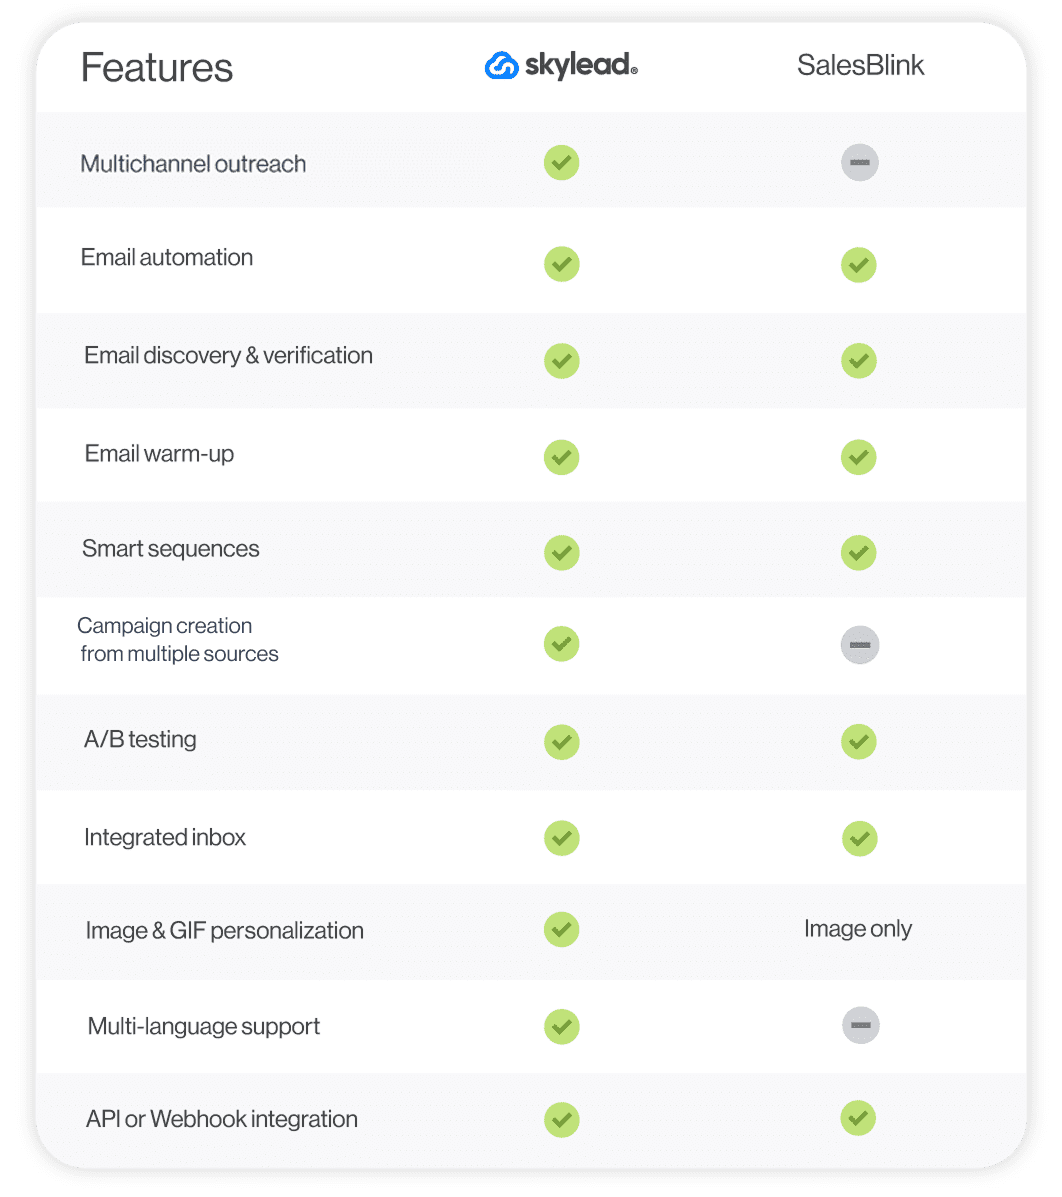
#17 Saleshandy - Best outreach tool for A-Z testing
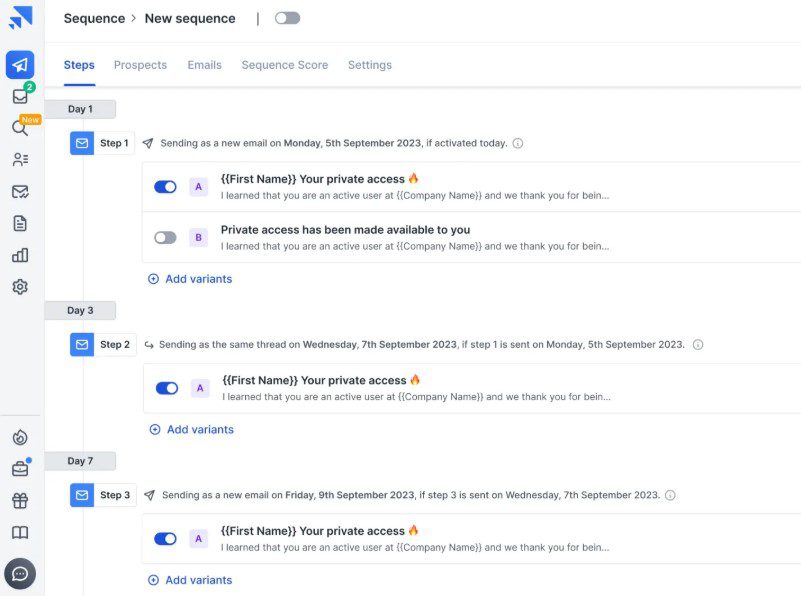
Saleshandy is a cloud-based software for email automation and prospecting.
Pros
The software has an up-to-date pool of over 700 million verified leads that you can search through and include in your outreach. It also has a Chrome extension that finds prospects’ emails on LinkedIn (phone numbers also, but at a higher cost).
Its highlight features, such as simple (not smart) email sequences, email scheduling, email tracking, and email warm-up streamline your cold email outreach, enhance deliverability, and help you generate more leads.
What really caught our attention, though, were the A/Z tests. The software allows users to test up to 26 different subject lines, email bodies, and CTAs.
Cons
Saleshandy doesn't support reaching out to prospects via LinkedIn and channels that aren’t email. While you can identify leads’ emails on this social networking site, be cautious; using its Chrome extension might compromise the safety of your LinkedIn account.
There’s an add-on for email verification, too. However, it costs extra.
What others said about Saleshandy
To Shamim Ahmed A., Saleshandy is one of the best and most affordable sales software for email outreach. He praises its many features, such as unlimited email warm-up, email automation, and analytics. Still, he hopes the warm-up feature will be further improved in the future.
Pricing
- Email Outreach Plans: From $36/month for the Outreach Starter to $299/month for the Outreach Scale Plus per account.
- B2B Lead Database Plans (emails only): From $29/month for the Lead Starter to $1299/month for the Lead Scale Plus per account.
Saleshandy’s email verification add-on will cost you an extra $79 for 25,000 recipients.
Rating
- Capterra: 4.5 (125)
Skylead vs. Saleshandy
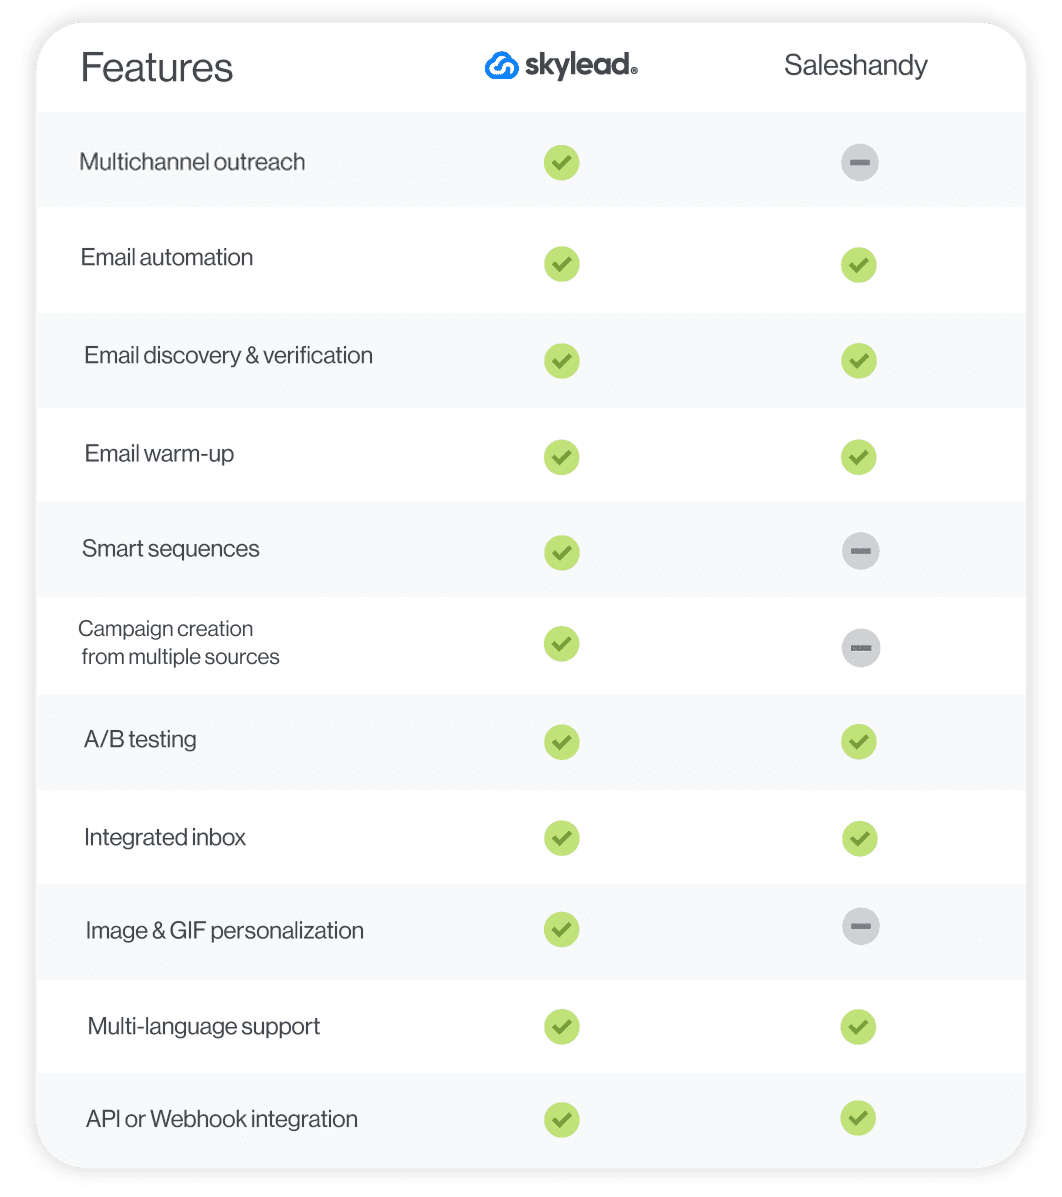
#18 Woodpecker - Best sales outreach tool for coming up with email copy quickly
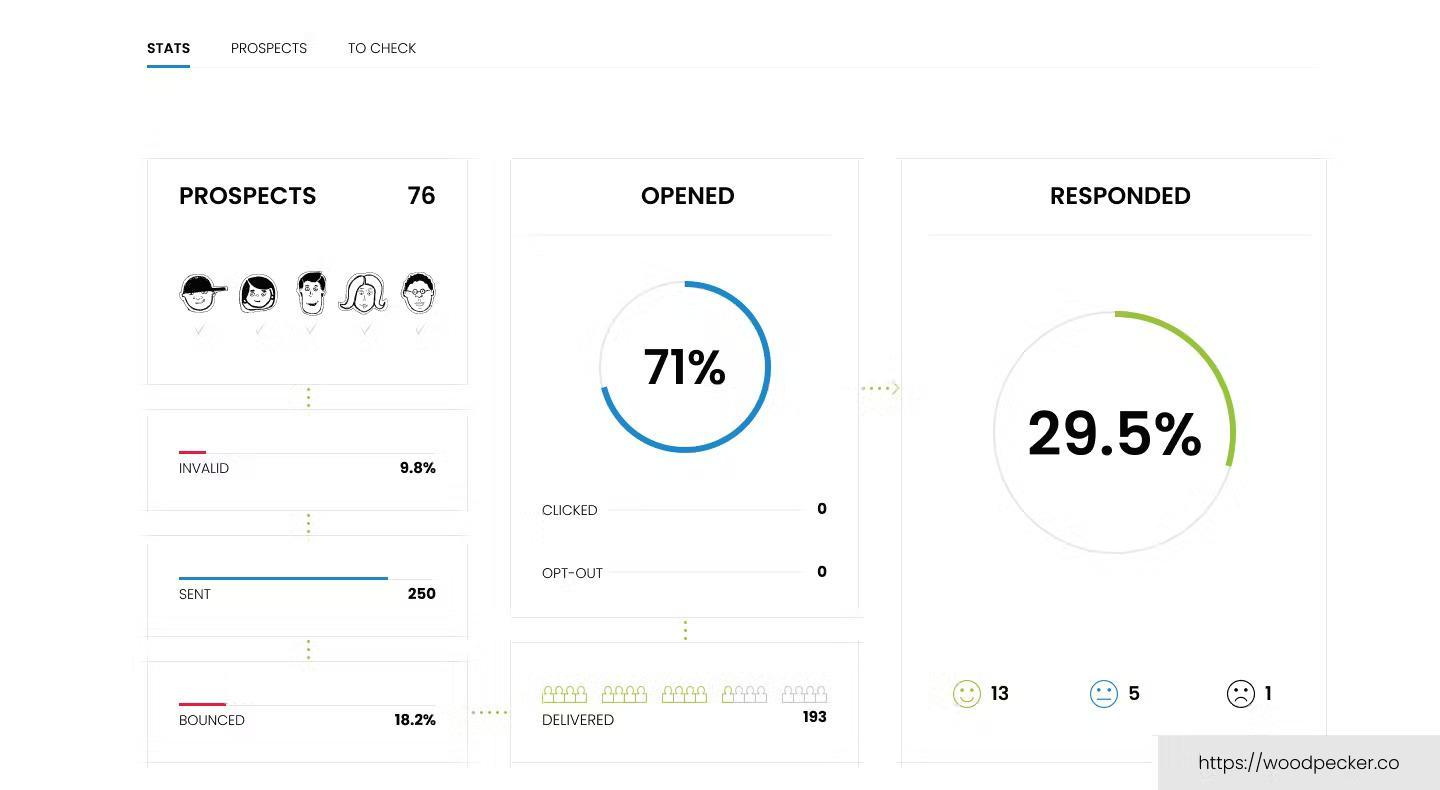
Woodpecker is one of the best cold email software with add-ons that turn it into an all-in-one sales outreach platform.
Pros
Woodpecker is natively an email outreach tool. Nonetheless, it supports creating multichannel campaigns with LinkedIn actions and calls through built-in integrations with Dux-Soup and AirCall.
The platform allows you to connect unlimited email accounts and auto-rotates them to keep email deliverability high.
Woodpecker can also warm up your mailboxes, verify your leads’ emails and also lets you A/B test up to 5 different email variants.
It even comes with an AI assistant that generates copy for your campaigns. However, as we said previously, we tested out AI-generated copies, and the results weren’t much better than our own. In some cases, the results were even worse.
Cons
Woodpecker relies on 3rd party tools for its multichannel outreach, which incurs additional costs.
Additionally, its email verification probability isn’t as high as Skylead’s or Hunter.io’s.
What others said about Woodpecker
Woodpecker is a standout software in Michael L.'s eyes due to its ease of use and great support. While not as advanced as some other sales outreach tools, he states it fares well in the cold emailing department.
Pricing
- Starter: From $29mo per account
- Growth: From $188/mo per account
- Scale: From $1,354/mo per account
- Max: From $9,999/mo prt account
Rating
- Capterra: 4.5 (33)
Skylead vs. Woodpecker
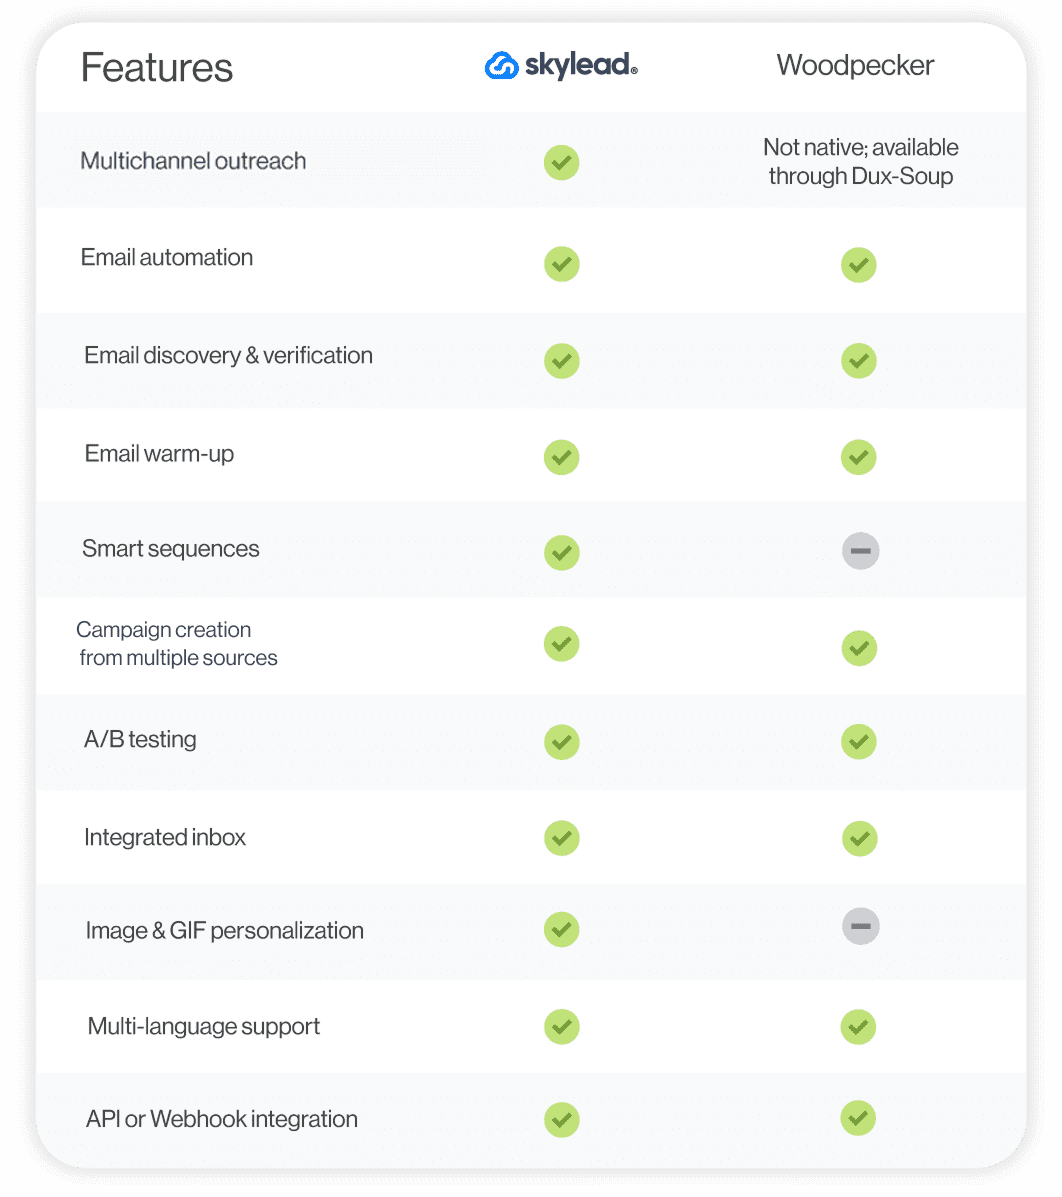
#19 Wiza - Best for extracting lead information from LinkedIn, Sales Navigator & Recruiter

Wiza is a Chrome extension that is used to scrape prospect information from LinkedIn.
Pros
Wiza is compatible with LinkedIn Premium, Sales Navigator, and Recruiter accounts. It’s notable for its instant email verification capabilities. At the same time, it allows you to export prospecting lists from LinkedIn to CSV or sync them to your CRM.
On top of extracting verified work and personal emails from LinkedIn, Wiza can also extract work and cell phone numbers that are publicly available on LinkedIn.
FIY, the software will use up your verification credits only if it manages to find valid prospect information.
Cons
We can’t say that Wiza is a real sales outreach tool, even though some categorize it as such. Instead, it’s a prospecting tool that can only inform your outreach strategy.
Also, since this is another Chrome extension on the list that injects code into LinkedIn, it could lead to your banning on the platform.
What others said about Wiza
As per Prerana B., Wiza is convenient, fast, and accurate. She also likes how the tool can scrape leads' information from LinkedIn. On the flip side, she finds it a bit expensive. However, while Prerana praises Wiza for its email discovery and verification capabilities, we’ve found Skylead to have a much higher email enrichment success rate.
Pricing
- Free: $0
- Starter: $49/mo per user
- Email: $99/mo per user
- Email + Phone: $199/mo per user
- Team plan: Starting at $399/mo (annual commitment)
Rating
- Capterra: 4.6 (20)
Skylead vs. Wiza
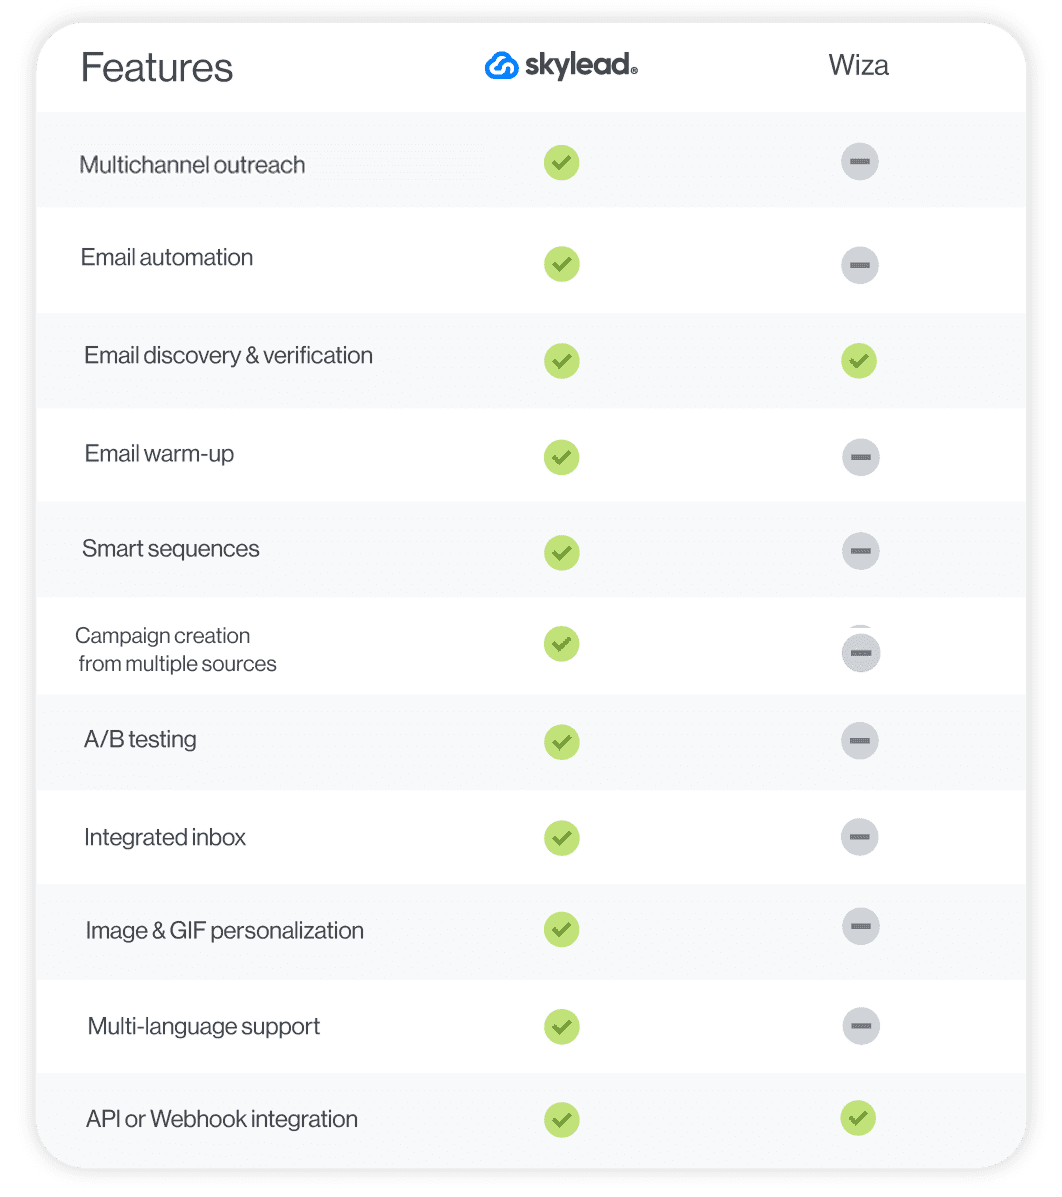
#20 GrowMeOrganic - Best sales outreach tool for automating hyper-personalized follow-ups
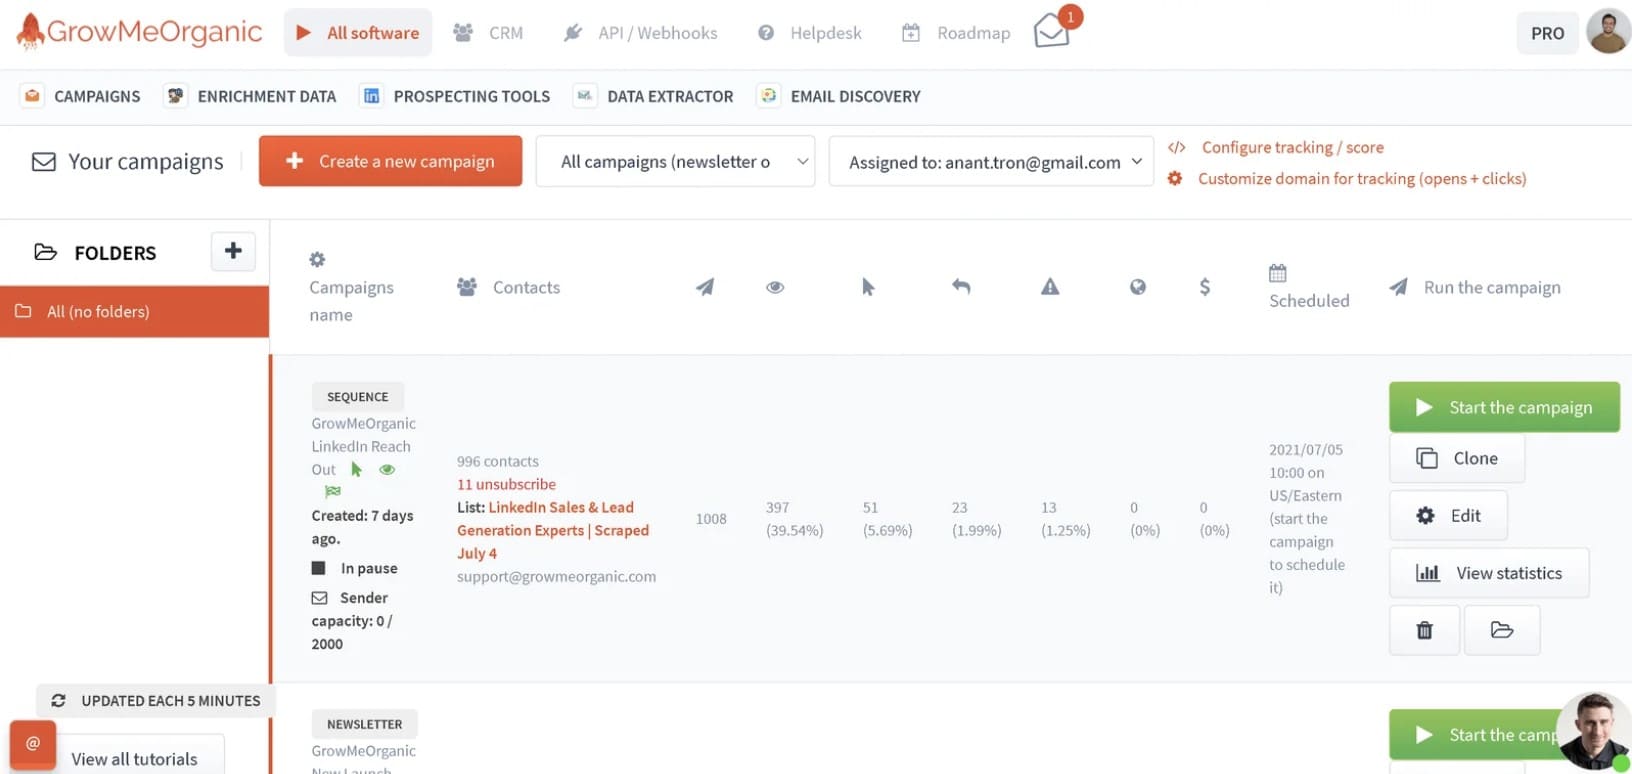
GrowMeOrganic is a cloud-based outreach solution for cold emailing. It also features a Chrome extension that can extract verified emails and phone numbers from LinkedIn.
Pros
GrowMeOrganic is great for automating cold emails and follow-ups based on your prospects’ behavior. We liked that the tool has a native image personalization feature and can track open, click, reply, and conversion rates.
GrowMeOrganic is compatible with email accounts from all providers.
Cons
Another Chrome extension, another major downside. To preserve your LinkedIn account, you are better off choosing another tool, at least for prospecting and email enrichment.
GrowMeOrganic also lacks support for LinkedIn outreach. As such, it misses out on the opportunities the greatest platform for social selling holds.
Furthermore, we noticed it’s impossible to download a PDF report. Only CSV and XLS exports are available.
What others said about GrowMeOrganic
Raghavendra D. has been using GrowMeOrganic for a while and says it's an excellent tool for sales automation. She finds its LinkedIn and Google My Business email scraper incredibly useful! Nonetheless, she doesn't like that this is a Chrome extension, nor do we. She’d like it better if there were an option to search for leads directly through the platform.
Pricing
- Starter: $49/mo / 1 user
- Growth: $99/mo / 5 users
- Pro: $199/mo / unlimited users
Rating
- Capterra: 4.2 (10)
Skylead vs. GrowMeOrganic

#21 Lusha - Best for prospecting around the Web
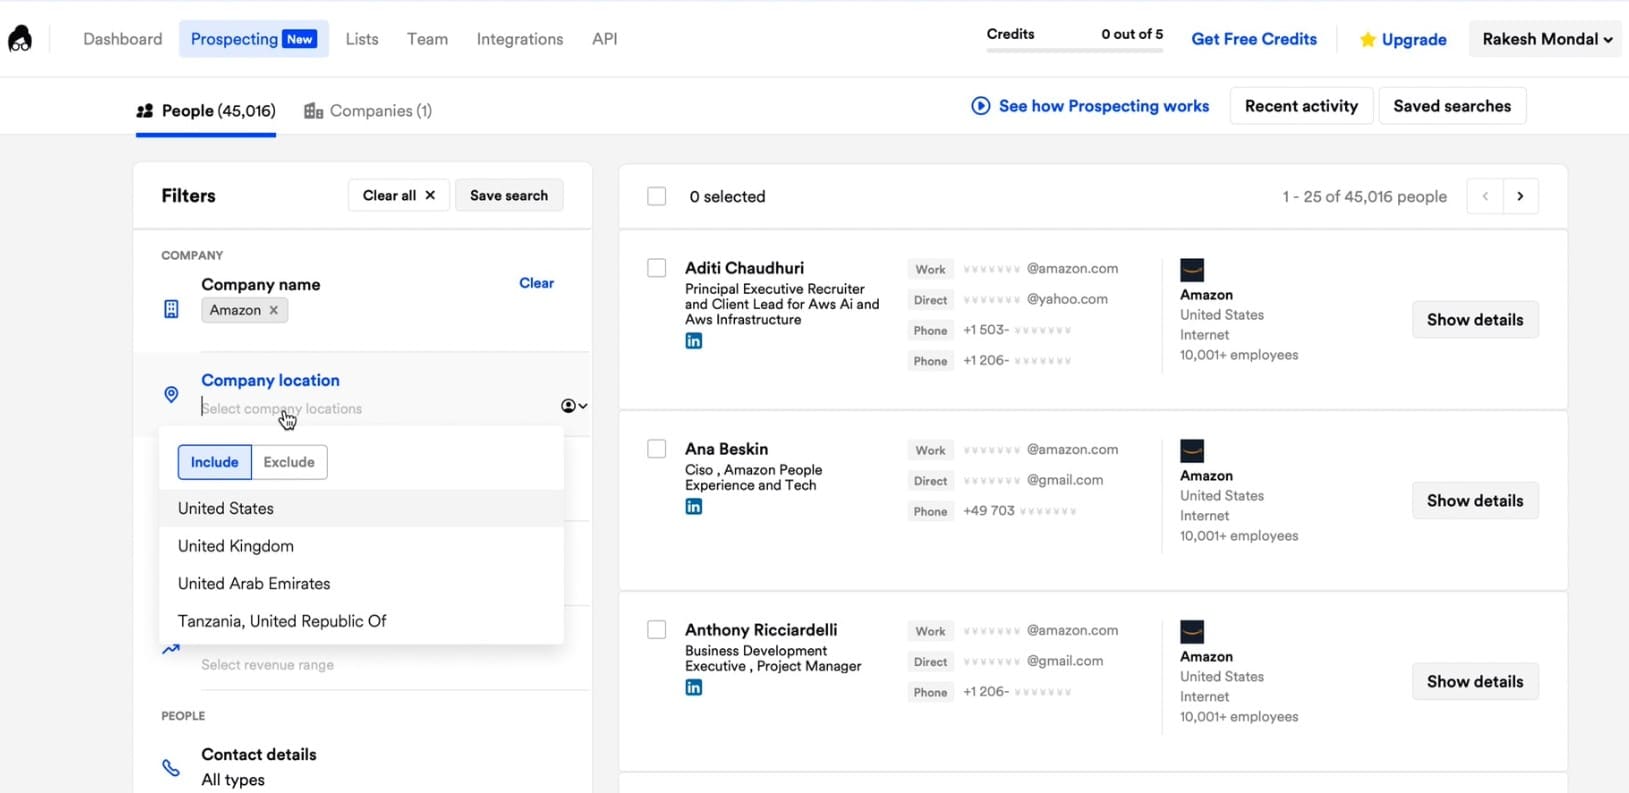
Like Wiza, Lusha is primarily a cloud-based prospecting tool, although salespeople can also use it for email outreach.
Pros
Lusha has a handy Chrome extension, which can extract prospects from anywhere. It also has a built-in B2B prospecting tool with filters that can get you up to 1,000 leads in one go.
Furthermore, you don’t have to resort to another software for your outreach; you can automate Lusha to send emails. Rather than relying on your time zone when doing so, the tool, like Skylead, lets you set different time zones for different email sequences. In other words, it reaches out to your leads when the time is right...for them!
To top it off, Lusha added an AI Playlists features, a.k.a. lead lists that automatically update based on your saved filters to keep your pipeline consistently full of new, high-potential contacts.
Cons
Lusha uses a Chrome extension to extract prospects from different sites. If you are prospecting on LinkedIn, it could threaten your account’s existence.
Moreover, this tool is only compatible with Gmail and Outlook accounts. If your email account is with a different provider, you won’t be able to use it for your outreach. Also, you can only connect one email account to Lusha, and it must be the one you used to register on the platform.
Lastly, its built-in database of B2B leads includes 45 million contacts in North America and 21 million in Europe. If your target audience is based on other continents, this may result in missed outreach opportunities.
What others said about Lusha
Ben B. reports that Lusha speeds up his prospecting and lead generation and offers great value for money. The only problem is that the quality of data found could sometimes be better.
Pricing
- Free: $0 / 1 seat
- Pro: Starts from $29.90/mo / 3 seats
- Premium: $69.90/mo / 5 seats
- Scale: Custom
Rating
- Capterra: 4.1 (383)
Skylead vs. Lusha
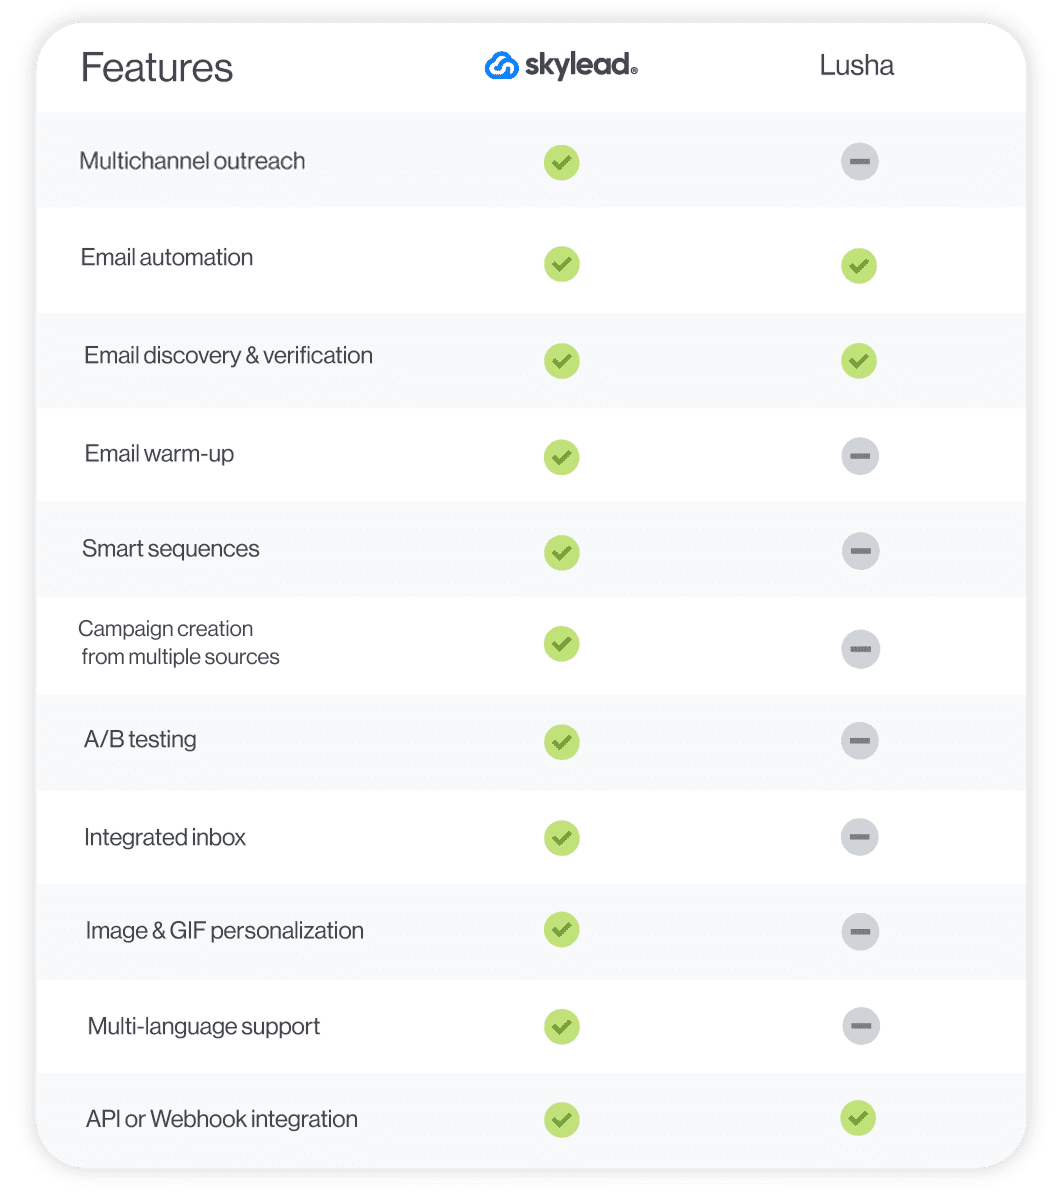
#22 MeetAlfred - Best sales automation tool for X outreach
MeetAlfred is a cloud-based sales outreach platform designed for LinkedIn, email, and X outreach.
Pros
MeetAlfred is different from other multichannel sales outreach tools in that it also integrates with X (formerly Twitter). As such, you can use it to automate different activities on three fronts: LinkedIn, email & X.
The tool’s campaign builder allows for adding infinite steps — from profile views and invites to connect to follow-up messages, inMails, emails, and X DMs. At the same time, it lets you set up delays between steps and personalize your messages with customizable templates and variables.
We also found it convenient how you can connect the tool to your Facebook and Instagram accounts. Although MeetAlfred can't be used to message prospects on these platforms, you can use it to create and schedule posts.
Cons
Unlike Skylead, MeetAlfred doesn’t have Smart sequences. Consequently, the software’s integrated inbox only shows your LinkedIn/Sales Navigator messages. If your campaign includes emails and DMs, you must manually check for new ones.
What others said about MeetAlfred
Martin P. considers MeetAlfred a perfect sales tool for someone with experience using this type of outreach software. He is fond of its simple interface and lots of customizable templates. Nevertheless, he believes it might be difficult for beginners to use.
Pricing
- Free: $0
- Individual: $59/mo per user
- Business: $99/mo per user
- Team: $79/mo per user
Rating
- Capterra: 2.8 (13)
Skylead vs. MeetAlfred
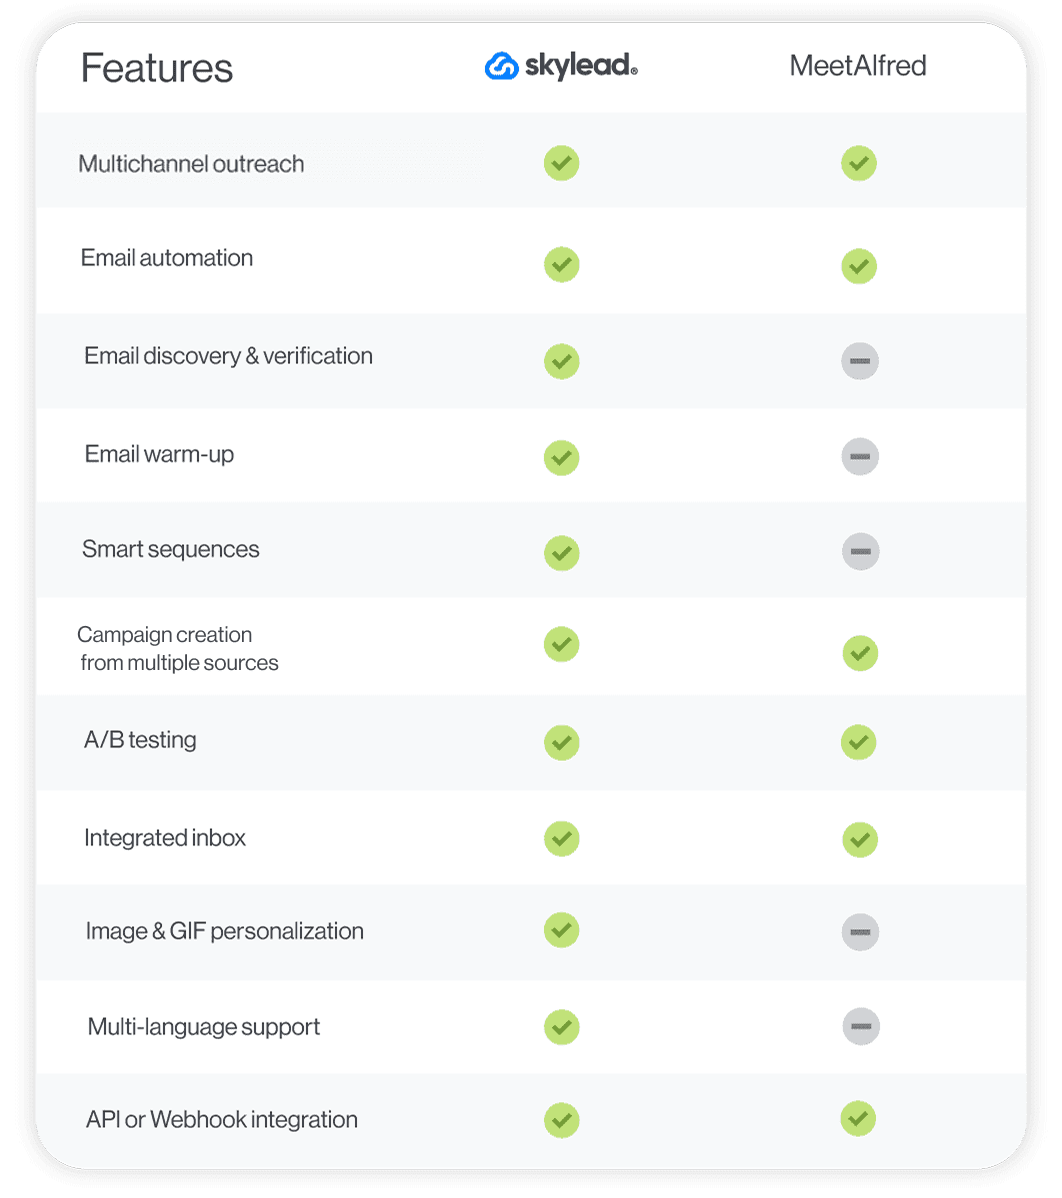
#23 LeadConnect - Best outreach solution for following up on LinkedIn
LeadConnect is a Chrome extension used for prospecting and outreach on LinkedIn.
Pros
LeadConnect connects to LinkedIn Basic and Sales Navigator accounts and pulls leads’ information from a LinkedIn search or a CSV file.
This tool lets you send personalized connection requests along with up to 6 automated follow-up messages.
Additionally, thanks to its native integration with HubSpot, pushing leads and conversations to the latter is as simple as a single click.
The tool also works with Findthatlead, Hunter.io, and Anymailfinder to discover your prospects’ email addresses. This is especially handy, as it gives you another channel to contact users who haven’t responded: email.
Cons
You can only use LeadConnect to contact users via LinkedIn. The tool doesn’t support sending inMails and emails, either.
The platform works only with LinkedIn Basic and Sales Navigator accounts. So, it cannot be used by anyone subscribed to LinkedIn Premium or a Recruiter plan.
With LeadConnect, you can only automate connection requests and LinkedIn messages. This makes it fairly primitive compared to Skylead and its multichannel smart sequences.
Plus, given that LeadConnect is a Chrome extension, it could lead to account restrictions.
What others said about LeadConnect
In Sheryl S.'s opinion, LeadConnect is a great sales outreach platform for growing her LinkedIn network. She also mentions that it's quite easy to use. The only issue is that when there are a lot of prospects to discover, she sometimes has to refresh the URL.
Pricing
- Free Forever: $0
- Professional: $ 25.95/mo per account
- Grow: $ 45.95/mo per account
- Ultimate: $ 85.95/mo per account
Rating
- Capterra: 4.4 (98)
Skylead vs. LeadConnect
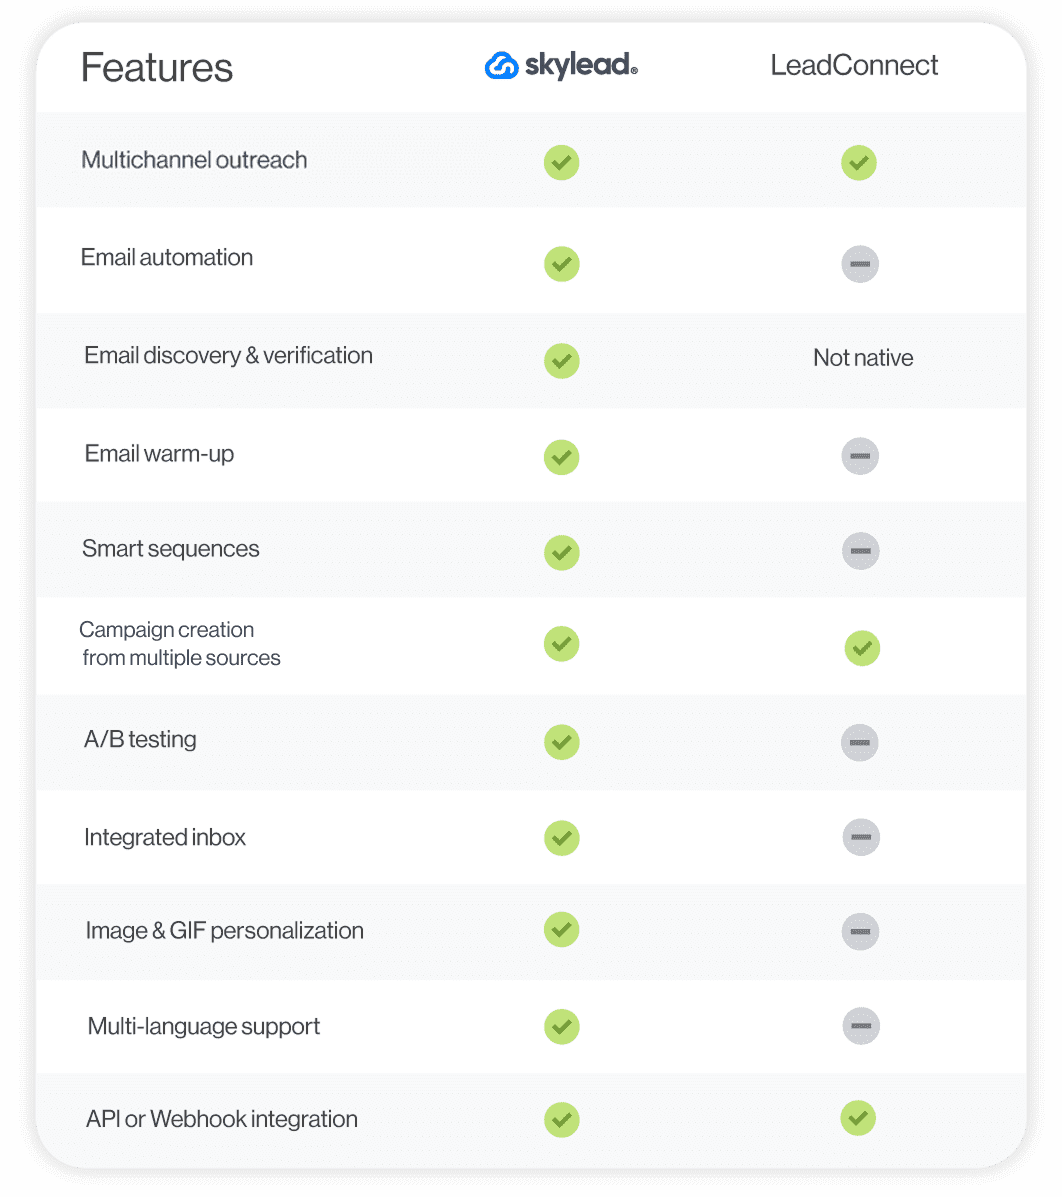
#24 Evaboot - Best tool for scraping leads from Sales Navigator
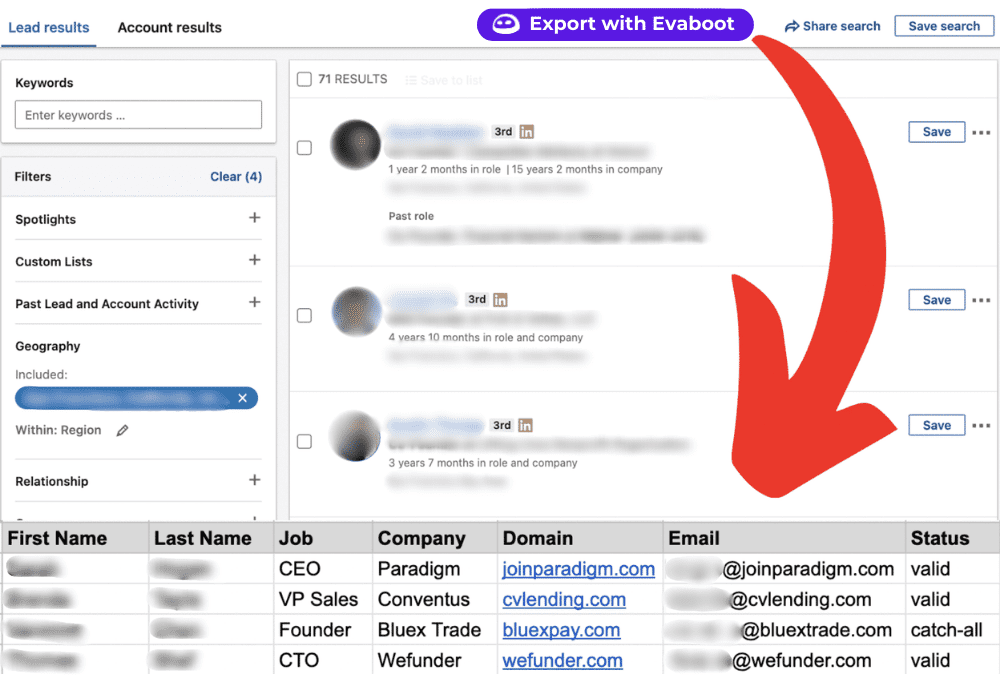
Like Wiza or Lusha, Evaboot is a Chrome extension for Sales Navigator prospecting.
Pros
Evaboot allows users to build lead lists from Sales Navigator in seconds and export them to CSV.
In addition to scraping leads, the tool can also find and verify professional emails.
Cons
Evaboot is only compatible with Sales Navigator, rendering it useless for LinkedIn Basic, Premium, or Recruiter subscribers.
Furthermore, this is a Chrome extension that, as you already know, can harm your Sales Navigator account.
We’ve tested the tool and can also tell you that their email discovery feature frequently provides inaccurate information or no information at all.
Lastly, this isn’t an email automation tool or any other type of outreach software. Yes, you can use the information gathered to contact leads. However, you’d need to subscribe to another sales outreach tool to do so.
What others said about Evaboot
Ky K. says Evaboot is easy to use and effective at what it does. However, the slight downside is that it doesn't allow him to select the number of leads to export.
Pricing
| LinkedIn data & professional email finder credits | Price (monthly / per account) |
| 100 | $9 |
| 500 | $29 |
| 1,500 | $49 |
| 4,000 | $99 |
| 8,000 | $149 |
| 20,000 | $299 |
| 50,000 | $499 |
| 100,000 | $899 |
| 200,000 | $1,699 |
| Custom | |
Rating
- Capterra: 4.6 (14)
Skylead vs. Evaboot
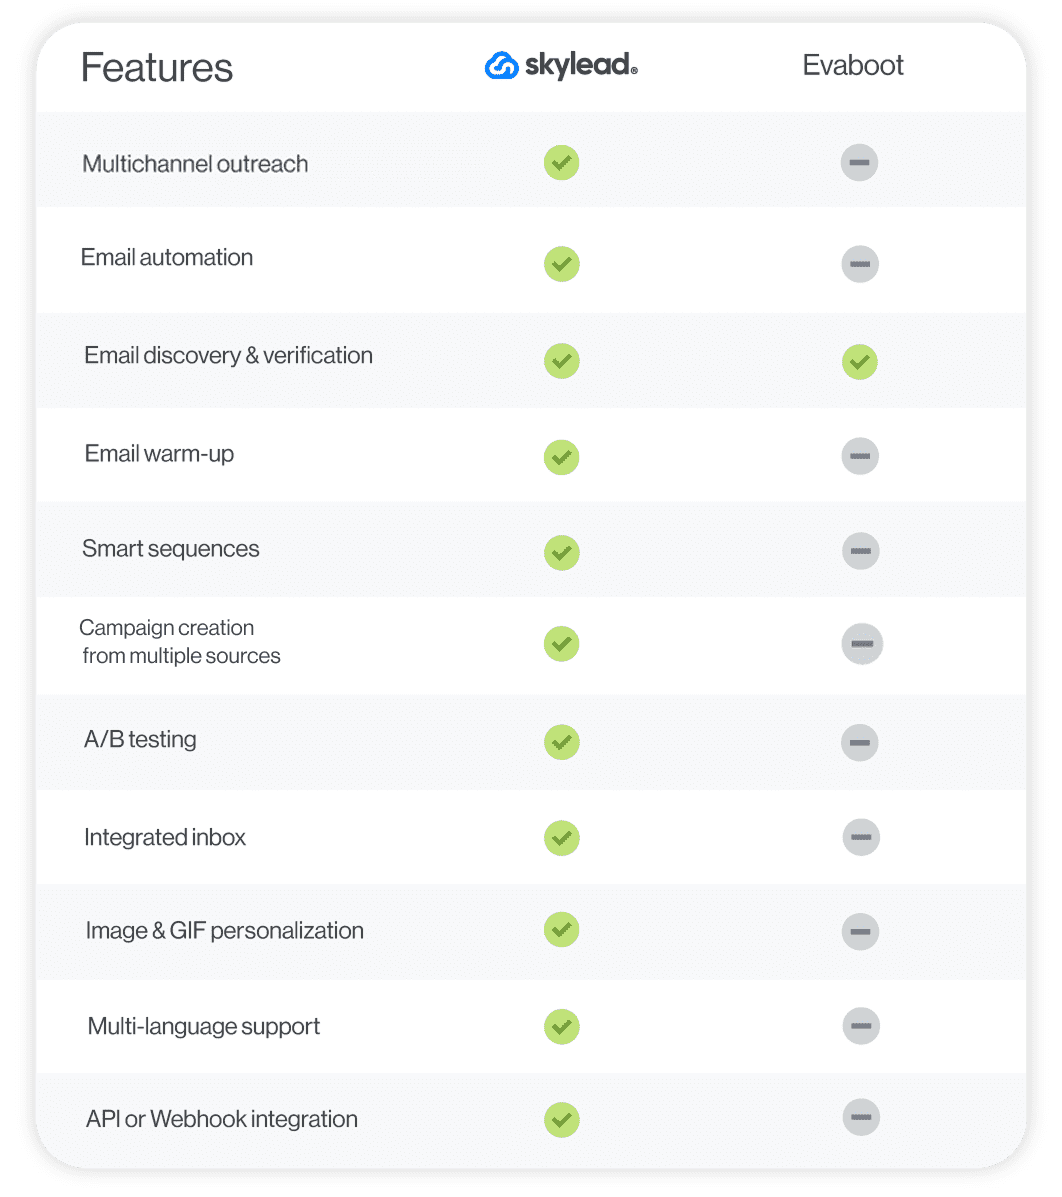
#25 Dux-Soup - Best LinkedIn automation tool for sending free and paid inMails
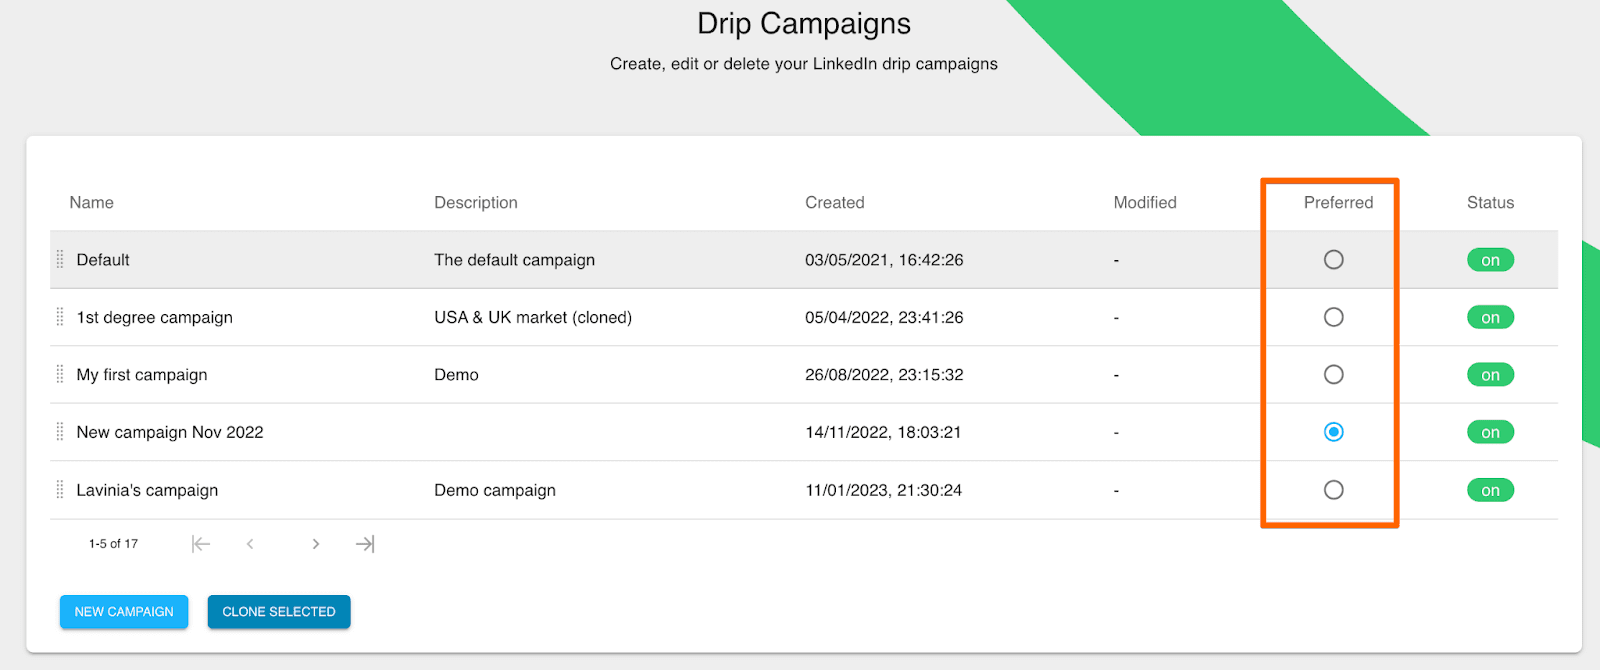
Initially a Chrome extension for LinkedIn automation, Dux-Soup now also offers a cloud-based sales outreach solution.
Pros
Dux-Soup can automate the following LinkedIn, Sales Navigator, and Recruiter actions:
- Endorsements
- Follows
- Profile visits
- Personalized connection requests
- Personalized messages to 1st connections
- inMails (free & paid)
With it, you can mix and match different actions to create unique drip campaigns that stop once your prospects’ respond.
We like that you can also customize time delays between individual steps and monitor campaign statistics once the campaign is live.
The software natively connects to Pipedrive, Hubspot, and SharpSpring. Nonetheless, you can also connect it to another CRM using Zapier webhooks.
Cons
Dux-Soup has a cloud-based solution for LinkedIn outreach, but it’s only available under their most expensive subscription plan. Those on lower plans have to rely on their Chrome extension for automation, which could compromise their LinkedIn accounts. Not to mention, the tool can only run while the browser is open.
Moreover, the software can’t be used for email outreach or any other type of outreach.
What others said about Dux-Soup
Leilani S. finds that Dux-Soup simplifies prospecting on LinkedIn. Her favorite feature is the X-ray tool, which enables her to discover LinkedIn profiles via Google. However, she notes that the software occasionally disrupts her workflow by randomly refreshing her page.
Pricing
Dux-Soup has 3 different plan categories:
Individual & Team Plans
- Pro Dux: $14.99/mo per seat
- Turbo Dux: $55/mo per seat
- Cloud Dux: $99/mo per seat
Agency Plans
- Pro Dux: from $337.50/mo for 30+ seats
- Turbo Dux: from $412.50/mo for 10+ seats
- Cloud Dux: from $371/mo for 5+ client seats
Rating
- Capterra: 4.0 (16)
Skylead vs. Dux-Soup
#26 Salesloop - Best for expanding your LinkedIn network on autopilot
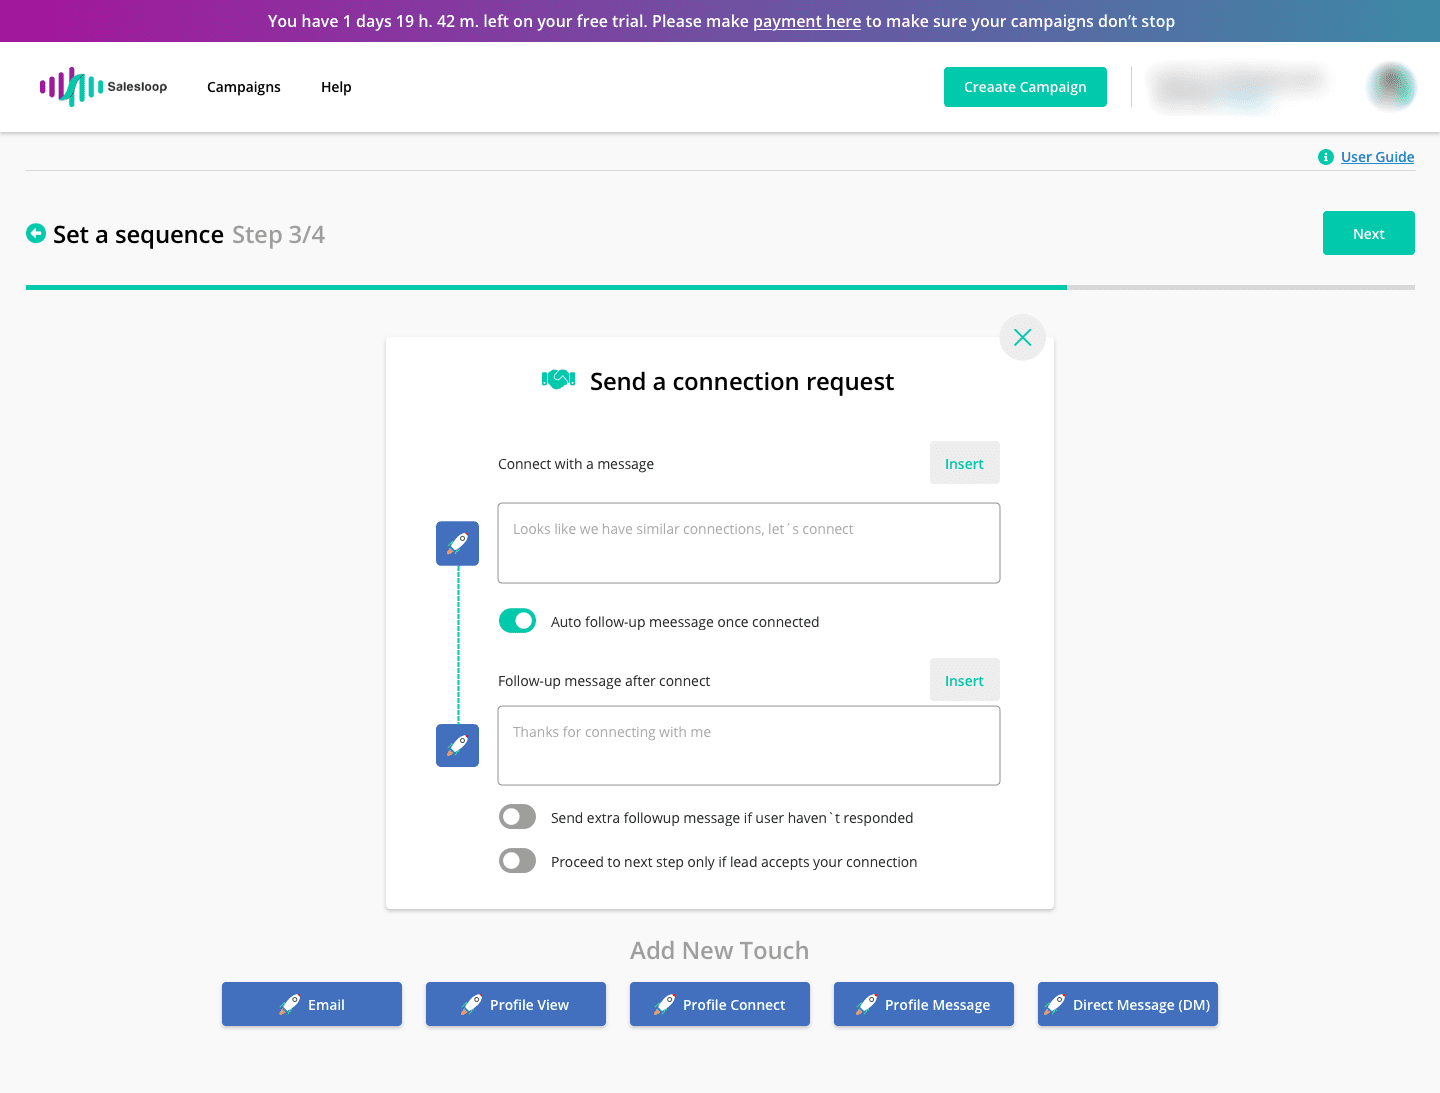
Salesloop is designed to work with all types of LinkedIn accounts: Basic, Premium, Sales Navigator, and Recruiter.
The software allowed us to build campaigns using LinkedIn search and by uploading lead lists in CSV format. Should you decide on the latter, you can also enrich your messages with custom variables for an added dash of personalization (on top of pre-set ones).
To make campaign tracking easier, Salesloop lets you download CSV reports.
Cons
Currently, the software supports LinkedIn automation only, although email and X (Twitter) integration are supposedly in the works. It also misses out on Smart sequences and, instead, relies on simple campaigns for its automation.
Additionally, Saleloop doesn’t integrate with any CRM natively. We were also disappointed to find out you can’t connect it to other tools via webhooks or API.
Lastly, unlike Skylead, which is one of the best sales outreach tools to support image & GIF personalization, Salesloop doesn’t currently offer this feature.
What others said about Salesloop
Krishan Kant S. is grateful for Salesloop because it improves his productivity and increases business performance. On top of that, it brings about financial benefits. He doesn't think the tool has any flaws.
Pricing
- Solo: $49/mo per 1 user
- Team: $199/mo per 6 users ($39 per user with a minimum of 3; tailored plans for more than 6 users)
- Managed Service: $2,000/mo
Rating
- G2: 3.5 (3)
Skylead vs. Salesloop
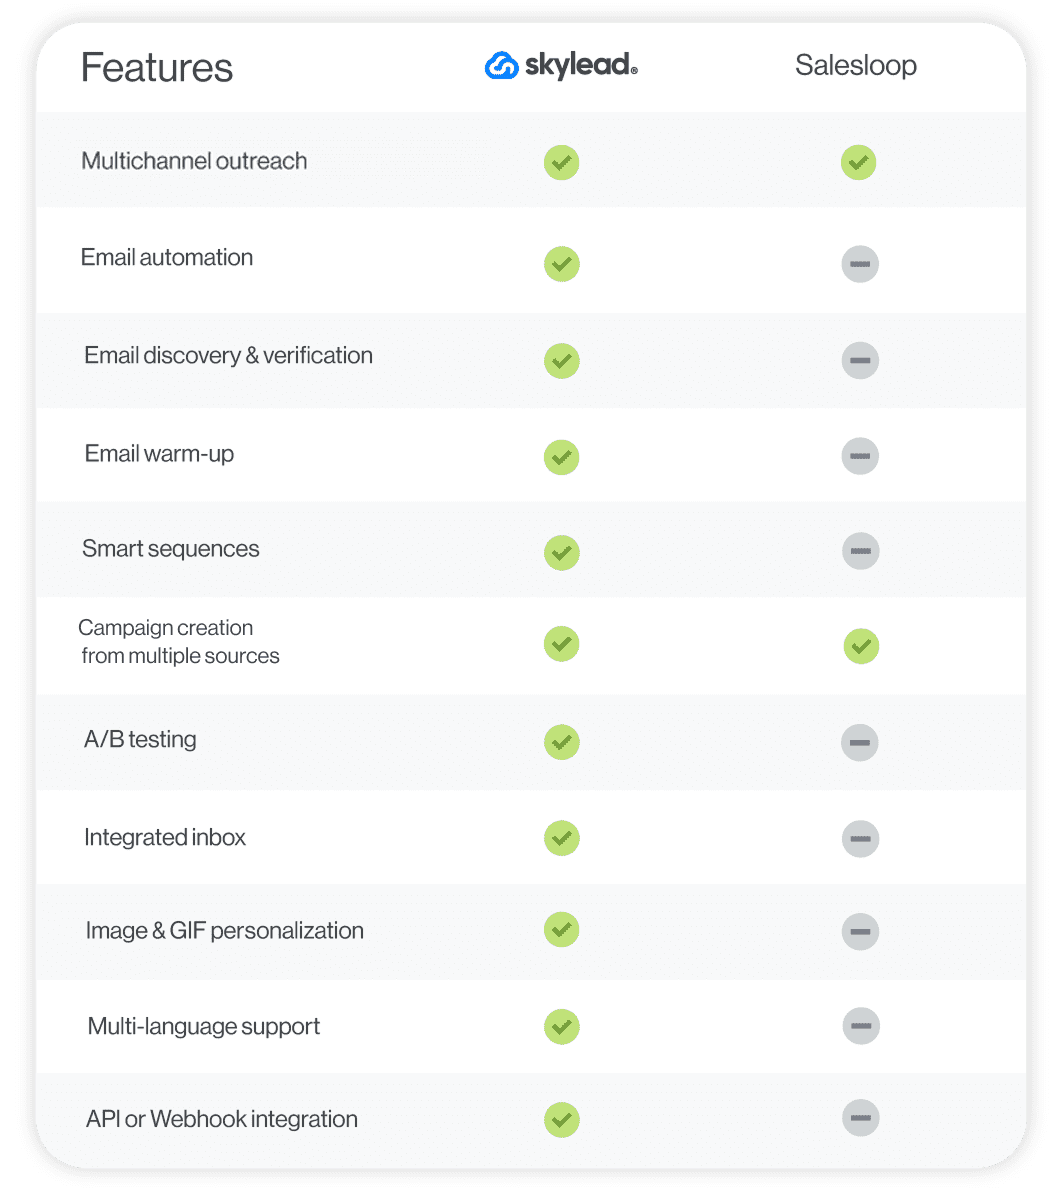
Frequently asked questions (FAQs)
Are sales outreach tools the same as CRM?
No. Sales outreach tools are designed to automate the initial contact with potential customers through various channels (e.g., email, LinkedIn, phone). On the other hand, CRM software is all about tracking interactions, managing sales pipelines, and storing information about leads and customers.
Can you use sales outreach tools without a CRM?
You can definitely use sales outreach tools without a CRM, especially if your business is small or just starting to build its sales process. Nonetheless, pairing these tools with a CRM is a smart move as your business grows and interactions with customers increase. This combo ensures a smooth workflow.
How do sales outreach tools ensure data privacy and security?
Sales outreach tools use various methods to safeguard sensitive information. This includes data encryption and compliance with GDPR. Many tools also manage consent and preferences to comply with privacy laws. Furthermore, trustworthy vendors have clear privacy policies and security protocols displayed on their websites.
Select the perfect tool and seal your sales deals easier than ever!
Here's the thing: the sales game has seriously leveled up from the old-school days. Today, we've got a whole arsenal of sales outreach tools at our disposal. Sure, choosing the right one from the bunch can feel like finding a needle in a haystack. But that's what you've got us for! So, if you feel indecisive after all this talk about the top software on the market, choose Skylead.
Start your 7-day free trial now and close more deals than ever—way faster!
Disclaimer: Skylead is not affiliated, endorsed by, or connected with LinkedIn in any way.
Are you searching for the best cold email software to generate leads, drive sales, and scale your business? However, with so many tools claiming to be the best, knowing which ones actually deliver is not exactly a walk in the park.
Recognizing how hard it is to find objective information, we’ve decided to give you some. Thus, we’ve tried a total of 21 of the best cold email software, evaluated them according to several criteria, and are bringing you our findings.
And if this is TL;DR for you, here’s a table for quick comparison.
| Tool ⚙️ | Best for 🥇 | User score ⭐(Capterra, G2 & Product Hunt) |
| Skylead | Salespeople looking for one tool that has it all | 4.7 / 5 |
| Smartlead | In-app email warm-up | 4.3 / 5 |
| Apollo | Its built-in lead database | 4.5 / 5 |
| Instantly | Its ease of use | 4,6 / 5 |
| Lemlist | Advanced personalization in email outreach | 4,5 / 5 |
| Reply.io | AI sales engagement | 4.5 / 5 |
| Expandi | ESP integration | 4.3 / 5 |
| Hunter.io | Email discovery and verification | 4.4 / 5 |
| Saleshandy | Email tracking | 4,4 / 5 |
| Snov.io | Its real-time sentiment analysis | 4.7 / 5 |
| Klenty | Video personalization | 4.7 / 5 |
| Woodpecker | Teams prioritizing email deliverability | 4.7 / 5 |
| Mailshake | Its AI email writer SHAKEspear | 4.7 / 5 |
| Outreach.io | Enterprise-level sales engagement | 4.4 / 5 |
| QuickMail | Its customizable Analytics | 4.7 / 5 |
| Close | Its CRM with basic cold email functionalities | 4.7 / 5 |
| Yesware | Automating cold email campaigns straight from your inbox | 4.4 / 5 |
| HubSpot Sales Hub | Its connection to HubSpot | 4.5 / 5 |
| GMass | Beginners | 4.7 / 5 |
| Mixmax | Teams after seamless email productivity tools | 4.5 / 5 |
| Salesforge | Outreach in 20+ languages | 4.7 / 5 |
However, if you’re curious to see which cold email software we ranked as the best and why, be sure to check out our hands-on experience with each one.
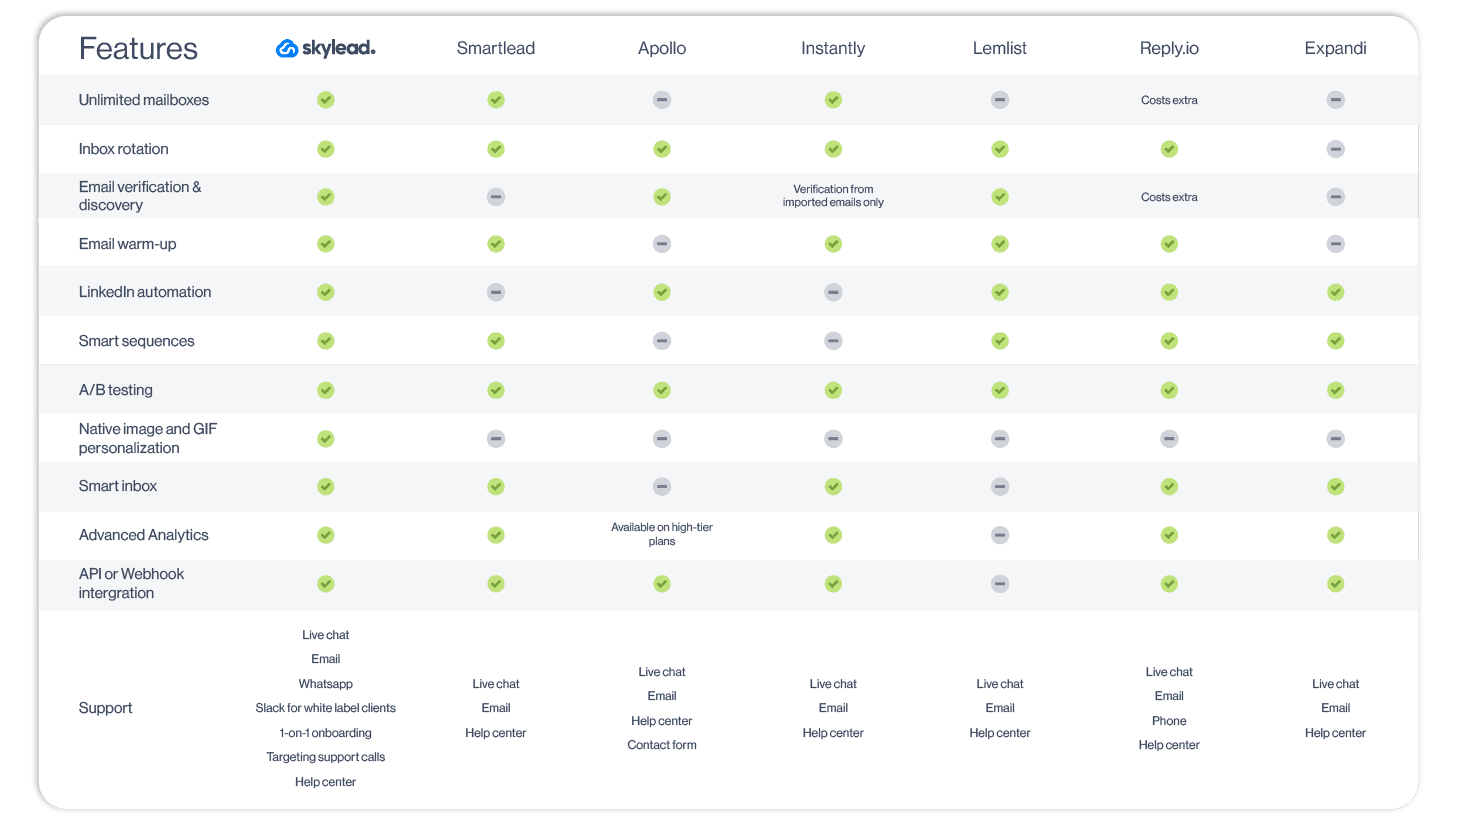

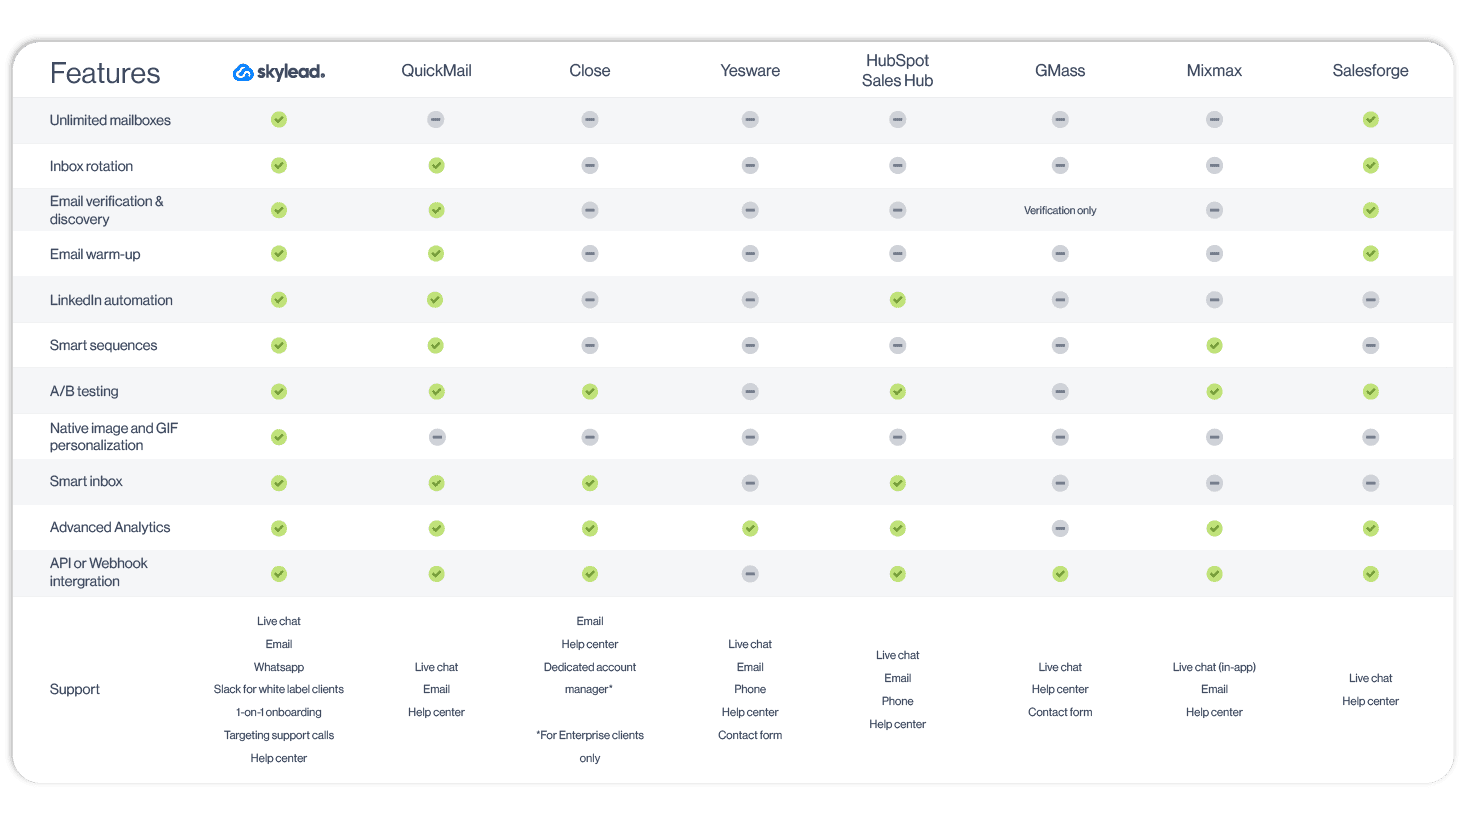
What is cold email software?
Cold email software is a type of tool designed to simplify and optimize the process of reaching out to prospects through email. It is commonly used by salespeople, marketers, recruiters, and agencies looking to connect with potential clients, partners, or candidates at scale.
What to look for in the best cold email software?
There are plenty of cold email software on the market, meaning the margin for error is high.
So, how do you choose the best cold email software out there?
It all boils down to the following:
1. Automation
Manual cold outreach is time-consuming, not to say exhausting. Thus, to save yourself more than 11 hours a week you’d spend on it, look for tools that do more than just send task alerts.
However, our advice is to go with a tool that has a Smart sequences feature, such as our Skylead. Smart sequences are outreach sequences that execute steps in a logical order according to the way your prospects' behave, thanks to if/else conditions. Using them, you can maximize touchpoints with leads to make sure your initial emails don't go to waste.
2. Deliverability
What good are your emails if they keep landing in spam?
That is to say, your software of choice should come equipped with features that ensure your emails make it to the Primary inbox. In other words, shop around for those with email warm-up, deliverability testing, blacklist monitoring, and similar functionalities.
3. Integration
For cold email software to be considered the best, it needs to work seamlessly with your existing tool stack (e.g., CRM, Slack, etc.). Otherwise, you are sure to experience workflow interruptions.
4. Personalization
Did you know that personalized email subject lines can see up to 20% higher open rates compared to those without personalized details?
For that reason, your best bet is to go with the software that lets you personalize your outreach. This may include the option to insert placeholders (a.k.a. variables) that auto-populate based on your leads’ information, such as first and last name and company name. The other handy feature is image and GIF personalization, which lets you personalize visuals with the text, logo, or name of your leads.
5. Analytics
You can’t know how good of a job the cold email software is doing without having insight into the data. Therefore, your go-to choice must have an Analytics dashboard that gives you the birds-eye-view of different metrics (e.g., open rate, click-through rate, reply rate).
6. Cost-effectiveness
The best cold email software for you is the one with the best price vs. feature ratio. In other words, a one-stop-shop tool that gives you the most value for your money. Simple as that.
Our testing methodology
So, you know what it is that makes a cold email software ‘’the best.’’ But you still need options. And options we’ll provide. Tried and tested ones, as a matter of fact.
But not before we’ve explained the criteria we used for the testing.
That said, we got hands-on with the most popular cold email tools to see what they’re really made out of, focusing on:
- Ease of setup - We signed up for each tool, went through the onboarding process, and tested how easy it was to get everything up and running.
- Key features - We poked around every feature to see if it actually worked as promised. Did the tools make life easier? Did they deliver on their big claims? We were bent on finding that out!
- Deliverability - We run actual email outreach campaigns to see whether emails would land in the Primary inbox or spam.
- User-friendliness - Some tools are so complicated they feel like they need a manual. Therefore, we made sure to assess how intuitive and easy-to-use each tool was.
- Price vs. features - Finally, we compared pricing to what each tool actually delivered. Our goal was to identify which tool was the best value.
The 21 best cold email software we tried
Now that you know what makes a great cold email tool and how we tested them, let’s get to the main event.
We’ve rounded up the 21 best cold email software on the market, carefully evaluating each one based on the criteria we laid out earlier.
With this in mind, for each tool, we’ll cover:
- User score
- Key features
- Pros
- Cons
- Pricing
And to keep it real, we’ll also share expert opinions—straight from the mouths (or keyboards) of actual users who’ve worked with these tools.
So, let’s dive in!
1. Skylead - Best cold email software for salespeople looking for one tool that has it all
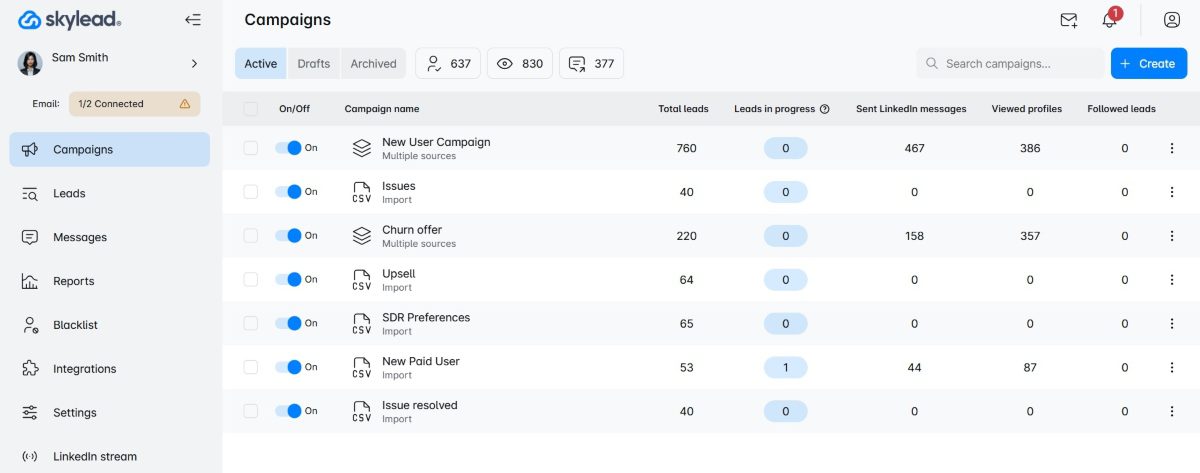
User score: ⭐ 4.7 / 5
Well, hello there! This is us! 🙂
Skylead is a sales engagement tool and cold email software that’s consequently your one-stop-shop tool for all your outreach needs.
Key features
Why do we say Skylead is a one-stop-shop tool?
Because it has everything you could possibly need for cold email outreach in one place and at one cost, including support for:
- Unlimited email outreach to send tens of thousands of emails at no extra cost;
- Email discovery and verification to reduce bounces and protect your domain;
- Image & GIF hyper-personalization to increase your response rate up to 76%;
- Email warm-up to keep your emails away from spam.
But what if we told you that, using our tool, you don’t have to settle for the email channel only?
Namely, Skylead is the 1st tool on the market to introduce Smart sequences. In other words, algorithms that combine if/else conditions with email and LinkedIn steps to form coherent outreach flows. Why? To find the fastest path to your leads.
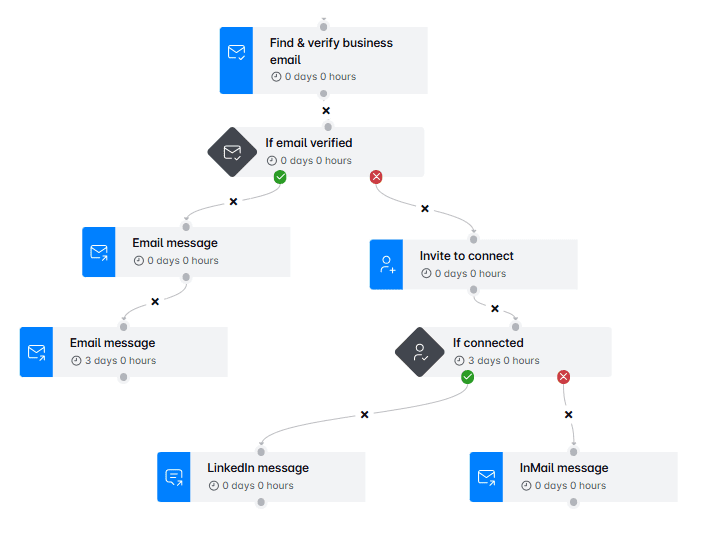
It’s all thanks to Smart sequences that you can combine email and LinkedIn actions.
Yours is just to choose a lead source from one of these…
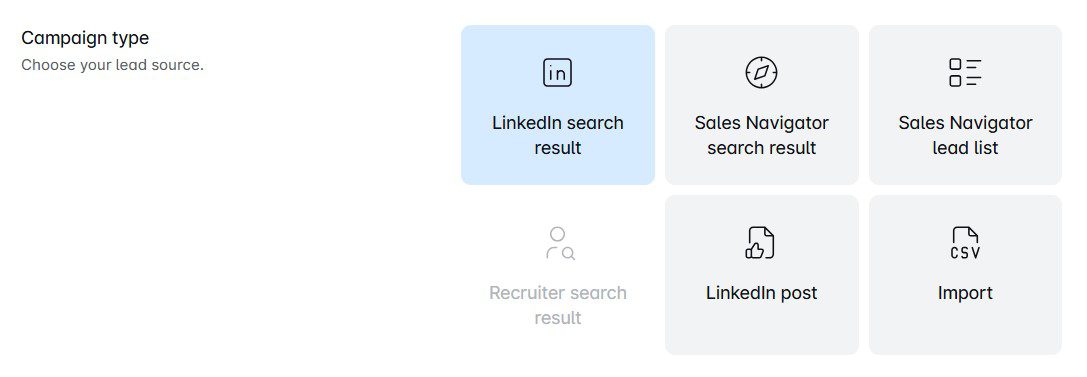
…build your Smart sequence using these LinkedIn and email steps…
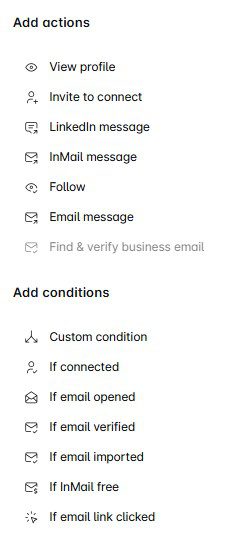
…and define your messages. While at it, you can even A/B test up to 5 versions of your subject lines, message copies, or CTAs and for email, LinkedIn messages, and inMails.
Thanks to an advanced Reports page, you can also easily evaluate the performance of all your campaigns in 3 modes (table, graph, step-by-step).
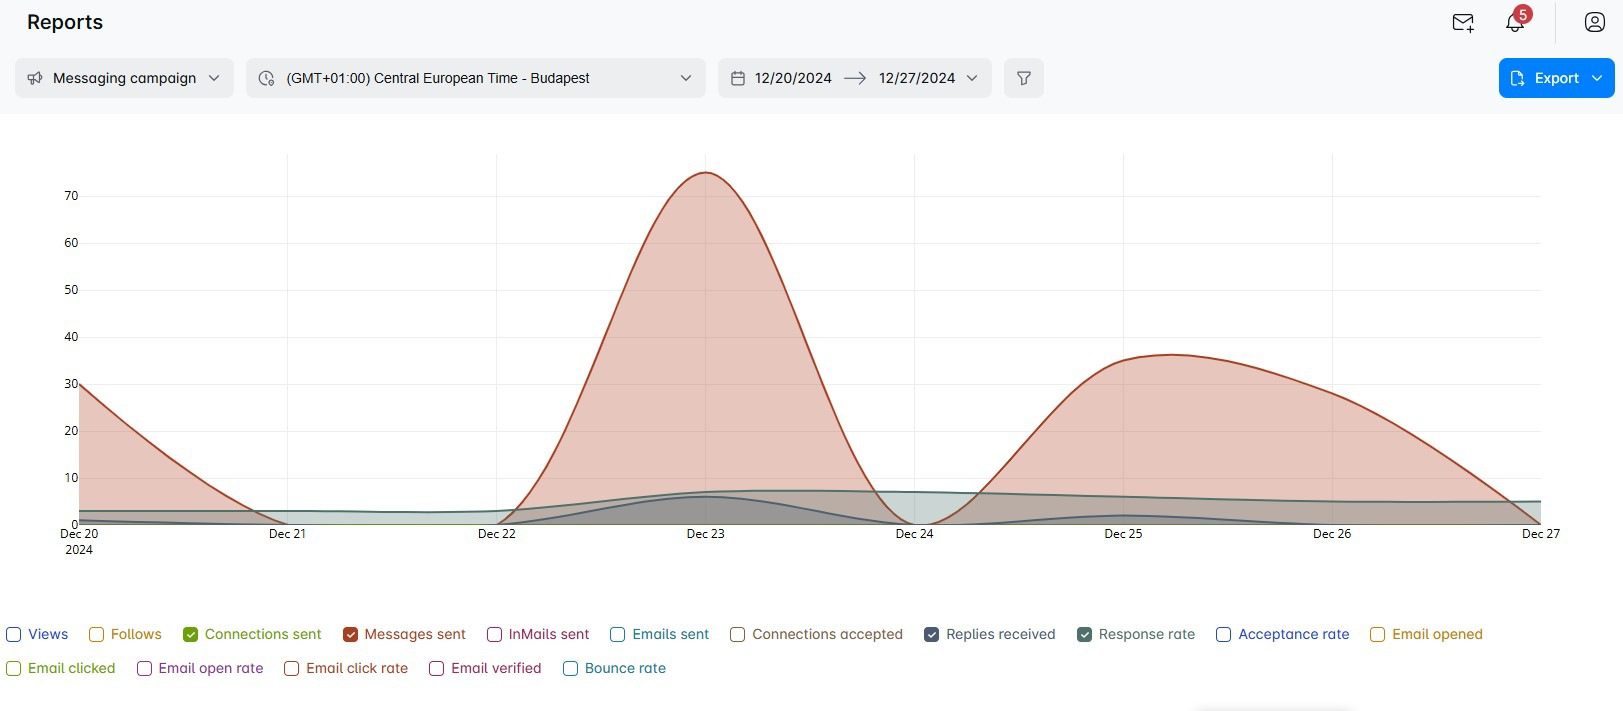
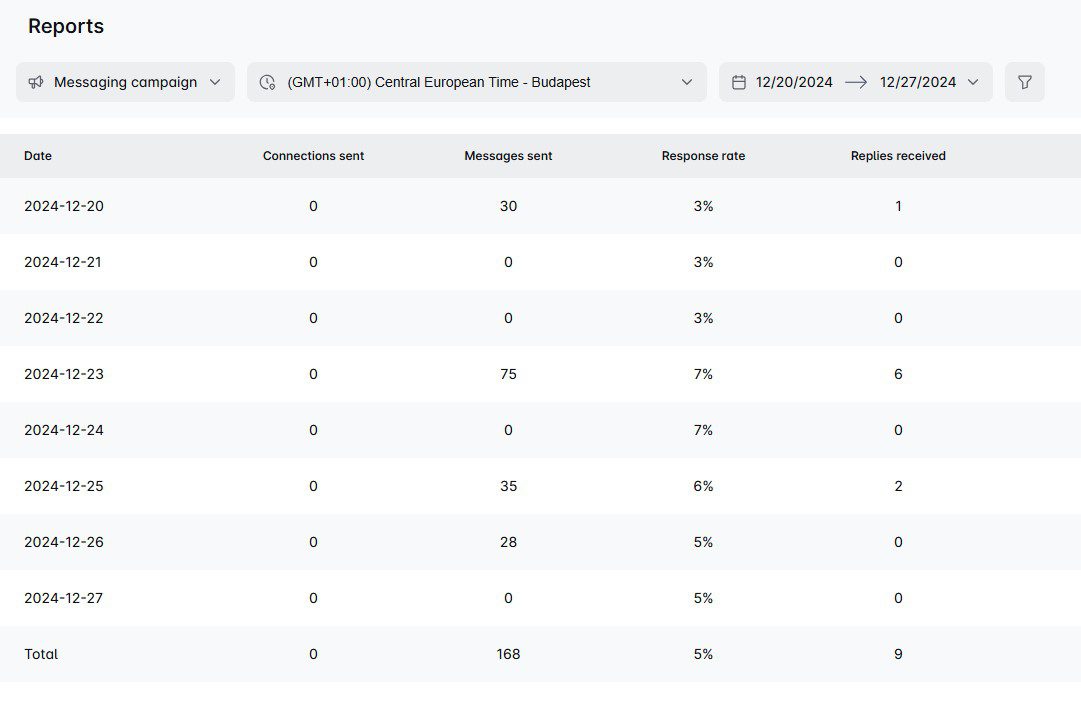
Moreover, you can also review the performance of your A/B tests and see which version is performing best.
Here, you can also download reports in CSV and/or PDF. Or, you can push your leads’ data straight into your CRM of choice by integrating it with Skylead through Webhooks or API. The same goes for any other tool out there.
Finally, you don’t have to go back and forth between multiple mailboxes and accounts. You can keep track of all your messages in one place—our Smart inbox. This is also where you can write notes and label leads to, say, measure conversions and ROI.
Now, let’s get deeper into features that make Skylead one of the best, if not the best cold email software.
Unlimited email automation
With Skylead, you can connect as many mailboxes as you need, making it possible to send tens of thousands of emails a month at no extra cost.
There’s no cap on the number of active leads you can manage, either. That basically means you can reach out to as many leads as you want and expand your outreach without limits.
Curious how it’s possible to send so many emails? It’s all thanks to our inbox rotation feature, which alternates sending emails across multiple mailboxes that you connected (email accounts). This way, your email-sending volume is distributed evenly, which keeps your accounts within safe sending limits.
Email discovery & verification
Using email discovery and verification, you can find and double-verify your leads’ email addresses to reduce the chances of bounces that could harm your deliverability and sender reputation. But the best part? It won’t interrupt your campaign creation flow.
Simply add the Find & verify business email step to your Smart sequence, and the tool will automatically locate and double-verify your leads’ emails.
What sets this feature apart is its exceptional accuracy—one of the highest on the market. Plus, it’s unlimited and included in your subscription at no extra cost. That means you can use it as much as you need without worrying about additional fees.
Infinite Email warm-up
Cold email software can only bring desired results if the accounts used for outreach are ready for it. But to make sure that happens, they need to be properly warmed up. Otherwise, the risk of your emails landing in spam runs high.
And since we know how important email warm-up is to the outreach process, we decided to partner up with the email warm up tool, InboxFlare, to bring you infinite email warm-up.
And yes, this is another feature you can use as a Skylead user at no extra cost.
With InboxFlare, you can:
- Warm up infinite mailboxes in 30+ languages
- Choose your own warm-up topics
- Perform regular deliverability testing
- Monitor blacklists
Once you’ve activated your InboxFlare seat, you’ll be able to connect it to your mailbox(es), be they with Gmail, Outlook, or another ESP. InboxFlare also lets you add custom SMPT. Once connected, it will use AI to craft a unique warm-up strategy.
Skylead pros
- Unlimited email outreach to send tens of thousands of emails per month at no added cost.
- Built-in email discovery and verification to reduce bounces and protect your sender reputation.
- Infinite email warm-up in more than 30 languages.
- Smart sequences combining email and LinkedIn to maximize getting in touch with leads.
- Image and GIF hyper-personalization to increase the response rate.
- Advanced reporting with export options and integration capabilities via Webhooks or API.
- Smart inbox to manage all email and LinkedIn conversations in one place.
Skylead cons
- InboxFlare isn’t built directly into Skylead.
- No native integrations with HubSpot, Salesforce, and other popular CRMs (integration is possible, though, through Zapier or API).
Pricing
Skylead is one of the few software that has one pricing plan to rule them all. That said, for just $100 a month per seat, you get all of the above features, plus a 1-on-1 onboarding call to get you started and a targeting support call.
What more could you ask for?
Expert opinion
‘’I’ve been using emails, InMails, and LinkedIn connection requests and messages altogether. But emails and LinkedIn messages are giving me the best conversion rate.’’
—Dennis Goyal, Co-founder & COO
‘’If/else conditions in Smart Sequences are also great. It's low code, so it's great because I'm not good at coding yet. I also like the Find & verify business email step, which finds email addresses most of the time. So you get, like, two ways you can get in touch with the client.’’
—Toine Boelens, Founder
2. Smartlead - Best for in-app email warm-up
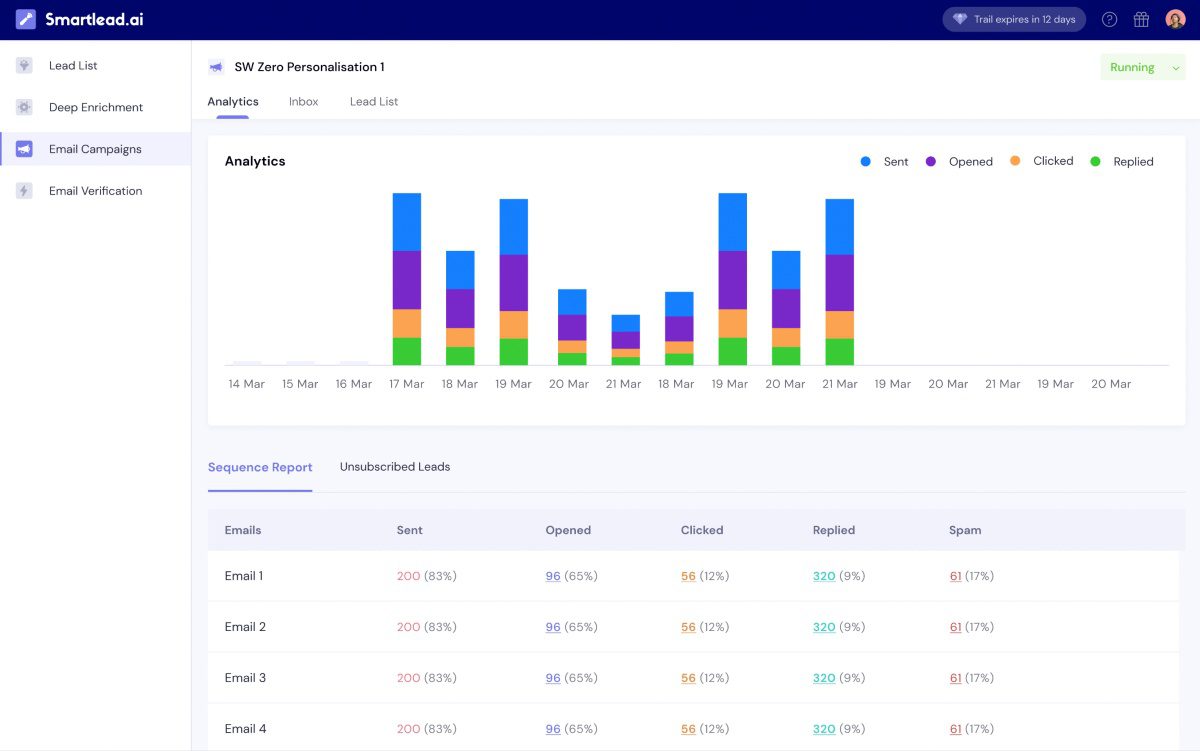
User score: ⭐ 4.3 / 5
Smartlead is a relatively new software that automates and streamlines cold email outreach.
Key features
Smartlead comes with support for unlimited mailboxes, inbox rotation, and a built-in email warm-up feature that helps build a strong senders’ reputation. We found it very reliable while testing the tool.
The software also has a Subsequences feature, a.k.a. email sequences that get triggered once specific conditions are met (e.g., if a lead bounces, if they reply, etc.).
Moreover, Smartlead has a Unibox, which lets you keep track of all emails and respond to them from one place.
Finally, they have an Analytics dashboard where you can keep track of your email campaigns’ performance.
Pros
- Good deliverability rates, courtesy of the built-in email warm-up feature with ESP matching.
- Support for unlimited mailboxes, as well as mailbox rotation.
- User-friendly interface that doesn’t overwhelm.
- Unibox to keep conversations organized.
- Native integration with HubSpot and 3rd party integrations via Webhooks and API.
Cons
- You can’t use it for LinkedIn lead generation because it lacks real multichannel outreach capabilities. Namely, you can add multichannel tasks into your sequences but need to perform them manually.
- No options for personalization other than variables, thereby positioning Smartlead alternatives like Skylead as a better option.
- Lack of email verification and discovery.
Pricing
| Basic | $39/mo *2,000 active leads per month |
| Pro | $94/mo *30,000 active leads per month |
| Custom | $174/mo *12M active leads per month |
Expert opinion
‘’Smartlead's email follow-up automation is a time-saver for crafting and delivering outreach sequences. Pre-designed templates are cool and a helpful advantage, especially for those new to cold emailing. The interface isn't the most intuitive. If you're new to cold email platforms, there might be a learning curve involved.’’
— Stephen O., Director of Sales Marketing
3. Apollo - Best for its built-in lead database
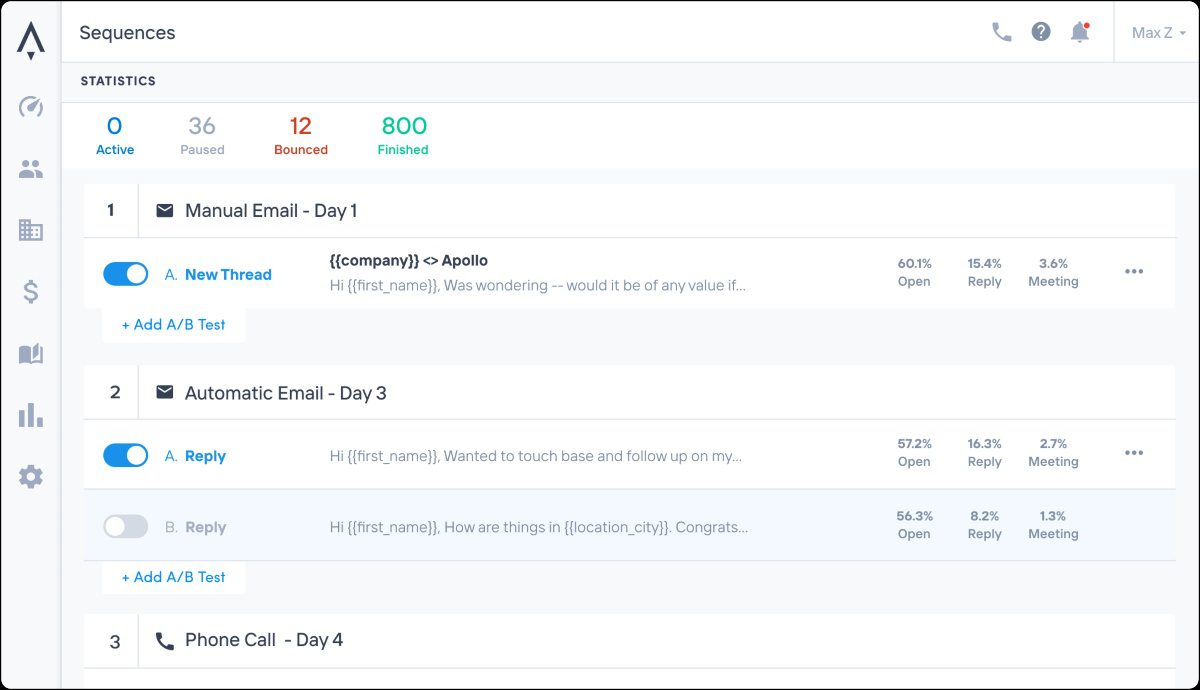
User score: ⭐ 4.5 / 5
Apollo is a powerful multichannel sales engagement platform that allows users to combine email, LinkedIn outreach, and cold calls in their campaigns.
Key features
Using Apollo, you can set up simple campaigns with automatic or manual emails while leveraging LinkedIn automation features to send connection requests and messages and engage with your leads’ posts.
Additionally, the tool integrates natively with platforms like Pipedrive, HubSpot, and Slack to provide seamless data synchronization.
It also includes A/B testing capabilities to optimize your campaigns and an AI-powered feature for crafting personalized outreach messages.
Lastly, Apollo boasts a database of over 275M contacts, which you can use to pull leads directly into your campaigns, along with an email verification and inbox rotation features.
Pros
- Multichannel support for email, LinkedIn, and phone outreach.
- Access to a large database of 275M+ contacts.
- Native integrations with Pipedrive, HubSpot, and Slack.
- A/B testing capabilities to refine your outreach strategy.
Cons
- Limited number of connected mailboxes (up to 15 for users of the most expensive plan).
- Multichannel sequences lack conditional logic, a.k.a if/else conditions found in Smart sequences.
- The tool uses Chrome extension to scrape lead information on LinkedIn, which could get your LinkedIn account restricted.
- AI functionality for crafting personalized messages is fairly basic, as we found.
- They integrate with Hyperise for Image & GIF personalization, which adds costs to the subscription (+$69 a month per seat).
- Lack of email warm-up feature.
- The tool also doesn’t have an integrated inbox, which was pretty inconvenient for us.
Pricing
| Free | |
| Basic | $59/mo per seat |
| Professional | $99/mo per seat |
| Organization | $149/mo per seat *billed annually |
Expert opinion
‘’Apollo is an easy go-to tool for generating leads and understanding the size of your market. The user interface is a bit clunky and not super intuitive at times, though.’’
—Zack P, CPO
4. Instantly - Best cold email software for its ease of use

User score: ⭐ 4.6 / 5
Instantly is a cold email software and email management platform that has quickly gained popularity for its scalability and user-friendliness, which we couldn’t help but notice the moment we set it up.
Key features
Instantly allows you to connect and manage unlimited email accounts, like Skylead and Smartlead, making it possible to scale your outreach significantly. While all connected accounts can be used in the same campaign, inbox rotation alternates sending emails from different accounts, so you can send more emails daily.
The software includes a built-in unlimited email warm-up feature. They also offer a B2B Lead finder, a database of 160M contacts, with filters similar to LinkedIn Sales Navigator filters (e.g., job titles, locations, industries, etc).
Using Instantly.ai, users can also conduct A/Z testing with up to 26 email variations.
What’s more, the software’s Unibox consolidates all email conversations into a single inbox for easy management. Meanwhile, its built-in CRM allows users to track lead statuses, make calls, and send SMS directly from the platform.
Instantly users can also verify their leads’ emails to reduce bounces and protect domain reputation.
Pros
- Simple and fast set-up.
- User-friendly interface.
- Unlimited mailboxes with inbox rotation to enhance deliverability.
- Unlimited email warm-up feature included.
- Unibox for streamlined conversation management.
- A/Z testing to optimize email performance.
Cons
- Basic reporting features may not meet the needs of users seeking detailed analytics. Furthermore, we didn’t like how you cannot export CSV or PDF reports.
- B2B Lead database and CRM cost extra.
- Lacks email-finding capabilities.
- Instantly is a cold email software only, meaning it’s not suitable for those relying on LinkedIn prospecting and outreach across multiple channels.
- Some users complain using Instantly damages their domain reputation, though we cannot say we experienced this while testing it ourselves.
Pricing
| Sending & Warmup Plans | Lead Plans | CRM | |||
| Growth | $37/mo per seat | Growth Leads | $47/mo per seat | Growth CRM | $47/mo per seat |
| Hypergrowth | $97/mo per seat | Supersonic Leads | $97/mo per seat | ||
| Light Speed | $358/mo per seat | Hyperleads | $197/mo per seat | Hyper CRM | $47/mo per seat |
| LightSpeed | $492/mo per seat | ||||
Expert opinion
‘’I am really happy with Instantly this far. It is such a well-rounded platform. You do have to pay quite a bit if you want to get the full experience, though.’’
—Niryen Z., CEO
5. Lemlist - Best for advanced personalization in email outreach
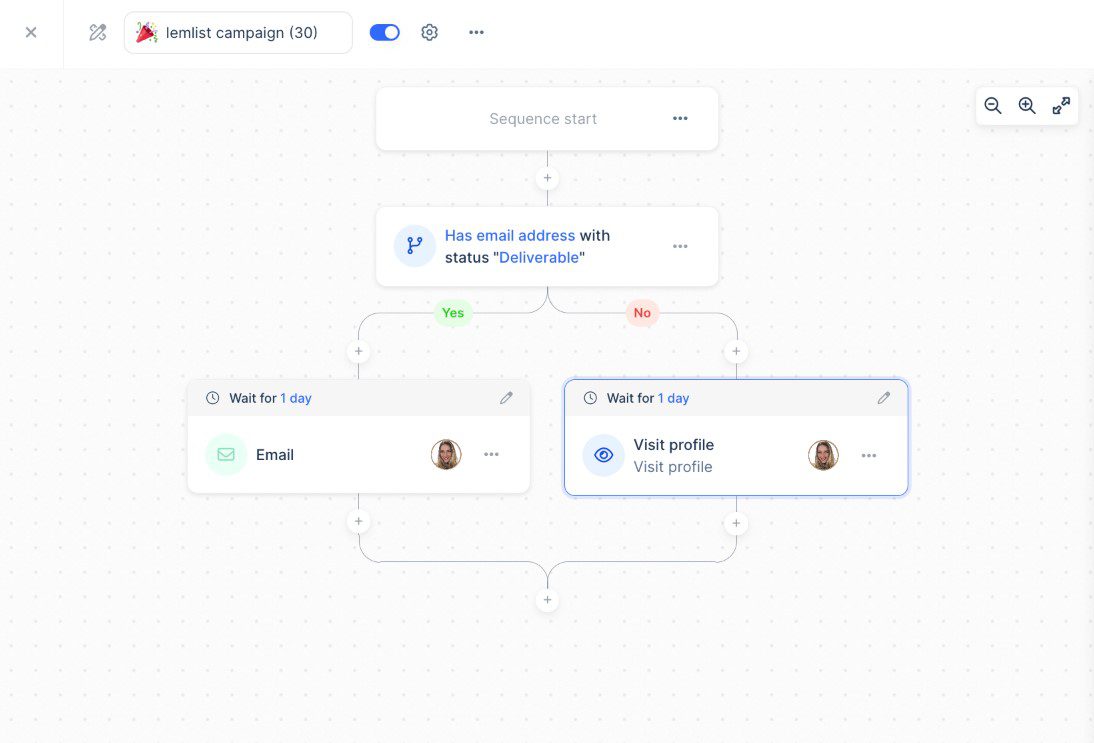
User score: ⭐ 4.5 / 5
Lemlist is a cold email software with advanced personalization capabilities. However, higher-tiered plans turn it into a multichannel platform.
Key features
We tested Lemlist’s most expensive plan. Therefore, we could create multichannel sequences combining email, LinkedIn, and cold calls. Additionally, conditions can be added to sequences to cover multiple outreach scenarios.
But what the software is best known for is its personalization features. Specifically, using Lemlist, users can customize images, intro lines, and even create dynamic landing pages.
Lemlist also offers Lemwarm, a built-in email warm-up tool that’s meant to keep emails out of spam folders.
To aid lead generation, Lemlist includes an email finder and verifier, as well as access to a B2B lead database with over 450M contacts.
Pros
- Supports multichannel outreach with LinkedIn actions and calls.
- Advanced personalization features, including custom images and dynamic landing pages.
- Lemwarm email warm-up tool to enhance deliverability.
- B2B lead database with as much as 450M contacts.
Cons
- Limited email discovery and verification, even with the highest-tier plan. Additional credits cost extra ($1 for every 100 emails found and verified).
- The quality of leads in the B2B database is inconsistent, as we found.
- For those who’d like to go beyond their lead database, the tool offers a Chrome extension for LinkedIn prospecting. This disappointed us, though, as using Chrome extensions on LinkedIn can lead to account restrictions.
- Cannot connect unlimited email accounts. Namely, the highest-paid plan lets you connect up to 15 mailboxes maximum.
Pricing
| Free | |
| Email Starter | $39/mo per user *1 mailbox |
| Email Pro | $69/mo per user *up to 3 connected mailboxes |
| Multichannel Expert | $99/mo per user *up to 5 connected mailboxes |
| Outreach Scale | $159/mo per user *up to 15 connected mailboxes |
Expert opinion
‘’Lemlist is better than many other tools because it gives you the tools to actually be unique and send emails in a slick manner. I WISH WISH WISH they had unlimited email accounts. That's the only thing I don't like about it, it caps you at 5 email accounts (15 with the pro plan).’’
—Zach Y., Founder
6. Reply.io - Best for AI sales engagement
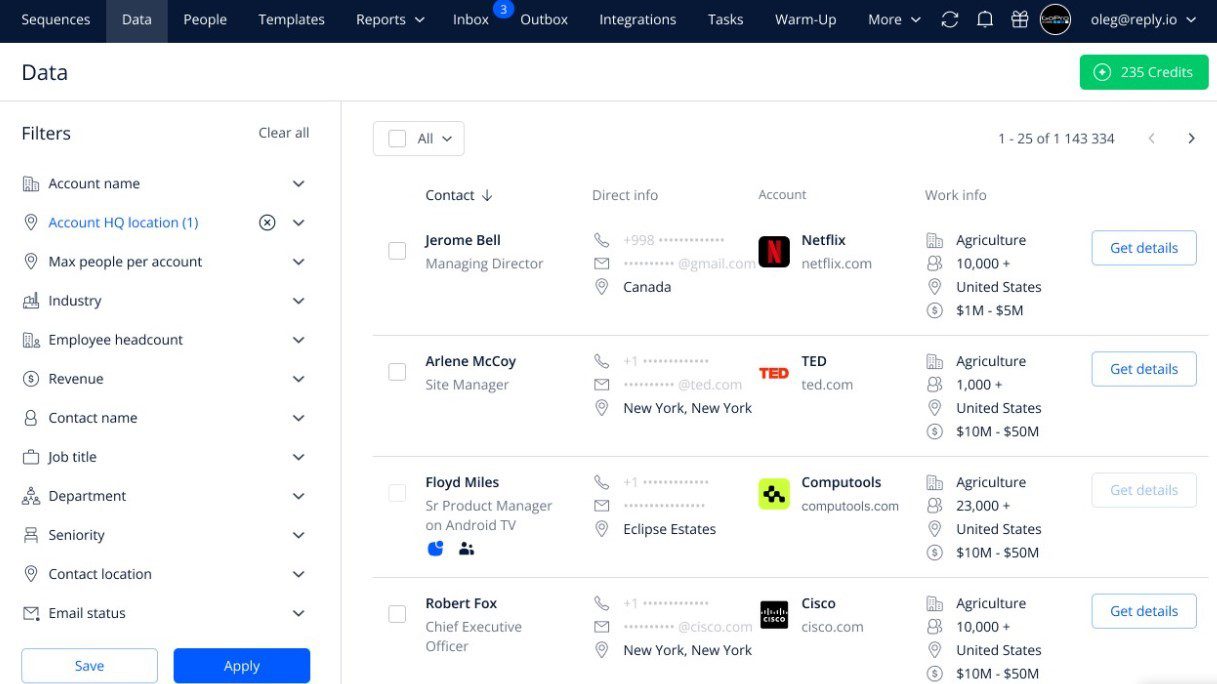
User score: ⭐ 4.5 / 5
Reply.io is a versatile sales engagement platform built for teams who prefer handling their entire outreach in one place.
Key features
Although primarily a cold email software, over the years, Reply.io has turned into a multichannel platform. That said, you can use it to create sequences with conditional logic that combine emails with automatic and/or manual LinkedIn actions.
Email-wise, we loved that, much like with Skylead, Smartlead, and Instantly, we could connect unlimited mailboxes to the tool, and it would later auto-rotate through these while sending emails. There’s also no cap on how many emails you can send monthly.
Moreover, each Reply.io user gets free access to Mailtoaster.ai for email warm-up.
In terms of integrations, the software natively integrates with some of the best CRM for sales, HubSpot and Pipedrive. Nonetheless, the support for 3rd party integrations via Zapier webhooks is there as well.
We found their Analytics dashboard intuitive and noticed that it contains a lot more details than some other sales outreach tools.
The newest addition to Reply.io is Jason, their AI SDR agent who finds leads, creates outreach sequences, personalizes interactions, automatically replies, and books meetings.
They also provide a sales AI chatbot to turn website visitors into traffic, although we haven’t tried this feature and can’t objectively rate it.
Pros
- Support for multichannel outreach combining email and LinkedIn tasks.
- Unlimited mailboxes and inbox rotation.
- Free Mailtoaster.ai seat for email warm-up.
- Native integrations with HubSpot and Pipedrive.
- AI SDR Jason for automated prospecting and engagement.
- Detailed analytics dashboard for performance tracking.
Cons
- AI SDR Jason requires an additional subscription. Moreover, the price heavily depends on the number of active contacts. Moreover, it’s not as advanced and certainly can’t replace human SDRs, as they claim.
- Full access to their +1M B2B lead database requires a separate subscription, and so does the AI chatbot.
- Chrome extension (Findy) to find leads directly on LinkedIn can cause account restrictions,.
- Message personalization is scarce (despite AI assistance), and the option for image and GIF personalization is lacking.
Pricing
Reply.io has 4 main pricing plans, whereas multiple sub-plans are available.
| Sales Engagement plans | |
| Email Volume | $59/mo per user |
| Multichannel | $99/mo per user |
| Agency | Starts from $210/mo |
| Live Data plans *Give access to the B2B lead database | |
| Free *With 50 live data credits | |
| Pro | Starts from $39/mo for 200 live data credits |
| AI Chat plans | |
| Free *10 conversations handled by AI | |
| Volume-based | Starts from $49.50/mo for 150 conversations handled by AI |
In the meantime, if you’d like to use their AI SDR agent, expect to pay $299 for 1,000 active contacts a month. However, if your needs exceed this, the price can easily skyrocket as it’s volume-based.
Expert opinion
‘’Reply is very easy to use, with a straightforward UX design and plenty of features for base-level users like me. I started using Reply for outreach campaigns in my role, and getting over the learning curve was a cinch. Unfortunately, as I'm writing this, Reply does not have a direct integration with Microsoft Outlook, which might inhibit some of my use cases.’’
—Ian L, Customer Success Manager
7. Expandi - Best for ESP integration
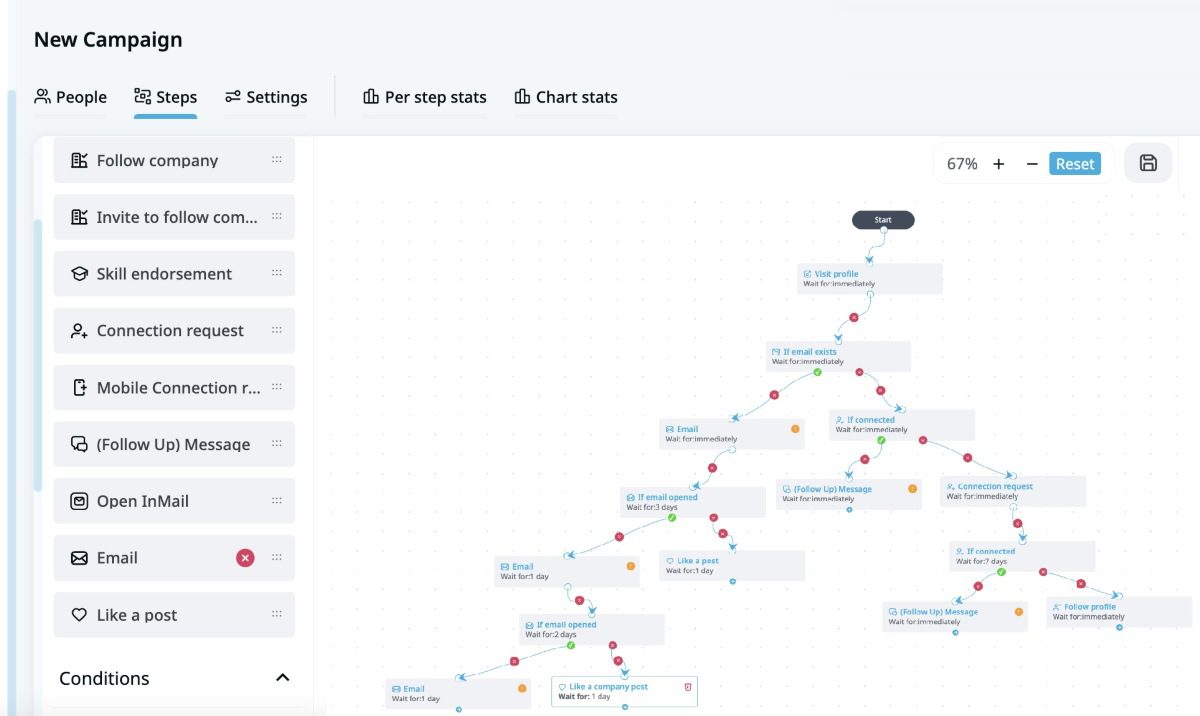
User score: ⭐ 4.3 / 5
Expandi is a cloud-based LinkedIn automation tool that also extends its capabilities to the email channel.
Key features
As opposed to Reply.io, Expandi was originally a LinkedIn automation tool that added the email channel into the mix. Thus, now, you can use it to create Smart sequences combining LinkedIn messages, inMails, and emails in a single workflow.
While testing Expandi, we were pleasantly surprised to find out that the tool lets you connect all email accounts, whether from major ESPs (Gmail, Outlook) or a custom SMTP.
Personalization-wise, this software comes with predefined variables, though you can also add your own. Additionally, provided you pay for Hyperise, you can even enrich your emails with personalized images and GIFs thanks to their direct integration.
Finally, if you wish to connect Expandi with other tools, the good news is that you can do so through Zapier webhooks or API.
Pros
- Smart sequences for multichannel outreach.
- Predefined and custom variables for message personalization.
- Integrates with major ESPs like Gmail and Outlook, as well as custom SMTP.
- Zapier webhooks for third-party integrations.
Cons
- Focused more on LinkedIn, with basic support for email automation.
- You can connect 1 mailbox at a time. We found this rather limiting.
- 100 emails a day sending limit.
- Expandi doesn’t have an email warm-up feature, nor does it offer it through a partner.
- The tool can’t discover and verify leads’ emails. It can only scrape publicly available emails on LinkedIn and only if you’re connected with someone.
- Image and GIF personalization, while there, is possible thanks to Expandi’s integration with Hyperise. Thus, it costs extra. Moreover, our impression is that it’s inconvenient to use.
- The UX is confusing, which is especially noticeable during the campaign creation.
Pricing
Expandi, like Skylead, has a single plan that will set you back $99 a month per seat.
Nonetheless, if you want to combine it with Hyperise, count on paying an additional $69 a month. This brings the total cost to $168 per 1 seat. For this reason, certain Expandi alternatives are proving to be better cold email software.
Expert opinion
‘’Great automation for LinkedIn. Easy UX. Constant webinars to learn. Tons of new features are always being added. Email outreach is very limited, though. I cannot see if the lead booked a meeting on a calendar to trigger enrollment - if they had this, I would use it for email as well.’’
—Jacob M., SDR
8. Hunter.io - Best for email discovery and verification
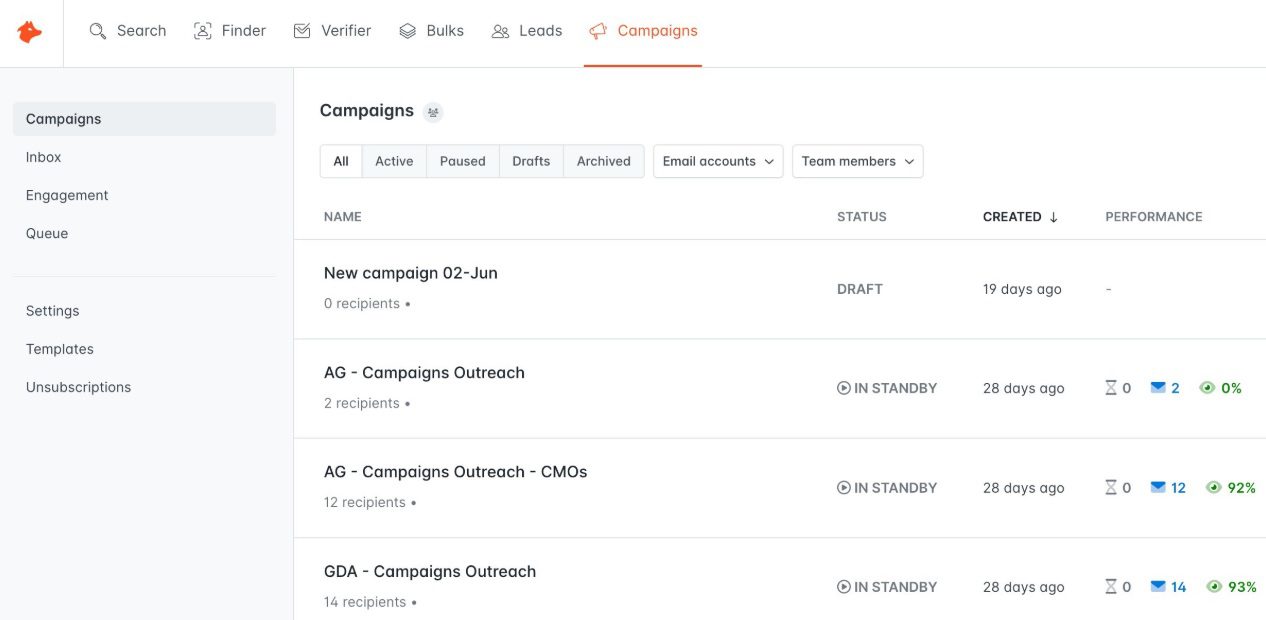
User score: ⭐ 4.4 / 5
Hunter.io is a popular email discovery tool. Nonetheless, it has expanded its services to include cold email outreach capabilities through its Campaigns feature.
Key features
Hunter.io's strength lies in its ability to discover and verify email addresses associated with specific domains or individuals.
However, with the introduction of Hunter Campaigns, users can now create and manage simple cold email campaigns directly within the platform. This feature supports personalized email sequences with automated follow-ups. It also integrates seamlessly with Gmail, Outlook, and custom SMTP.
The number of mailboxes you can connect to Hunter.io depends on the plan. Nonetheless, all plans support mailbox rotation.
Moreover, we couldn’t help but notice how simple Hunter Campaigns are to use. Not to mention, you get access to the Reports page to track your campaign performance.
For integrations, Hunter supports Zapier webhooks and has a public API, making it easy to connect with other tools in your tech stack.
Pros
- Great email discovery and verification capabilities.
- Direct Gmail and Outlook integration for sending emails.
- User-friendly interface suitable for beginners.
- Free plan available for users with limited needs.
Cons
- Email outreach features are scarce compared to other cold email software.
- Email sequences are basic and lack if/else conditions.
- No built-in email warm-up feature.
- Limited email discovery and verification credits. It’s possible to purchase more, though the exact rate varies by plan. Moreover, the tool, while accurate, isn’t as successfully at finding and verifying emails as Skylead.
- Theoretically, you could connect unlimited mailboxes to the tool. However, this would cost you $10 for each additional mailbox, which is a con if you ask us.
Pricing
Hunter Campaigns is available under all 5 paid plans.
| Free *1 mailbox, 25 email discovery & 50 verification credits | |
| Starter | 49€/mo per account *3 mailboxes, 500 email discovery & 1,000 verification credits |
| Growth | 149€/mo per account *10 mailboxes, 5,000 email discovery & 10,000 verification credits |
| Business | 499€/mo per account *20 mailboxes, 50,000 email discovery & 100,000 verification credits |
| Enterprise | Contact sales |
Expert opinion
‘’Email verifier and Email finder come in very handy whenever I upload bulk leads. Also, the option to follow up in the same thread just by keeping the subject line blank is something I like. There are a few downsides. First up, the UX could be far better, it takes a while to find simple options like cloning the campaign. Moreover, the follow-up frequency is confusing- it never shows you the date of sending. All the sent mails are also visible in my gmail sent-box.’’
—Vinayak H., Product Marketing Associate
9. Saleshandy - Best cold email software for email tracking
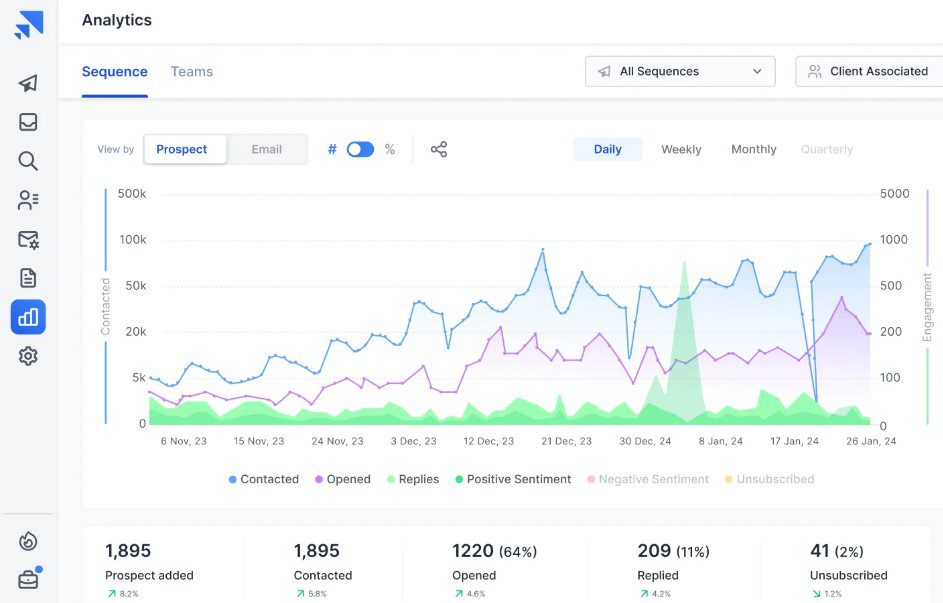
User score: ⭐ 4.4 / 5
Saleshandy is a go-to tool for anyone who values unlimited email capabilities and reliable campaign tracking capabilities.
Key features
Saleshandy is considered one of the best cold email software because it allows for unlimited email accounts, sequences, and email tracking.
The tool also offers email warm-up through its partner, TrulyInbox. However, the daily warm-up limit varies by plan. We also didn’t find it to be very reliable during our testing since our emails landed in spam, regardless.
Additionally, Saleshandy includes email discovery and verification, as well as mailbox rotation.
Meanwhile, direct integrations with CRMs like HubSpot, Pipedrive, and Salesforce allow seamless workflow automation.
The platform also offers A/Z testing and detailed email performance analytics to help users optimize their campaigns.
Pros
- Unlimited email accounts, sequences, as well as email tracking.
- Email warm-up through TrulyInbox integration.
- Mailbox rotation to send more emails daily.
- Direct CRM integrations with HubSpot, Pipedrive, and Salesforce.
Cons
- The number of active prospects is limited by plan, and so is the number of emails sent monthly.
- We realized their ‘’unlimited mailboxes’’ claim isn’t exactly true because you can use a maximum of 50 mailboxes per campaign. And that’s with the highest subscription!
- Email discovery and verification credits aren’t unlimited, either, as is the case with Skylead. Instead, credits are capped by the plan.
- The subscription also determines the number of warm-up emails exchanged daily.
Pricing
Saleshandy offers 4 email outreach plans.
| Outreach Starter | $36/mo per account *2,000 active prospects & 6,000 monthly emails, 100 warm-up emails a day, 1,100 verification credits |
| Outreach Pro | $99/mo per account *30,000 active prospects & 100,000 monthly emails, 1,000 warm-up emails a day, 4,000 verification credits |
| Outreach Scale | $199/mo per account *60,000 active prospects & 200,000 monthly emails, 3,000 warm-up emails a day, 12,000 verification credits |
| Outreach Scale Plus | Starting at $299/mo per account *up to 500,000 active prospects & 1,500,000 monthly emails, 6,000 warm-up emails a day, 55,000 verification credits |
Expert opinion
‘’The price is very reasonable and has many features like unlimited email warm-up, email automation, analytics, and many more. I hope there will be some improvement in email warm-up features in the future.’’
—Shamim Ahmed A., SDR
10. Snov.io - Best for its real-time sentiment analysis
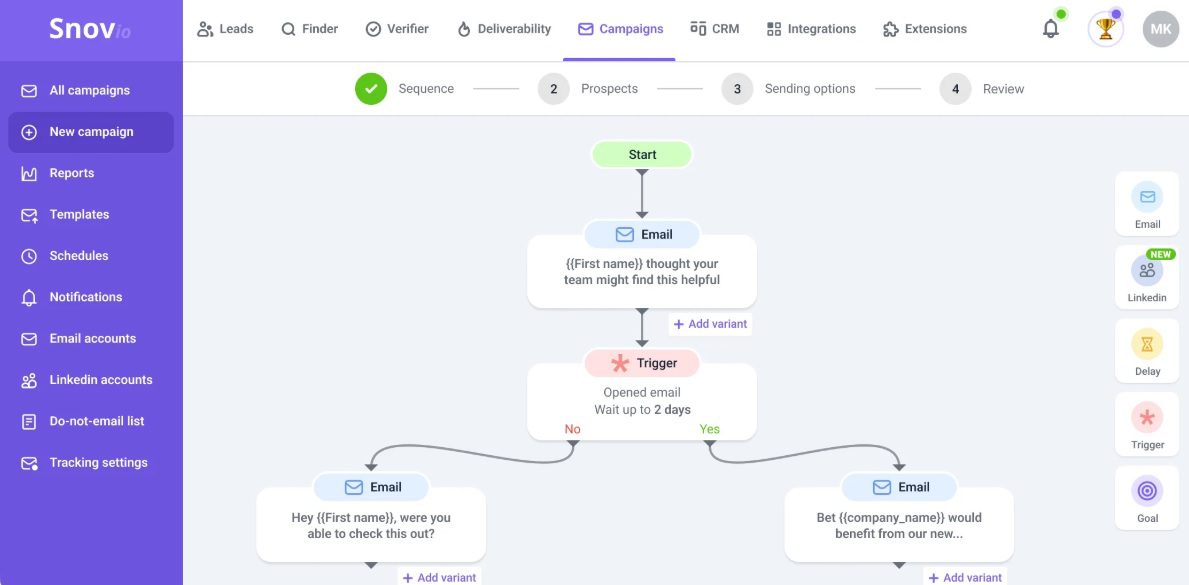
User score: ⭐ 4.7 / 5
Snov.io is a sales engagement platform rather than merely a cold email software. It’s meant to help you automatically find leads and reach out to them to close more deals in less time.
Key features
Snov.io’s email campaigns are enhanced by smart triggers that adapt based on recipient behavior. The platform also has an A/B testing feature, which lets you experiment with multiple variations of your subject lines and email bodies.
One feature we really liked is the AI sentiment analysis, which detects a lead’s interest level in real-time and suggests how to adjust messaging.
If you're interested in using multiple channels for your outreach, the good news is that Snov.io even offers an optional LinkedIn automation add-on. However, we were surprised to find it costs extra.
Additionally, Snov.io, much like Skylead, Smartlead, Instantly, and similar tools, allows you to connect unlimited mailboxes. Similarly, it supports unlimited mailbox rotation.
The platform also includes email discovery and verification and directly integrates with HubSpot, Pipedrive, and Calendly.
Finally, it has built-in email warm-up, email tracking (for Gmail), and deliverability testing features.
Pros
- Unlimited mailboxes with rotation.
- Built-in email warm-up to improve sending reputation.
- AI-driven sentiment analysis for real-time adjustments.
- Native integrations with HubSpot, Pipedrive, and Calendly.
- Multichannel support with LinkedIn touches (via paid add-on).
Cons
- LinkedIn automation, while there, requires an additional fee.
- Slight learning curve due to the platform's broad range of features.
- Limited email discovery and verification credits.
- The Starter plan lets you warm up up to 3 mailboxes.
- Given that the Pro plan has volume-based pricing, the cost can easily skyrocket.
Pricing
| Starter | $39/mo per seat *1,000 verification credits & 5,000 email recipients |
| Pro | $99 / $189 / $369 / $738/mo per seat *Depends on the number of email recipients and verification credits |
The add-on for LinkedIn automation costs an extra $69 a month per account.
Expert opinion
‘’Reliable outreach and research tool. I like the efficiency and speed of searching and validating emails, ease of use, and customer support. However, lots of emails are not really in the database. There’s also a lack of detailed statistics and dark mode.’’
11. Klenty - Best cold email software for video personalization
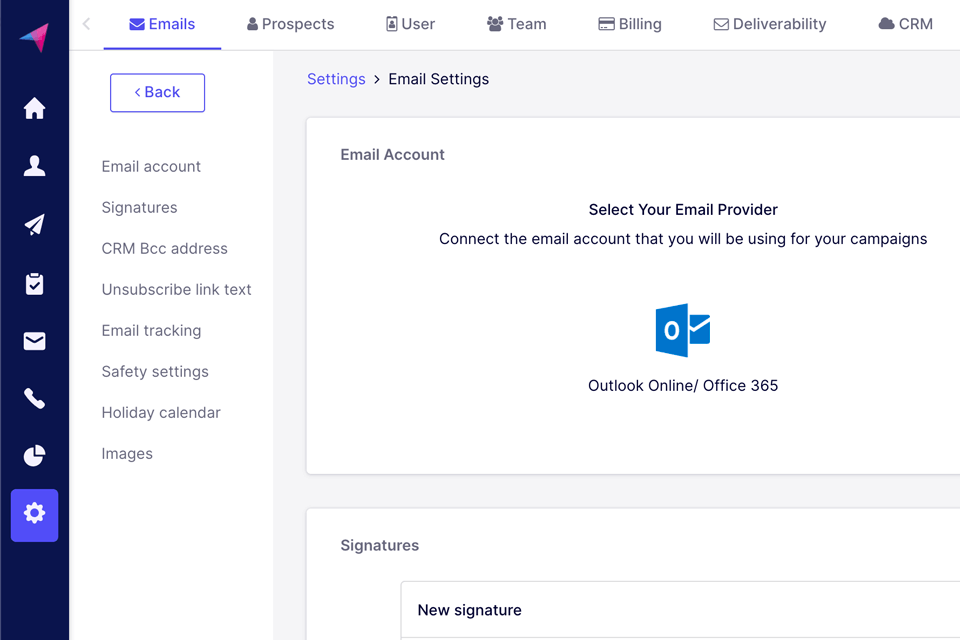
User score: ⭐ 4.7 / 5
Klenty is a cold email automation platform that helps sales teams hyper-personalize their outreach.
Key features
While testing Klenty, we were really impressed with their Liquid email templates. These templates use dynamic formulas to automatically adjust email content based on when prospects receive or open your emails. As a result, they make each touchpoint feel extra personalized.
And if plain text isn’t cutting it, Klenty lets you take it a step further with video personalization. Namely, you can embed videos into your emails with custom elements to further stand out.
We also appreciated Klenty’s flexibility when it comes to sequencing. You can reorder steps, adjust delays, and even clone successful sequences to save time and replicate winning campaigns.
Klenty also provides deliverability insights to help you understand how many emails land in the primary inbox, like a warm-up tool that you can use with Skylead.
Additionally, the tool includes email verification, supports unlimited mailboxes with inbox rotation, and has email tracking to keep you informed about engagement levels.
Lastly, the platform can be integrated with other software via API or Webhooks.
Pros
- Liquid email templates for advanced personalization.
- Video personalization to stand out in inboxes.
- Flexible email sequencing.
- Detailed deliverability insights to optimize campaigns.
- Email discovery and verification based on prospects’ name and company domain.
- Integrations via API and Webhooks.
Cons
- No monthly pricing plans; only quarterly or annual payments are available.
- LinkedIn automation, albeit there, relies on a Chrome extension, rendering it unsafe.
- If your bounce rate is high (which can happen if you’re using their tool to verify emails, as we experienced), the campaign won’t automatically stop.
- You can connect unlimited mailboxes to the tool, as we discovered, only if they share the same domain. You can add more domains if you’d like, but only if you pay an additional $30 per domain.
- There are no 1-on-1 onboarding calls. And seeing that the platform isn’t easy to navigate, this is definitely a disadvantage.
Pricing
Klenty only has quarterly and annual plans, with the latter being up to 20% cheaper.
That being said, there are a total of 3 pricing plans available.
| Startup | $60/mo per seat *billed quarterly |
| Growth | $85/mo per seat *billed quarterly |
| Pro | $125/mo per seat *billed quarterly |
Expert opinion
‘’I liked the ability to run campaigns through Klenty using salesforce data. However, I didn’t like that Klenty does not automatically stop a campaign if an email is bouncing.’’
—Matthew D., Distribution Manager
12. Woodpecker - Best for teams prioritizing email deliverability
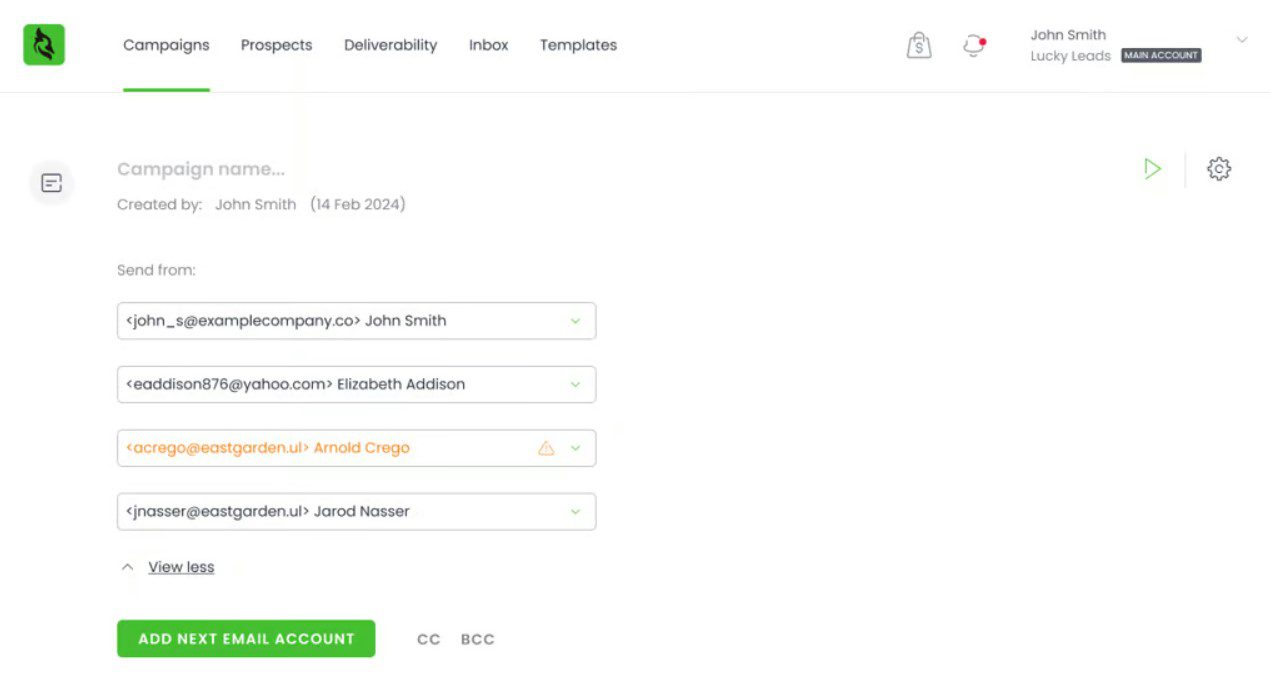
User score: ⭐ 4.7 / 5
Woodpecker is a cold email software designed to maintain optimal email deliverability.
Key features
Woodpecker is best known for its focus on email deliverability. The platform includes a built-in email warm-up feature, auto-reply detection, and email verification (powered by Bouncer), which ensures your emails avoid the spam folder.
The tool also supports A/B testing, allowing you to experiment with up to 5 variations of subject lines and email content.
The good news for teams managing multiple email accounts is that Woodpecker also offers unlimited mailbox connections with auto-rotation to spread your sending load and protect your domain.
It also fits right into your tool stack through native integrations with HubSpot and Pipedrive, along with Google Sheets and Calendly.
Speaking of integrations, it can be expanded into a multichannel outreach platform through the integration with Dux-Soup, a LinkedIn automation tool.
Pros
- Built-in email warm-up for improved deliverability.
- Auto-reply detection to better manage follow-ups.
- Unlimited mailboxes with auto-rotation.
- Integrates directly with popular CRMs, plus Google Sheets and Calendly.
Cons
- The subscription limits the number of prospects you can contact, and costs can escalate quickly if you need to scale.
- The number of mailboxes you can warm up, and emails you can send monthly is capped. Unless you’re paying for the highest subscription.
- No built-in LinkedIn automation.
Pricing
Woodpecker offers 4 plans, albeit pricing depends on the number of contacted prospects, mailboxes warmed up, and emails sent.
That said, prices start from:
| Starter | $29/mo *For 500 contacted prospects, 2 warm-ups, 6,000 emails sent |
| Growth | $84/mo *For 3,000 contacted prospects, 8 warm-ups, 36,000 emails sent |
| Scale | $188/mo *For 10,000 contacted prospects, 20 warm-ups, 120,000 emails sent |
| Max | $9,999/mo *Unlimited prospects, warm-ups, emails sent |
Expert opinion
‘’Over the years, I have used all the major players, from the large SEPs to platforms with similar functionality and costs to Woodpecker. Woodpecker stands out for me due to the fundamental fact that it has deliverability at the forefront of everything it does. Nonetheless, the Hubspot integration is basic and does not allow activity tracking at the contact level. Moreover, the warm-up feature is new and works, but it needs more ability to monitor and control settings.’’
—Oliver K., Head of Sales Development
13. Mailshake - Best for its AI email writer SHAKEspear
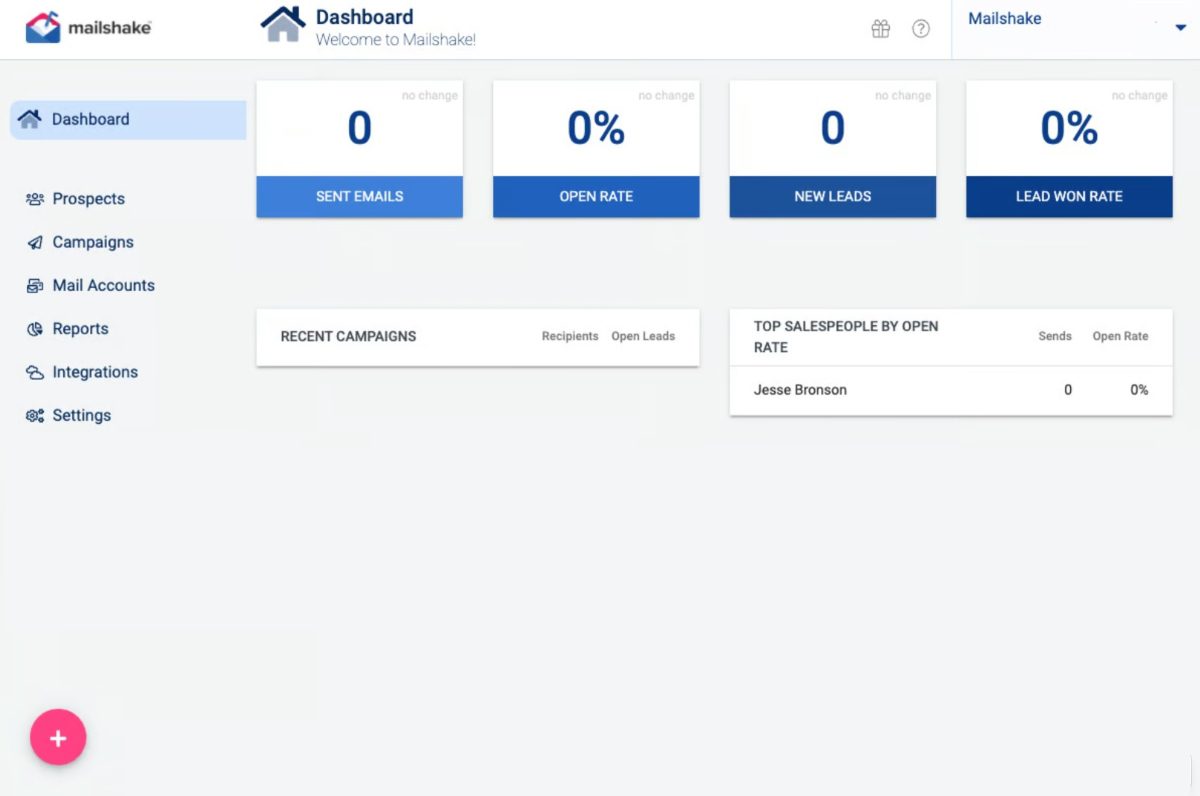
User score:⭐ 4.7 / 5
Mailshake is a cold email software with support for multichannel outreach.
Key features
One of Mailshake’s unique selling points is SHAKEspeare AI Email Writer, which is included for free with every account. Its job is to help you write personalized emails at scale.
However, using Mailshake, you’re not limited to automating cold email outreach only. The tool supports outreach via multiple channels (LinkedIn and phone), although only under its Sales Engagement plan. This means you can seamlessly switch between email, LinkedIn, and direct calls within the same sequence. Still, these sequences are simple, as opposed to Skylead’s Smart sequences.
The platform also offers unlimited email warm-ups and mailbox rotation for better deliverability. Moreover, we found its A/B testing to be particularly helpful for testing different variations of messaging.
Finally, the tool integrates directly with Salesforce, Pipedrive, and HubSpot and supports over 1,000 additional integrations via Zapier webhooks. Therefore, it’s rather easy to fit into your workflow.
Pros
- SHAKEspeare AI Email Writer is included for free.
- Unlimited email warm-ups and mailbox rotation for improved deliverability.
- A/B testing to keep track of what’s working, as well as what’s not.
- Direct integrations with Salesforce, HubSpot, and Pipedrive.
- Supports more than 1,000 integrations via Zapier webhooks.
Cons
- SHAKEspear AI, though useful, can be easily replaced with Chat GPT for sales copywriting.
- The Starter plan doesn’t support multichannel outreach.
- There is no built-in email verification (you’ll need a 3rd-party tool).
- You can connect up to 5 mailboxes maximum. And that’s only if you’re subscribed to their most expensive Sales Engagement plan. Other than that, you’re left to work with only 2 email accounts.
- LinkedIn automation operates through a Chrome extension.
- Analytics can be hard to comprehend, in our opinion.
- Frequent bugs.
- Annual billings only and no free trial.
Pricing
| Email Outreach | $59/mo per seat *billed annually |
| Sales Engagement | $99/mo per seat *billed annually |
Expert opinion
‘’Easy to get started and use, high deliverability, and great customer support team. Several cons are limited analytics, the fact that you can't create bespoke email sequences based on an action (e.g., a click,) and you can't upload lists for bulk deletion.’’
14. Outreach.io - Best for enterprise-level sales engagement
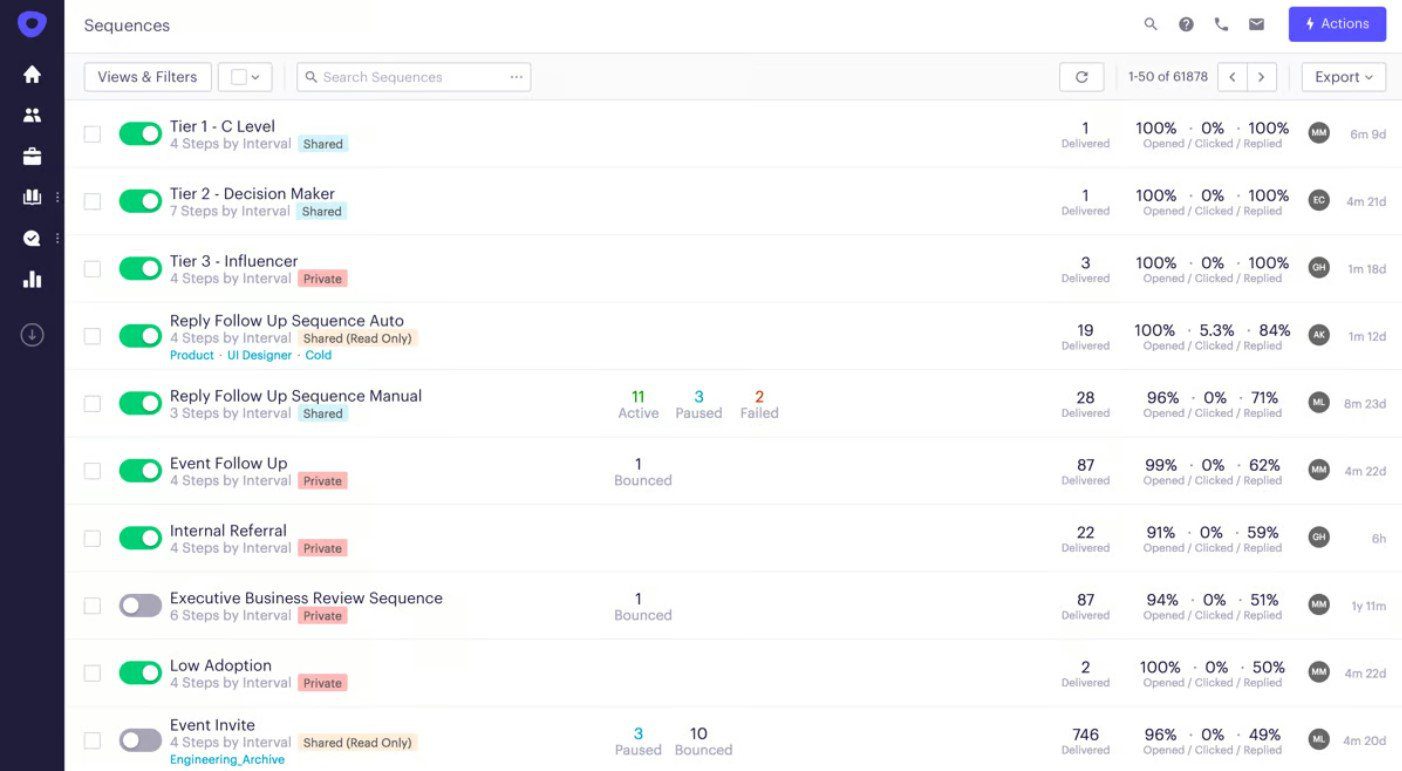
User score: ⭐ 4.4 / 5
Outreach.io is a sales execution platform built for larger teams looking to scale their prospecting and closing efforts.
Key features
Outreach.io goes beyond your regular cold email software. In fact, it’s a full-fledged platform that you can use to engage prospects through email, phone, and Sales Navigator—all from one place. Moreover, its smart automation features make it easy to schedule, track, and analyze sequences for maximum efficiency.
While exploring the tool, we really liked its AI-powered insights, which provide recommendations for the best times to engage with prospects and suggest improvements to your messaging based on past performance. Additionally, Outreach.io’s predictive analytics help sales teams identify high-potential leads, forecast outcomes, and focus their efforts on deals most likely to close.
The platform also includes CRM integrations with Salesforce and HubSpot.
Not to mention, Outreach.io’s reporting and analytics capabilities provide a detailed overview of sequence performance to help teams optimize their outreach strategies.
Pros
- Multichannel engagement through email, phone, LinkedIn, and more.
- AI-powered insights for improving outreach strategy.
- Seamless integrations with Salesforce and HubSpot.
- Advanced reporting and analytics for performance tracking.
- Enterprise-grade scalability for large sales teams.
Cons
- Outreach.io lacks many features found in the best cold email software. This includes email warm-up, email discovery and verification, and inbox rotation.
- It’s impossible to connect more than 2 mailboxes to the tool.
- Pricing is on the higher end, making it less accessible for smaller teams.
- Steeper learning curve compared to simpler cold email tools.
- The integration with HubSpot doesn’t work very well.
Pricing
Outreach.io doesn’t publicly disclose its pricing. What we can tell you, though, is that connecting even 1 email account is expensive, way past $100 per email account. Moreover, there’s no monthly subscription, only annual, and they have no free trial.
Expert opinion
‘’It makes it very easy to manage a lot of prospects and keep track of who is being reached out to. I like that it enables you to be flexible and set up a lot of integrations. There are some functionalities that don't work as well as they should. For example, being able to edit steps of a sequence when emailing, having a small drafting window, and syncing activity.’’
—Benjamin S., Owner
15. QuickMail - Best for its customizable Analytics
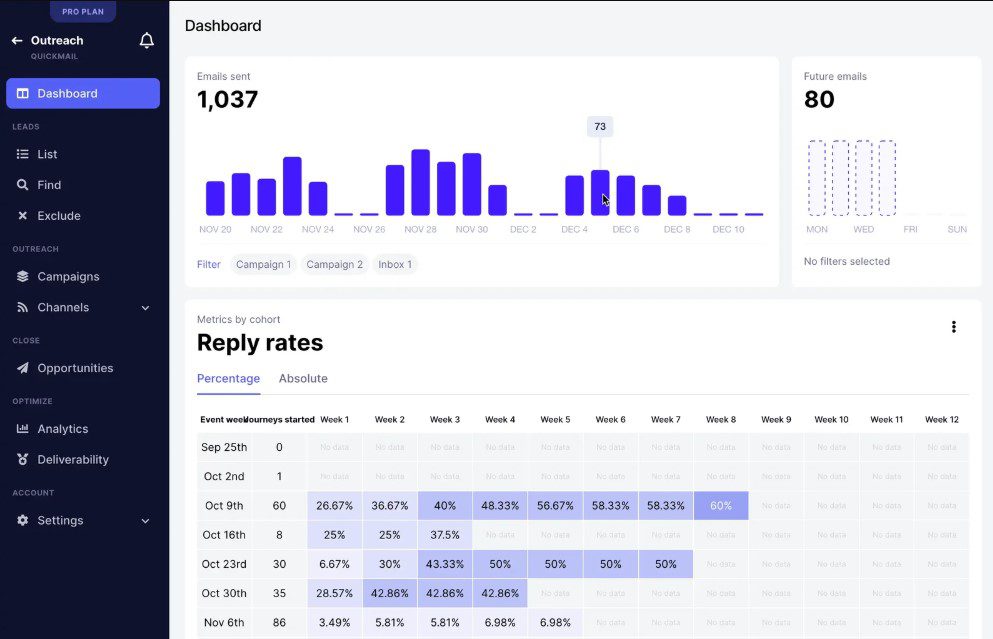
User score: ⭐ 4.7 / 5
QuickMail is one of the best cold email software that stands out for its customizable Analytics dashboard.
Key features
Every QuickMail account includes free email warm-up via MailFlow to help keep emails out of spam folders.
The platform also supports LinkedIn outreach (through a Chrome extension) via multiple LinkedIn accounts, as well as inbox rotation for email, which evenly distributes email loads across multiple inboxes to protect your domain.
Speaking of multiple inboxes, QuickMail allows you to connect up to 50 mailboxes on the highest subscription plan.
Moreover, it integrates with Hyperise to add custom images or GIFs to your emails. The option to customize the Analytics dashboard any way you look is another nice touch, in our opinion.
Finally, the software integrates directly with HubSpot and Pipedrive, supports Zapier for additional workflows, and allows you to import prospects from Google Drive or CSV files.
Pros
- Free email warm-up via MailFlow is included with every account.
- Inbox rotation to protect your domain.
- Customizable analytics dashboards.
- Native CRM integrations with HubSpot and Pipedrive, plus 3rd-party integrations via Zapier.
Cons
- Email verification is available through 3rd-party integrations and costs extra.
- LinkedIn outreach relies on a Chrome extension and requires higher subscriptions.
- Image and GIF personalization is outsourced through Hyperise, as is the case with Expandi. Thus, it costs extra.
- Limited to 50 mailboxes on the highest subscription.
- Capped monthly email sends and active prospects.
- The tool isn’t the simplest to set up.
Pricing
QuickMail has 2 plan types: Single & Agency.
| Single Basic Plan | $49/mo for 1 LinkedIn account and 5 mailboxes |
| Single Pro Plan | $89/mo for 5 LinkedIn accounts and 20 mailboxes |
| Single Expert Plan | $129/mo for 15 LinkedIn accounts and 50 email addresses |
| Agency Basic Plan | $399/mo |
| Agency Pro Plan | $599/mo |
| Agency Expert Plan | $799/mo |
Expert opinion
‘’All you have to do is write email copies and build prospect lists and Quickmail manages everything else such as inbox rotation and measurement of the campaign's results along with recommendations. Nonetheless, Quickmail is difficult to setup in the very beginning and would require some assistance if your team is not very technical.’’
—Nico Chiong M., Marketing Manager
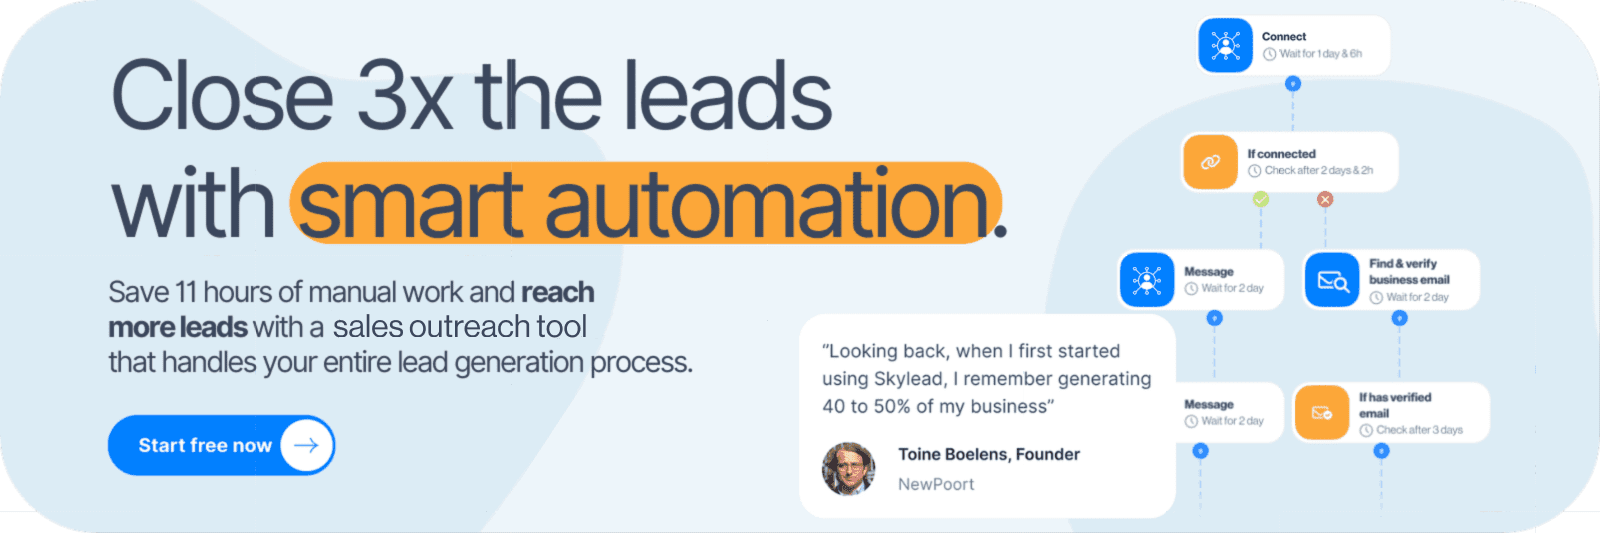
16. Close - Best for its CRM with basic cold email functionalities
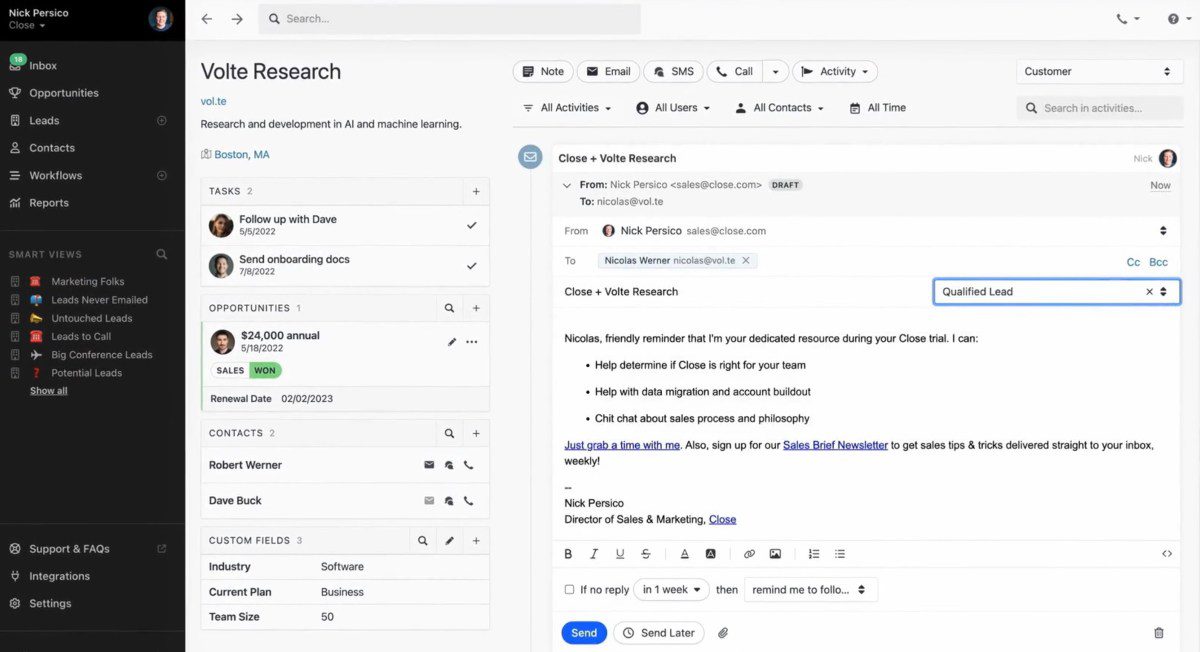
User score: ⭐ 4.7 / 5
Close is primarily a CRM but comes with built-in cold email functionalities.
Key features
Close simplifies email outreach by integrating it directly into its CRM. With it, you can create and use email templates and schedule emails with follow-up reminders to ensure timely communication with prospects.
On top of automating workflows, you can use Close to send bulk emails to multiple recipients at once. Additionally, the tool allows teams to create and share email snippets with each other.
Close supports A/B testing for subject lines and email bodies, much like many other cold email software on the list.
You can also track performance through the Sent Email Report page, which provides insights into open rates, click rates, and more.
Close integrates with HubSpot, Calendly, ChatGPT, and many others, making it a good choice for sales teams with extensive tool stacks.
Pros
- Combines CRM and cold email functionalities in one platform.
- Built-in A/B testing for subject lines and email content.
- Sent Email Report for performance tracking.
- Bulk email sending with team-wide email snippet sharing.
- Extensive integrations, including HubSpot, Calendly, and Chat GPT.
Cons
- Primarily a CRM, meaning the email functionalities are not be as advanced as in standalone cold email software.
- Bulk email sending lacks more sophisticated automation features like smart sequences.
- No email warm-up feature.
- No inbox rotation.
- Lacks advanced personalization features, like image and GIF personalization.
Pricing
| Startup | $59/mo per user |
| Professional | $109/mo per user |
| Enterprise | $149/mo per user |
Expert opinion
‘’I love how easy it is to use Close. I had never used it before in my current role, and it has been very simple to learn. I have found it's not as easy to create templated emails as I would like, and it's harder to include attachments in emails, though.’’
—Brianna G., Account Executive
17. Yesware - Best for automating cold email campaigns straight from your inbox
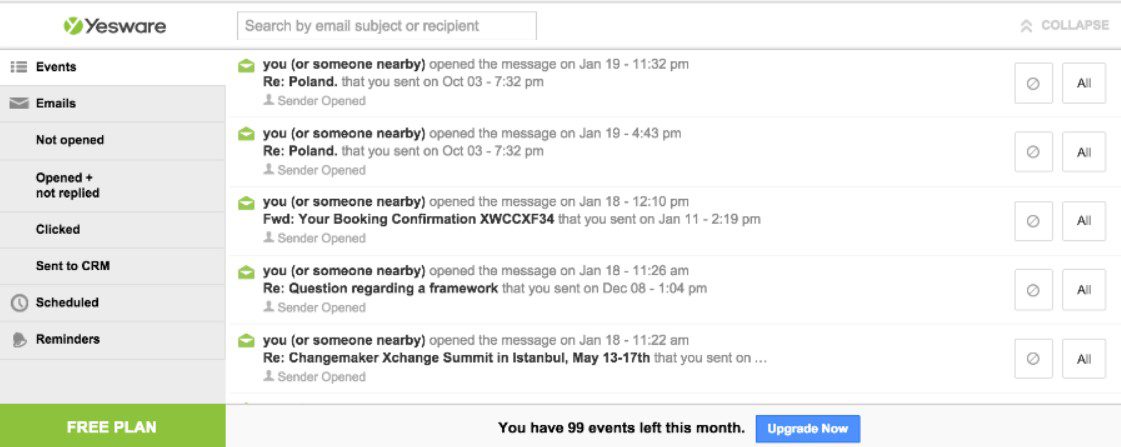
User score: ⭐ 4.4 / 5
Yesware is a cold email software with direct Gmail and Outlook integrations.
Key features
Yesware integrates directly into Gmail and Outlook through a Chrome extension. Once installed, you can send emails as usual while benefiting from Yesware’s tracking and engagement tools.
Moreover, Yesware enables users to create automated follow-up sequences to stay top-of-mind with prospects who don’t reply. The tool also supports multichannel campaigns that combine emails, calls, and social touches.
The platform offers email templates that can be personalized and saved for future use. You can also use placeholders (a.k.a. variables) to personalize emails at scale.
The email tracking feature notifies you when recipients read your emails, click on links, or view attachments, allowing you to focus on the most engaged prospects. Meanwhile, the Analytics dashboard gives you a weekly overview of your email performance.
Additionally, Yesware includes a B2B contact database with over 100M contacts for lead generation. However, this feature comes at an extra cost.
Pros
- Direct integration with Gmail and Outlook through a Chrome extension.
- Pre-defined email templates..
- Automated follow-ups for improved prospect engagement.
- Multichannel campaign support with emails, calls, and social touches.
- Detailed email tracking and engagement history for each contact.
- Weekly performance insights through Analytics dashboard.
Cons
- Does not track email deliverability rates.
- The B2B contact database is a paid add-on.
- Lacks email warm-up feature.
- Limited to Gmail and Outlook users.
- We noticed that Yesware is often buggy.
- The interface looks very outdated if you ask us.
Pricing
Yesware has a free plan that offers basic functionalities.
Meanwhile, there are a total of 4 paid plans:
| Pro | $19/mo per seat |
| Premium | $45/mo per seat |
| Enterprise | $85/mo per seat |
| Custom Plan | Contact sales |
Expert opinion
‘’Yesware makes it easier for me to track my emails and it also scans for viruses when I try to upload any files. The UI can be better. I mean, seriously, tools like Mailchimp have a much better UI.’’
—Johnson T., Senior Account Executive
18. HubSpot Sales Hub - Best for its connection to HubSpot
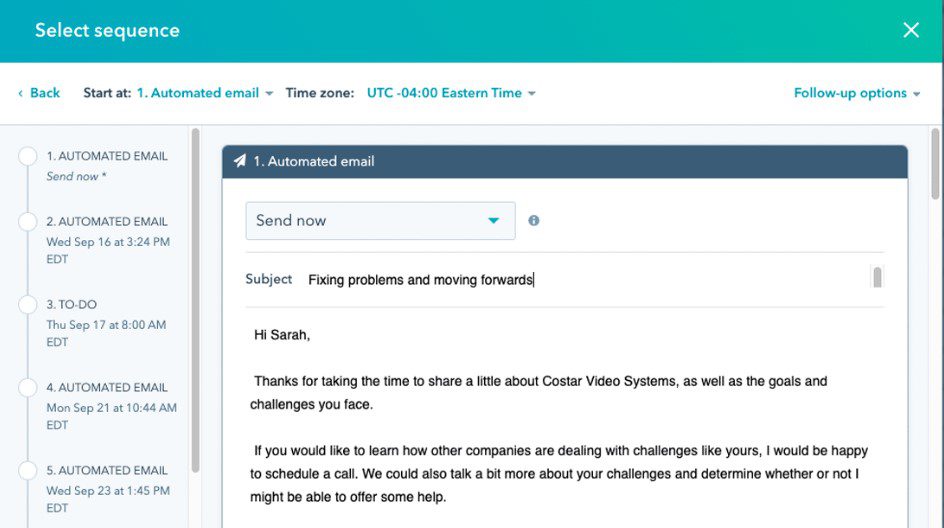
User score: ⭐ 4.5 / 5
HubSpot Sales Hub is a sales software that works seamlessly with its namesake CRM.
Key features
Using HubSpot Sales Hub’s automation features, you can connect up to 200 inboxes. You can use these to schedule emails and follow-ups at scale. Alternatively, the platform allows you to set reminders for manual actions, like:
- Sending LinkedIn invites
- Emails,
- Or making calls.
Thanks to the A/B testing feature, you can fine-tune your messaging to maximize lead engagement. HubSpot also enables users to turn their best-performing emails into templates that can be optimized, personalized, and shared across the team.
Additionally, HubSpot’s email tracking notifies you when prospects open emails or click links to help you prioritize the most engaged leads. It also comes with email health reporting.
Meanwhile, the platform’s integrated dashboard lets you score deals, assign tasks, and monitor your pipeline in real time, so no opportunity is missed.
Pros
- Supports personalized, automated email sequences.
- Email tracking to monitor engagement.
- Run multiple A/B tests to refine email sequences.
- Create, optimize, and share team-wide email templates.
- Integrates with HubSpot CRM for end-to-end deal management.
Cons
- Not a full-fledged cold email software since features like mailbox rotation and email warm-up are missing.
- No email discovery or verification features are available.
- No image and GIF personalization.
- Pricing can be steep for small teams.
- We experienced lots of lagging while using the platform.
Pricing
| Sales Hub Professional | €90/mo per seat |
| Sales Hub Enterprise | €150/mo per seat |
Expert opinion
‘’It is very user-friendly, and dashboards and integrations are really easy to use even for people that have never used it before. I think the cost is a little bit high.’’
—Diego P., VP of Engineering
19. GMass - Best for beginners
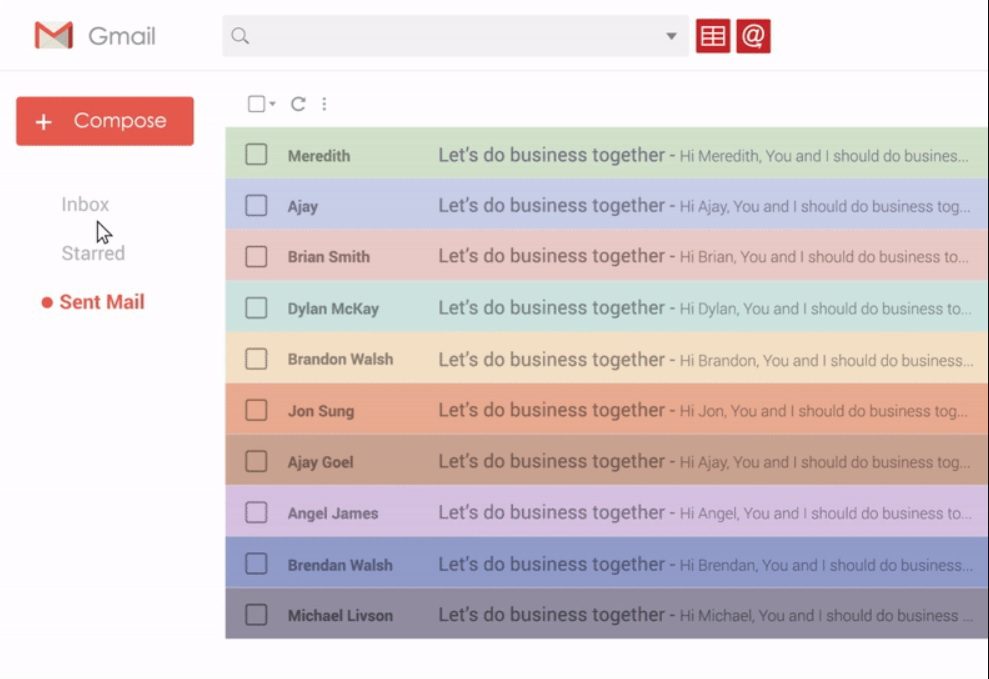
User score: ⭐ 4.7 / 5
GMass is a cold email software that integrates directly with Gmail through a Chrome extension.
Key features
GMass allows users to send emails directly from their Gmail account.
With its mail merge capabilities, you can customize emails using data from Google Sheets, making for more efficient and targeted outreach.
The platform supports automated follow-ups and email tracking to notify you when emails are opened or links are clicked. It also has a deliverability testing feature to check where your emails land in recipients’ inboxes.
GMass also includes tools like email verification to clean your list and reply detection to help manage responses.
Additionally, GMass integrates seamlessly with Google Workspace, meaning no external apps or complex setups are required. At the same time, you can connect GMass to other software via Zapier.
Pros
- Direct integration with Gmail for ease of use.
- Personalized bulk emails with mail merge from Google Sheets.
- Automated follow-ups to maintain prospect engagement.
- Email tracking to monitor opens and clicks.
- Integrations with 3rd-party software via Zapier.
Cons
- Limited to Gmail users. Therefore, it isn’t suitable for those using other email providers.
- You can use it on one email account at a time.
- No advanced cold email features like inbox rotation or email warm-up.
- Bulk email sending is capped by Gmail’s daily sending limits. Your account could get flagged if you try to ‘’bypass’’ the limit.
- Makes the Gmail interface seem kind of ‘’all over the place’’.
Pricing
GMass has Individual and Team plans.
| Individual Plans | |
| Standard | $25/mo |
| Premium | $35/mo |
| Professional | $55/mo |
| Team Plans | ||
| Premium | 5 users | $145/mo |
| 10 users | $265/mo | |
| 25 users | $600/mo | |
| 50 users | $1,100/mo | |
| 100 users | $1,800/mo | |
Expert opinion
‘’It's better than mass email senders (i.e., Mailchimp/Hubspot) for sending organic emails directly from your Gmail. But it's not a substitute for mass email senders because it doesn't have all the features they do.’’
—Alejandro S., Executive Director
20. Mixmax - Best for teams after seamless email productivity tools
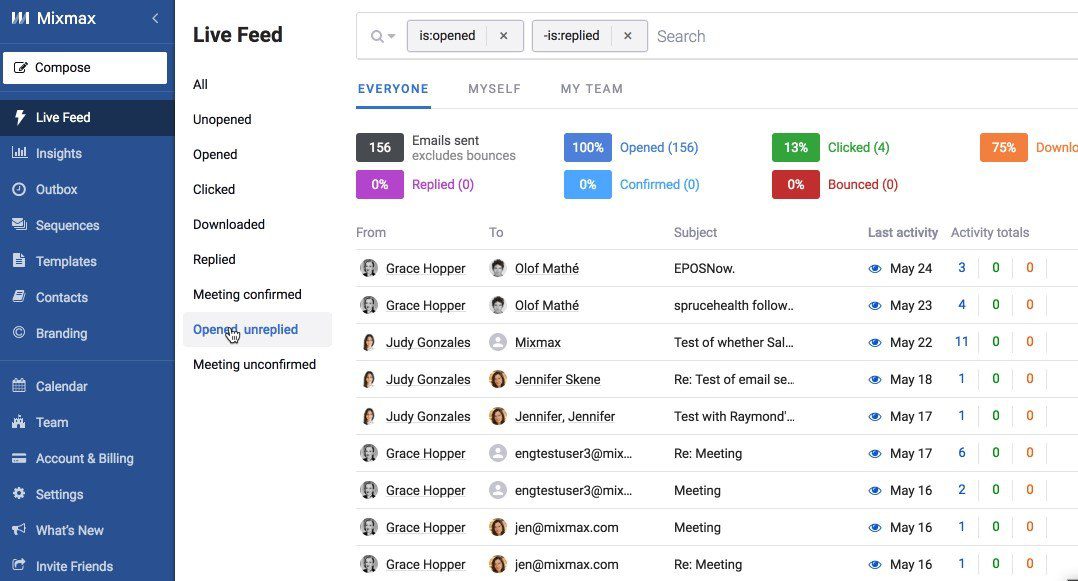
User score: ⭐ 4.5 / 5
Mixmax is an email productivity platform that integrates with Gmail, much like Yesware and GMass.
Key features
Mixmax offers features designed to make email outreach more efficient. Its email tracking provides real-time notifications when recipients open emails, click on links, or download attachments, giving users insights into engagement.
Mixmax allows you to use custom templates and insert dynamic fields to customize messages for recipients at scale. The platform also supports sequenced campaigns to automate follow-ups and nurture leads effectively. Moreover, you can add manual multichannel tasks into campaigns, including calls, LinkedIn connection requests, and inMails.
Another standout feature is Mixmax’s calendar scheduling, which lets users embed their availability directly into emails for easy appointment booking. This is complemented by the platform’s polling and survey tools, which gather feedback directly in email threads.
Mixmax integrates with Google Workspace and CRMs like Salesforce, thus allowing users to easily sync workflows and track leads. Finally, advanced users can leverage its rules and triggers feature to automate repetitive tasks and set conditions for outreach.
Pros
- Real-time email tracking for opens, clicks, and downloads.
- Calendar scheduling is embedded directly into emails.
- Automated sequenced campaigns for follow-ups.
- Dynamic fields for personalized email templates.
- Integrates with Salesforce and Google Workspace.
Cons
- The least expensive plan has no automation.
- The least expensive plan also lacks email personalization.
- Multichannel sequences are available to teams under their most expensive Scale plan. On top of that, multichannel tasks need to be executed manually.
- Its extension for Gmail and Outlook slowed our browser.
- There is no email verification, email warm-up, or inbox rotation available.
Pricing
Mixmax comes with Individual and Teams plans.
| Individual Plans | |
| Free | $0/mo |
| SMB *Sales engagement and calendaring | $34/mo per user |
| Growth *Sales automation | $65/mo per user |
| Growth + CRM *Sales engagement with Salesforce or HubSpot integration | $89/mo per user |
| Team Plans | |
| Essentials *Collaborative sales engagement for small teams | $199/mo per user |
| Startup *Sales automation for growing teams | $499/mo per user |
| Scale *Multichannel sales engagement for larger teams | $899/mo per user |
Expert opinion
‘’I've been using Mixmax almost every day for a while now, and it's been a game-changer for my workflow. This tool has significantly helped me automate my outreach campaigns, saving me a ton of time and effort. I'd like to be able to download reports for my different campaigns. It would be very helpful to have information on a target by target, especially to re-contact them if they haven't replied in a certain time, or if they never opened my emails.’’
—Ana A., Business Development Associate
21. Salesforge - Best cold email software for outreach in 20+ languages
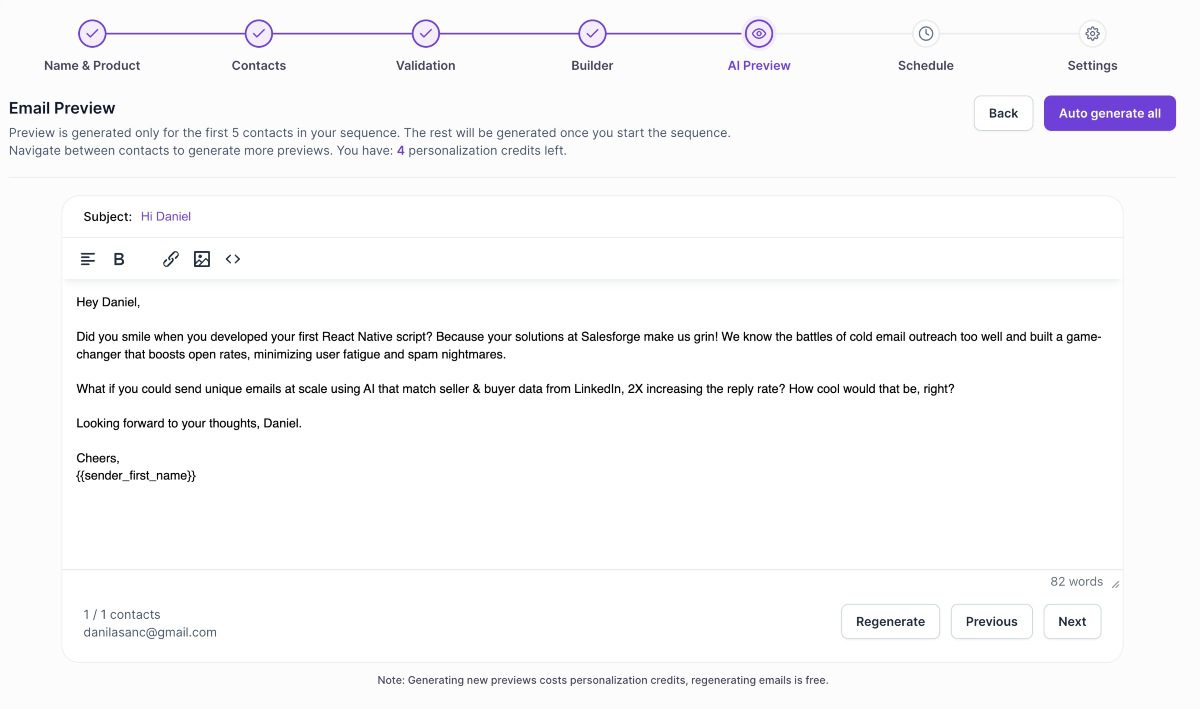
User score: ⭐ 4.7 / 5
Salesforge is a cold outreach platform combining human effort with AI to manage email campaigns and personalize outreach at scale—in as much as 20+ languages.
Key features
Salesforge streamlines cold outreach with its Forge Ecosystem, which includes:
- Mailforge: A distributed email infrastructure with automated DNS setup.
- Infraforge: Customizable private email architecture with multiple IP addresses and domain masking for better deliverability.
- Warmforge: Automated, unlimited warm-up for Gmail and Outlook mailboxes.
- Agent Frank: An AI-powered SDR that handles everything from prospecting and outreach to booking meetings.
The platform allows users to connect unlimited mailboxes with smart rotation to guarantee even distribution of email loads. In the meantime, email verification protects your sender's reputation by verifying emails directly within the dashboard.
Salesforge also integrates with Slack, Clay, and other tools via Zapier webhooks, thus providing seamless workflow automation.
Pros
- AI-powered email personalization in more than 20 languages.
- Unlimited mailboxes with smart rotation.
- Automated email warm-up and email validation.
- Native integrations and those made possible through Zapier.
- All-in-one dashboard to manage mailboxes and sequences.
Cons
- Advanced features such as Infraforge may be too technical for beginners.
- Plans limit the number of active prospects.
- The maximum number of emails you can send monthly is 50,000 on the highest plan.
- Email verification credits are limited to 1,000 maximum, as well.
- Agent Frank, Mailforge, Infraforge, and Warmforge cost extra.
Pricing
| Pro | $48/mo per user |
| Growth | $96/mo per user |
| Mailforge | $3/mo and as low as $1.67 per mailbox/mo |
| Infraforge | $4 and as low as $2.5 per mailbox/mo |
| Warmforge | $12 and as low as $3 per mailbox/mo |
| Agent Frank | $499/mo per user *billed quarterly |
Expert opinion
‘’Love how they utilize the power of AI to craft unique emails as well as increase delivery rate. It's a new product, so some features are missing.’’
Frequently asked questions (FAQs)
What is cold email software and how does it differ from regular email marketing tools?
Cold email software is specifically designed to help businesses reach out to leads who may not have prior knowledge of their company. Unlike regular email marketing tools, which typically send bulk campaigns to opt-in subscribers, cold email software focuses on personalized, 1-on-1 emails to build connections and drive conversions.
Is it legal to send cold emails?
Yes, provided that you adhere to regulations. In the US, the CAN-SPAM Act requires you to include an unsubscribe button, avoid misleading subject lines, and identify your email as an advertisement if applicable. Meanwhile, in the EU, GDPR requires a legitimate interest or prior consent to contact individuals.
How does cold email software help with email deliverability?
Cold email software includes features specifically designed to improve deliverability and keep your emails out of spam folders. These typically include features such as email warm-up, deliverability testing, inbox rotation, and domain authentication, among others.
Can I integrate cold email software with my existing CRM?
Generally speaking, most cold email software support integration with popular CRMs. These integrations enable you to sync contact data seamlessly, track engagement directly in your CRM, as well as manage follow-ups and tasks in one place. If a native integration isn’t available, tools like Zapier or API access can bridge the gap.
How do I personalize emails using cold email software?
The best cold email software allows for both basic and advanced personalization. In other words, most let you use placeholders (variables) to insert first names, company names, etc., to personalize your emails dynamically. Also, some cold email software, like Skylead, lets you personalize images and GIFs for greater impact.
What is the best cold email software?
Still here? Great! That means you’re probably wondering, What’s the best cold email software out there?
If you asked us, we’d say Skylead—and no, it’s not just because we built it. It’s because it truly checks all the boxes.
But truth be told, there's no single answer to this question, simply because you yourself best know your needs.
So, how do you figure out which software is right for you? You make a top 5 out of 21 on this list and test them out—just like we did.
For example, start with Skylead—our ultimate LinkedIn automation and cold email software that has all the essential cold email features you need. In one place, at that!
So, sign up for our 7-day free trial now, explore everything Skylead offers, and who knows? You might not even need to look anywhere else.
Disclaimer: Skylead is not affiliated, endorsed by, or connected with LinkedIn in any way.
Is Dripify falling short of your expectations for LinkedIn outreach? Or maybe you're starting to question if another tool can deliver better results for your LinkedIn lead generation? LinkedIn automation has come a long way, and today, we don’t have just 1 Dripify alternative but many more.
And guess what? They all come with distinct features, integrations, and pricing models to suit different preferences.
Curious to know more about these tools? We've compared the top 9 Dripify competitors to help you find the ideal match.
| Dripify alternative 🔄 | Best for 🥇 | Link 🔗 |
| Skylead | Hyper-personalized, smart, multichannel outreach | Read more… |
| Expandi | Automated LinkedIn profile engagement | Read more… |
| Dux-Soup | Automating free and paid InMails | Read more… |
| Meet Alfred | Multichannel outreach across LinkedIn, email, and X | Read more… |
| Waalaxy | Beginners to LinkedIn and email automation | Read more… |
| Apollo | Its extensive lead database | Read more… |
| HubSpot Sales Hub | Scalable outreach with advanced email automation | Read more… |
| Salesrobot | Keeping leads and responses organized | Read more… |
| Lemlist | Email warm-up | Read more… |
But first, let’s:
- Learn more about Dripify and its features.
- Discover the pros and cons of using Dripify.
- Go through user reviews and pricing details.
What is Dripify?
As per their official website, Dripify is a:
"LinkedIn autopilot that works while you sleep."
In other words, it's a LinkedIn automation tool that helps users manage their lead generation and outreach with automation.
Dripify connects to free and Premium LinkedIn accounts and enables you to create search or CSV-based drip campaigns to automatically:
- Send invites to connect
- Message your leads
- Send free inMails
- View leads’ profiles
- Follow them
- Endorse their skills
- Like their content
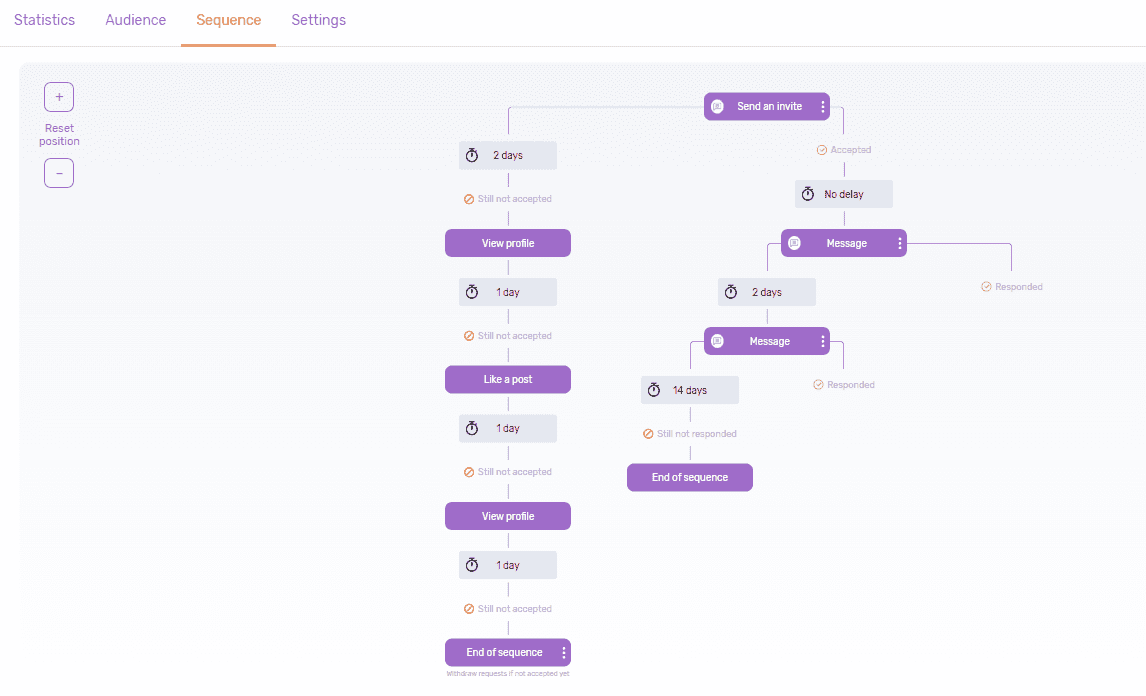
Moreover, the tool allows you to personalize messages with over 15 variables to give your outreach a more human feel.
Beyond outreach, Dripify also serves as a lead extraction tool. It scrapes your leads’ data from LinkedIn, including their:
- Full name
- Company
- Position
- Number of connections
- Phone number
- Website URL
All this information can be compiled into a CSV file that you can download at your convenience.
Dripify also has you covered if you want to collaborate with your team. Namely, you can invite team members directly from the tool, assign them roles, set permissions, and track their performance. Important metrics like conversion rates are displayed on the Analytics page, giving you a bird's-eye view of how everyone performs.
There’s also the integrated inbox that lets you reply to all your LinkedIn messages straight from the platform. Plus, it lets you mark important conversations for easy access later and even add notes to your leads’ profiles to keep everything organized.
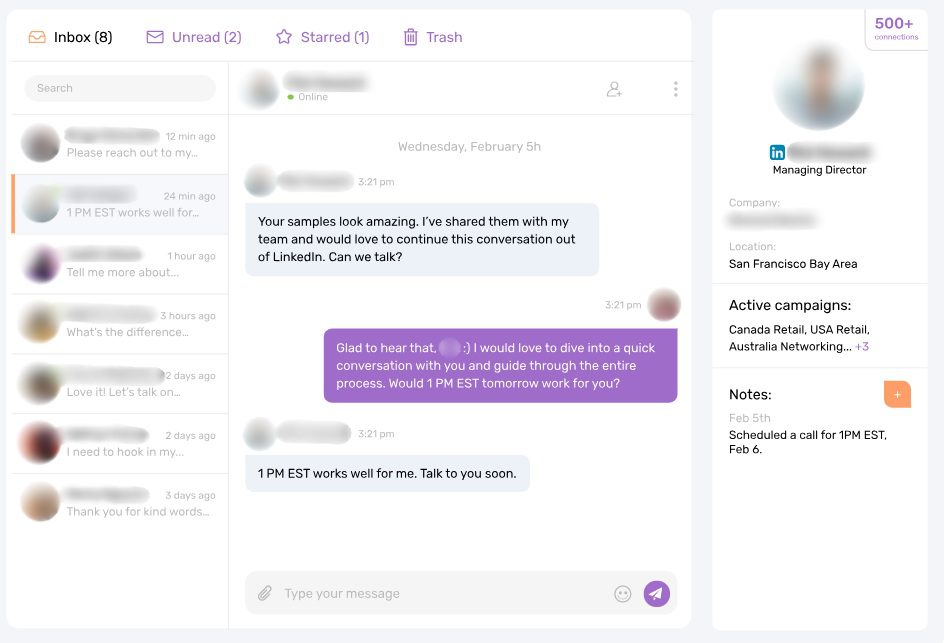
Not to mention, Dripify supports over 1000 integrations via Zapier webhooks, making it incredibly flexible for any workflow.
Who is Dripify for?
Although anyone can use Dripify, the tool is primarily aimed at:
- Business owners
- Sales teams
- Marketing agencies
- Recruiters
For business owners, it’s primarily a time-saving tool that takes over the grunt work associated with prospecting, lead generation, and outreach. As a result, it frees up valuable time, which they can use to focus on scaling their operations.
In the meantime, sales teams typically use Dripify to automate lead-generation campaigns and track team performance. The platform's analytics dashboard is especially useful here because it helps refine strategies on the go.
Since Dripify supports multiple LinkedIn accounts, it’s a good option for marketing agencies that are managing multiple clients.
As for recruiters, they can use the software to scale their talent acquisition. Want to fill the open roles faster? Dripify automates the entire process, allowing them to focus on finding the perfect match.
Is Dripify allowed on LinkedIn?
Generally speaking, LinkedIn is against automation. But that doesn't mean all tools are created equal.
That said, there are 3 types of LinkedIn automation tools you’ll come across:
- Cloud-based tools
- Desktop apps
- Chrome extensions
Dripify falls under the cloud-based category, which is considered the safest. And since it does, the chances of getting your LinkedIn account restricted when using it are a lot lower compared to when using, say, Chrome extensions.
However, the question is, is it as perfect as it seems, or are you better off with a Dripify alternative?
Dripify cons
While good in many aspects, Dripify is far from perfect. The biggest limitation? It supports just 1 channel: LinkedIn.
Many sales outreach tools nowadays (and outreach tools in general) offer the ability to reach leads across multiple platforms. Why is this valuable, though? Because with support for multichannel outreach, you can reach prospects where they’re most active.
Say someone you’re targeting isn’t active on LinkedIn. Dripify can still send them a connection request, but what good is it if they never see it? If you could send them an email, however—which they’re likely to check—the chances of getting a response would be much higher.
That said, here are some other areas where Dripify falls short that may warrant looking for an alternative solution:
- No paid InMails – You can use the tool to send free inMails only.
- No email finding or verification – While it scrapes LinkedIn data, the software can’t find or verify your leads' emails.
- Lacks A/B testing – Although you can create multiple campaigns and compare their results, Dripify doesn’t have real in-campaign A/B testing.
- Limited personalization options – There’s no support for advanced personalization, like using images or GIFs in your messages, which can make them feel more engaging.
- No one-on-one onboarding– Their customer support team is available 24/7. Nonetheless, Dripify doesn’t offer personalized onboarding. This can be a drawback for users who prefer more hands-on help when getting started.
So, if you find any of these functionalities essential, Dripify may not be the most ideal option.
But a Dripify alternative just might!
What do Dripify reviews say?
During our research, we came across both positive and negative Dripify reviews.
As for the positives, a lot of users appreciate the software’s ease of use and the effectiveness of its automation features.
For instance, Jong Chan C., a Venture Manager, said:
‘’I tried Dripify, which revolutionized my LinkedIn outreach strategy with its rich features and automation.’’
Conversely, some users have pointed out areas where Dripify could improve.
Although he mentioned how intuitive the tool is, Zach E. mentioned that it:
‘’Would be great if they had the ability to use the paid InMail credits through campaigns.’’
Meanwhile, Laurens V. noted that:
‘’Inbox is a bit slow in updating. Not super easy to see where your converted leads come from.’’
Dripify pricing
Dripify offers 3 distinct pricing plans:
| Basic | $59/mo per seat |
| Pro | $79/mo per seat |
| Advanced | $99/mo per seat |
If you opt to pay for the annual subscription, you’ll get a 35% discount.
As for the differences, with the Basic plan, you can run 1 drip campaign at a time. Meanwhile, Pro & Advance plans let you run as many as you want.
That said, if you're managing multiple campaigns or clients, the Pro or Advanced plan may be better suited.
Or another Dripify alternative, that is.
9 Dripify competitors to help you find a perfect alternative
Dripify is a solid LinkedIn automation tool, but it's not the only player in the game. With that in mind, we’ve rounded up 9 Dripify competitors that prove superior.
Let’s break them down one by one to help you find your ideal Dripify alternative!
Dripify alternative #1: Skylead
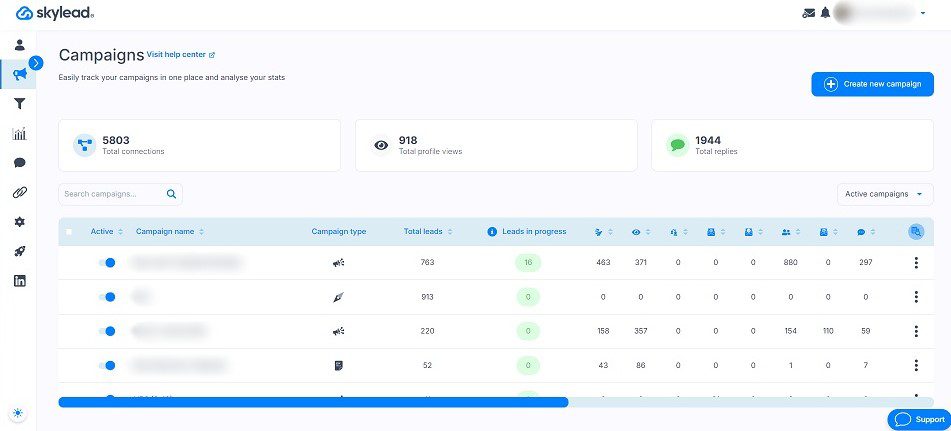
Why, yes. That’s us! 😊
Skylead is your ultimate multichannel sales engagement tool and cold email software.
It’s designed to help sales teams, marketers, founders, agency owners, and recruiters scale their outreach while saving +11 hours a week.
It’s an All-In-One platform that offers every tool you need in one package—and at a single price.
That said, our Skylead is a combination of a:
- LinkedIn prospecting
- Multichannel outreach
- Cold email software
- Email finder & verifier
Unlike Dripify, Skyleads supports multichannel outreach. This means you can use it to connect with leads on multiple channels, courtesy of our first-to-market Smart sequences.
Speaking of email outreach, Skylead lets you send tens of thousands of emails a month at no extra cost. How? It allows you to connect unlimited email accounts and auto-rotates between them when sending emails, all while protecting your domain.
Thanks to our partnership with an email warm-up tool, InboxFlare, you also get to warm up infinite mailboxes to keep your emails away from spam.
Moreover, with its cloud-based infrastructure it makes your multichannel outreach work seamlessly.
Skylead also supports A/B testing, helping you fine-tune your campaigns by testing the impact of different message variations and subject lines.
Personalization-wise, there are different message variables for you to try alongside our native image & GIF personalization.
And, with the Smart Inbox, you can keep all your conversations—whether from LinkedIn or email—in one place, making it easy to track, label, and manage responses.
Finally, if you need to integrate Skylead with another tool, you can do so. The tool can connect to any CRM or software via Zapier webhooks or API.
Exciting, right?
Now, let’s cover the features that make Skylead truly shine in greater detail!
LinkedIn & email automation
Let’s be honest: LinkedIn alone isn’t enough.
That’s why Skylead combines both LinkedIn and email automation, giving you the flexibility to reach your audience through the channel that works best for them.
And the best part? It all happens in one seamless outreach flow, thanks to our Smart sequences.
Smart sequences are algorithms that combine different LinkedIn and email actions with if/else conditions. Actions in the sequence unfold according to your prospects’ behavior with the goal of finding the fastest path to them.
These are the actions and conditions you can add to a Smart sequence.
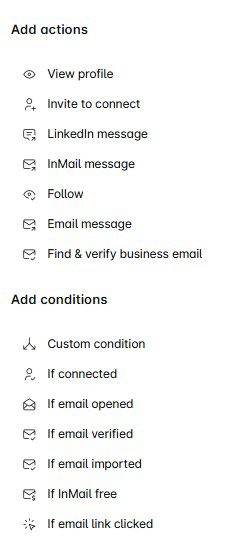
As mentioned, Smart sequences react to the way your prospects’ behave. And they do it in real-time.
Here’s one Smart sequence.
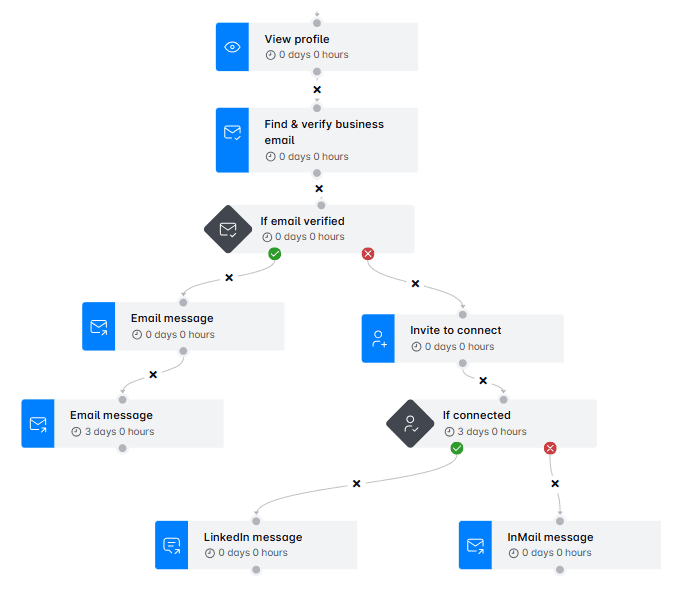
In this example, when Skylead finds someone's email, it sends them an email followed by a follow-up. If it can't find their email, it sends a connection request instead.
If they accept the invite, the next step is sending them a message. But if they don’t, the tool automatically sends an InMail.
Of course, this is just one scenario. You can create a Smart sequence any way you like to cover an infinite number of them.
Email finder & verifier
So, you’ve set up your perfect Smart sequence and have your LinkedIn outreach covered.
But what if you also want to reach your prospects via email and you’re missing their contact details?
That’s where our email discovery and verification feature comes in to save the day. Add it as a step while creating your outreach campaign, and the tool will provide you with double-verified emails.
But why is our email finder and verifier so powerful? Because it reduces bounce rates and increases the chances of your messages being actually seen. Moreover, unlike other tools that rely on risky Chrome extensions to find emails, we use a safer, more reliable method. Combine that with our market-leading email verification accuracy, and you’ve got a winning solution.
Not to mention, this functionality is built right into the platform. So, yes, it doesn’t rely on third-party tools, as is the case with some other tools that offer it.
Image & GIF personalization
Your leads are more likely to pay attention to—and remember—messages that stand out visually.
And what better way to ensure that than with our very own image and GIF personalization feature?
Instead of sending a plain message, add an image to it. Then, use our built-in editor to enrich it with your prospect's name, company logo, or another detail that feels like it was created just for them. The same goes for GIFs.

Choose to use it, and you’ll see an increase in response rate of 63% or more.
Who knows? You may even beat this result!
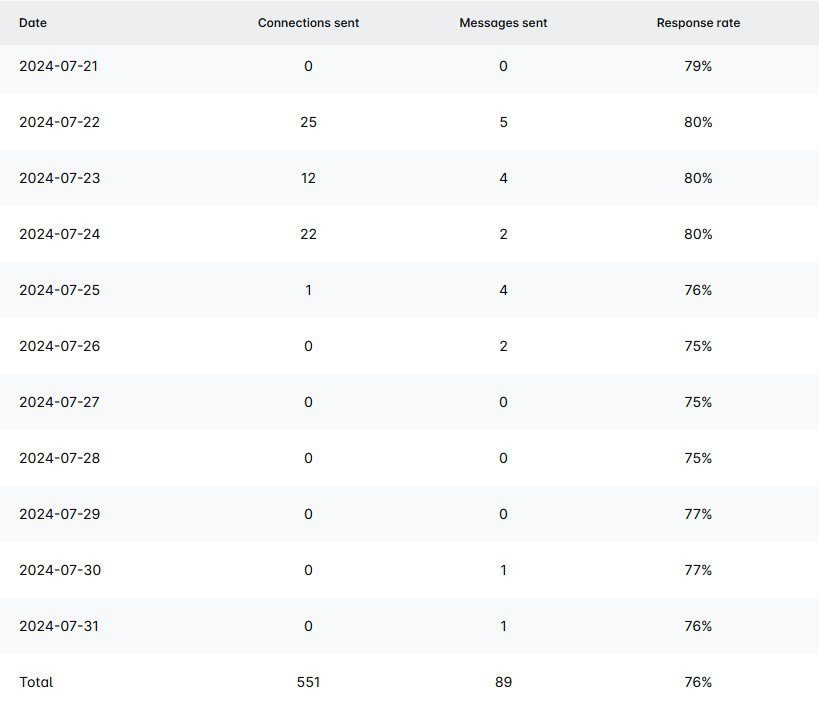
Smart inbox
No more bouncing between platforms to keep track of messages,. Everything is right here, in Skylead’s Smart inbox.
What sets our Smart Inbox apart, however, is its labeling feature. You can label chats to monitor your leads’ journey, track conversions, and even measure ROI.
That said, feel free to create custom ones that fit seamlessly into your workflow. Whether you want to categorize based on lead status, priority, or custom tags, the flexibility is all yours.
Advanced reporting
Do you feel like digging deeper into your outreach campaigns to see what’s working and what needs tweaking? The Reports page has got you covered!
Here, you can analyze your campaigns in:
- Graph view – This view helps you quickly spot oscillations to assess your campaigns at a glance.
- Table view – The table format makes it easy to observe how your metrics fluctuate day by day, giving you insights into which days perform best.
- Step-by-step view – This is especially useful for A/B testing, as it shows precisely how recipients engage at each stage of your sequence.
Skylead also lets you export these reports in 2 different formats: CSV and PDF. You can download them to share results with your team or keep track of your progress over time.
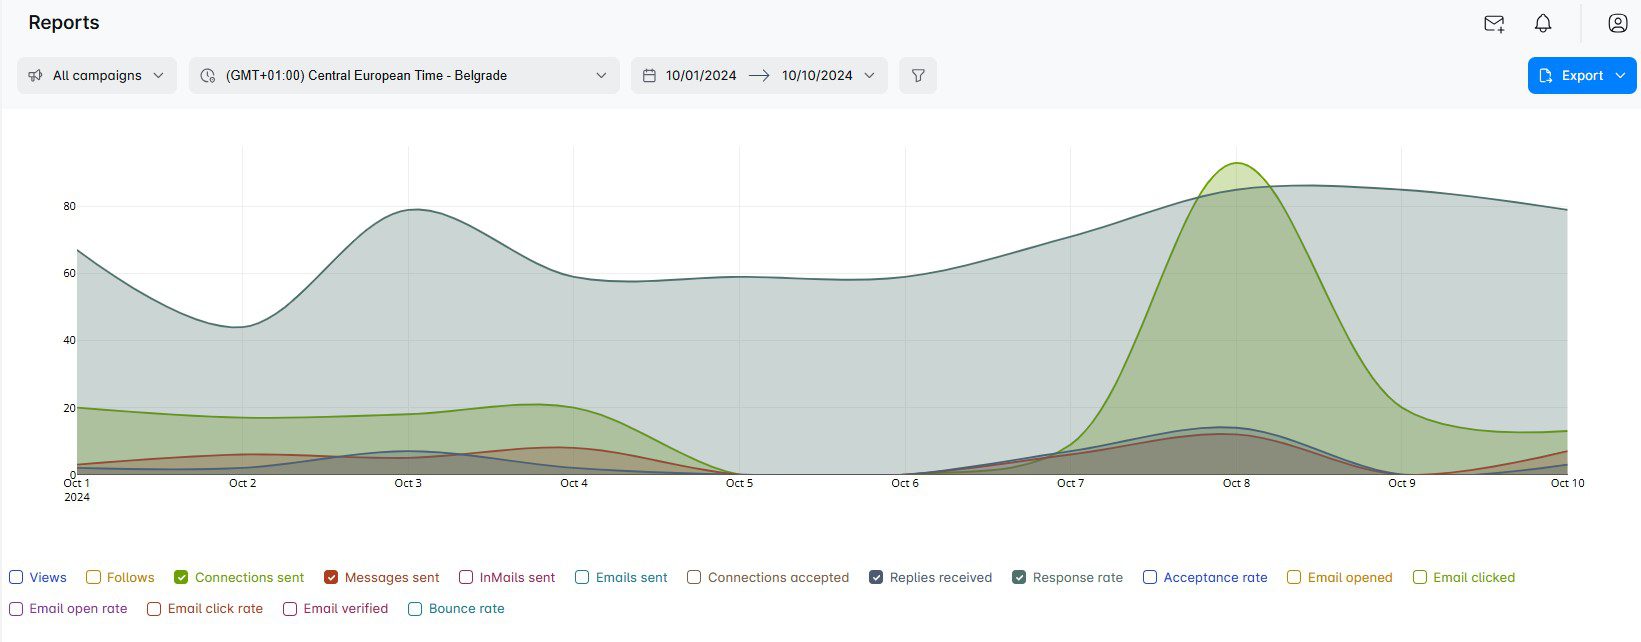
What do Skylead reviews say?
If you think we’re biased—with Skylead being ours and all—look at all the glowing reviews that we’ve got!
For example, Ian B. said we have:
‘’Full, rich features combined with a logical interface and 24-hour customer care. Easy to set up and manage. This platform has important features others are missing.’’
Tony B. has also praised us, our customer success team in particular. He said:
‘’Customer service is fantastic, response time is excellent, I have sent thorough screenshots when I have hit a snag, and they are all over it. This has saved me a huge amount of time, and there is no way that I could ever connect with 60 new people a day without this automation.’’
Skylead pricing
Skylead is the only Dripify alternative that comes with a single pricing plan.
For just $100 a month per seat, you’re getting a one-stop-shop tool for your outreach.
No confusing tiers, no hidden fees—just one price for all the tools you need to supercharge your outreach.
And what more could you ask for?
Dripify vs. Skylead
| Features | Skylead | Dripify |
| Cloud-based multichannel outreach | ✅ | ✅ |
| Email automation | ✅ | ❌ |
| Email verification | ✅ | ❌ |
| Email warm-up | ✅ | ❌ |
| Smart sequences | ✅ | ✅ |
| Free + paid inMails | ✅ | Free inMails only |
| A/B testing | ✅ | Limited |
| Integrated inbox | ✅ | LinkedIn inbox only |
| Image & GIF personalization | ✅ | ❌ |
| API or Webhook integration | ✅ | ✅ |
| 1-on-1 Onboarding | ✅ | ❌ |
Dripify alternative #2: Expandi
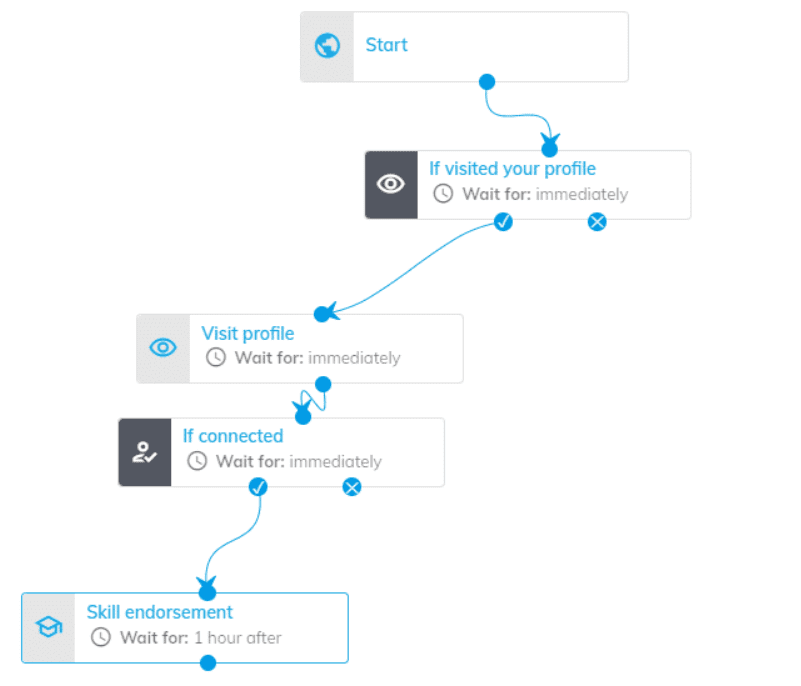
Expandi is a cloud-based Dripify alternative.
Much like Skylead, it comes with Smart sequences that allow you to automate multichannel campaigns.
Thanks to them, you can send automated LinkedIn connection requests, messages, and free inMails. The tool can also perform additional automatic actions, which include auto-liking posts and endorsing skills.
But it’s not all rainbows and sunshine.
Although Expandi technically allows users to enrich outreach messages with personalized images and GIFs, this feature isn’t natively built into the platform. Instead, it’s integrated through a third-party tool called Hyperise and costs an additional $69 a month.
Furthermore, if you need to verify emails or find contact information outside of LinkedIn, don’t count on Expandi to help. It doesn’t offer this functionality.
Another limitation is that Expandi doesn’t support sending paid inMails. So, if reaching out to LinkedIn users outside your network through this method is essential to your strategy, you’ll have to look elsewhere. Or rely on free inMails only.
Expandi pricing
| Business | $99/mo per seat |
| Agency | Custom |
Dripify vs. Expandi
| Features | Skylead | Dripify | Expandi |
| Cloud-based multichannel outreach | ✅ | ✅ | ✅ |
| Email automation | ✅ | ❌ | ✅ |
| Email verification | ✅ | ❌ | ❌ |
| Email warm-up | ✅ | ❌ | ❌ |
| Smart sequences | ✅ | ✅ | ✅ |
| Free + paid inMails | ✅ | Free inMails only | Free inMails only |
| A/B testing | ✅ | Limited | ✅ |
| Integrated inbox | ✅ | LinkedIn inbox only | LinkedIn inbox only |
| Image & GIF personalization | ✅ | ❌ | Not-native; through Hyperise |
| API or Webhook integration | ✅ | ✅ | ✅ |
| 1-on-1 Onboarding | ✅ | ❌ | ❌ |
Dripify alternative #3: Dux-Soup

Dux-Soup is another LinkedIn automation tool on our list.
Originally a Chrome extension, it’s now available as a cloud-based solution, but only if you opt for their highest-tier plan.
With Dux-Soup, you can automate actions like:
- Follows
- Profile views
- Connection requests
- Messages to 1st-degree connections
- Free & paid inMails
- Endorsements
You can combine these into simple drip campaigns that stop when your prospects respond. Plus, you can customize time delays between actions to make your outreach appear more natural.
Dux-Soup offers real-time performance tracking so you can keep an eye on your campaign results. It integrates directly with Pipedrive and HubSpot, and you can connect it to other CRMs through Zapier webhooks.
However, the tool has some limitations. It doesn’t support email outreach, so your outreach efforts are restricted to LinkedIn.
And, if you’re not on their highest-tier plan, you’ll have to rely on the Chrome extension, which comes with its own risks. Not only does it run the risk of getting your LinkedIn account flagged, but it also only works while your browser is open, limiting how hands-free your campaigns can be.
Dux-Soup pricing
| Individual & Team plans | |
| Pro Dux | $14.99/mo per seat |
| Turbo Dux | $55/mo per seat |
| Cloud Dux | $99/mo per seat |
| Agency plans | |
| Pro Dux | from $337.50/mo, 30+ seats |
| Turbo Dux | from $412.50/mo, 10+ seats |
| Cloud Dux | from $371/mo, 5+ seats |
Dripify vs. Dux-Soup
| Features | Skylead | Dripify | Dux-Soup |
| Cloud-based multichannel outreach | ✅ | ✅ | Higher subscription required |
| Email automation | ✅ | ❌ | ❌ |
| Email verification | ✅ | ❌ | ❌ |
| Email warm-up | ✅ | ❌ | ❌ |
| Smart sequences | ✅ | ✅ | ❌ |
| Free + paid inMails | ✅ | Free inMails only | ✅ |
| A/B testing | ✅ | Limited | ✅ |
| Integrated inbox | ✅ | LinkedIn inbox only | LinkedIn inbox only |
| Image & GIF personalization | ✅ | ❌ | ❌ |
| API or Webhook integration | ✅ | ✅ | ✅ |
| 1-on-1 Onboarding | ✅ | ❌ | ❌ |
Dripify alternative #4: Meet Alfred
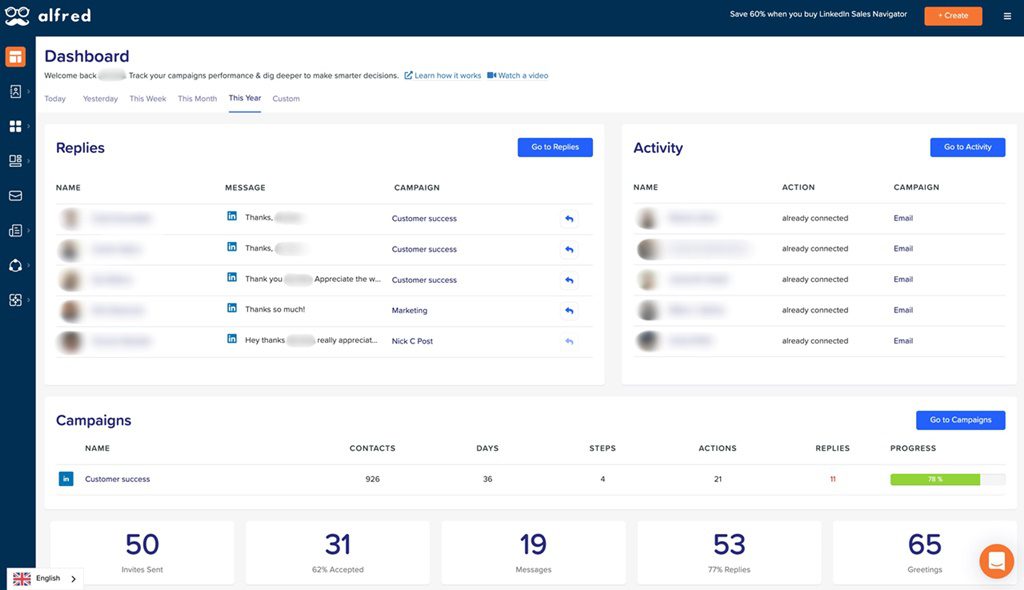
Meet Alfred is a cloud-based Dripify alternative that takes multichannel outreach up a notch.
It supports outreach across LinkedIn, email, and X (formerly Twitter). But here’s the catch: you’ll need to be on the Pro or Teams plan to access all those channels. The Basic plan leaves you to work with LinkedIn alone.
With Meet Alfred, you can build campaigns with unlimited steps, including:
- Profile views
- Connection requests
- Follow-up messages
- inMails
- Emails
- X DMs
To keep things looking natural, you can also set delays between actions.
When it comes to personalization, the tool offers message variables and templates to save you time crafting messages.
While you can connect your Instagram and Facebook accounts, you won’t be able to run outreach campaigns on those platforms. Instead, you can use them to schedule posts and manage content.
Another limitation is that Smart sequences aren’t available.
Paid inMails are also not supported, just like in Dripify and Expandi.
Lastly, Meet Alfred has an integrated inbox, but it only shows LinkedIn messages. If you need to check your DMs or emails, you'll have to do that manually.
Meet Alfred pricing
| Basic | $59/mo per user |
| Pro | $99/mo per user |
| Teams | $79/mo per user *3 users minimum |
Dripify vs. Meet Alfred
| Features | Skylead | Dripify | Meet Alfred |
| Cloud-based multichannel outreach | ✅ | ✅ | ✅ |
| Email automation | ✅ | ❌ | ✅ |
| Email verification | ✅ | ❌ | ❌ |
| Email warm-up | ✅ | ❌ | ❌ |
| Smart sequences | ✅ | ✅ | ❌ |
| Free + paid inMails | ✅ | Free inMails only | Free inMails only |
| A/B testing | ✅ | Limited | ❌ |
| Integrated inbox | ✅ | LinkedIn inbox only | LinkedIn inbox only |
| Image & GIF personalization | ✅ | ❌ | ❌ |
| API or Webhook integration | ✅ | ✅ | ✅ |
| 1-on-1 Onboarding | ✅ | ❌ | Higher subscription required |
Dripify alternative #5: Waalaxy
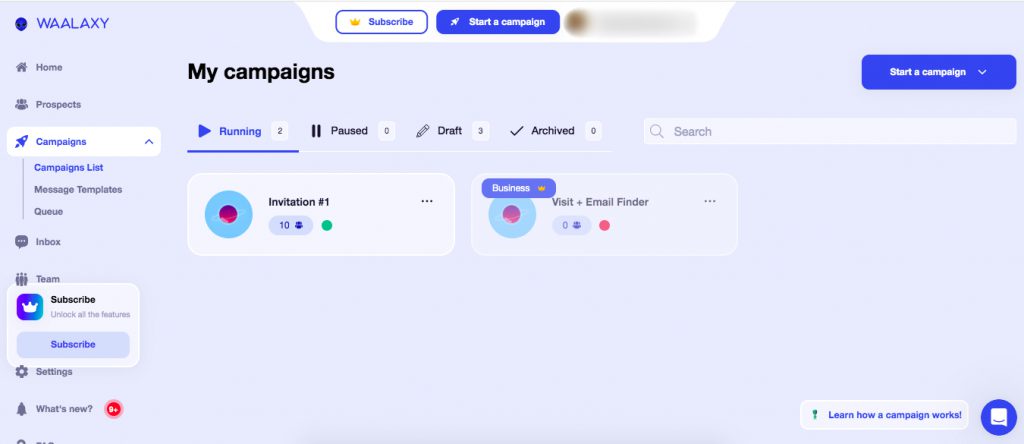
Waalaxy is a cloud-based solution that’s great if you’re just getting started with LinkedIn outreach.
It supports multichannel outreach, combining both LinkedIn and email, so you can connect with your prospects on the platforms they prefer.
Setting up campaigns is easy. You can build them from:
- LinkedIn search URLs
- Sales Navigator lead lists
- CSV files
With message variables and A/B testing, Waalaxy lets you personalize and fine-tune your outreach to see which versions get the best responses.
Plus, if you need help crafting those messages, the platform has an AI writing assistant. It could potentially replace ChatGPT for sales and marketing copywriting.
But, as with any tool, there are a few limitations.
One of the biggest downsides is that you can’t create outreach sequences from scratch. Instead, you’ll have to work within pre-made templates, which can feel restrictive if you want more control over your campaigns.
Also, the email discovery and verification feature isn’t natively built into Waalaxy. It relies on a third-party integration with Dropcontact, which adds extra cost.
Speaking of extra costs, Waalaxy’s inbox feature—which consolidates your messages—requires an additional payment.
Finally, while Waalaxy does offer a free version, it runs as a Chrome extension. As with other extensions, this can potentially put your LinkedIn account at risk. So, be cautious if using the free plan.
Waalaxy pricing
| Free | |
| Advanced | $88/mo per seat |
| Business | $131/mo per seat |
| Team | From $88/mo *The final price depends on the payment term, number of seats, and selected features. |
Waalaxy charges an extra $44 a month for LinkedIn inbox.
Also, if you need additional email finder credits, you can purchase them. However, expect to pay another $0.01 for each email address found.
Dripify vs. Waalaxy
| Features | Skylead | Dripify | Waalaxy |
| Cloud-based multichannel outreach | ✅ | ✅ | ✅Free version / Chrome extension |
| Email automation | ✅ | ❌ | ✅ |
| Email verification | ✅ | ❌ | Not native; through Dropcontact |
| Email warm-up | ✅ | ❌ | ❌ |
| Smart sequences | ✅ | ✅ | ❌ |
| Free + paid inMails | ✅ | Free inMails only | Free inMails only |
| A/B testing | ✅ | Limited | ✅ |
| Integrated inbox | ✅ | LinkedIn inbox only | LinkedIn inbox only |
| Image & GIF personalization | ✅ | ❌ | ❌ |
| API or Webhook integration | ✅ | ✅ | ✅ |
| 1-on-1 Onboarding | ✅ | ❌ | ❌ |
Dripify alternative #6: Apollo
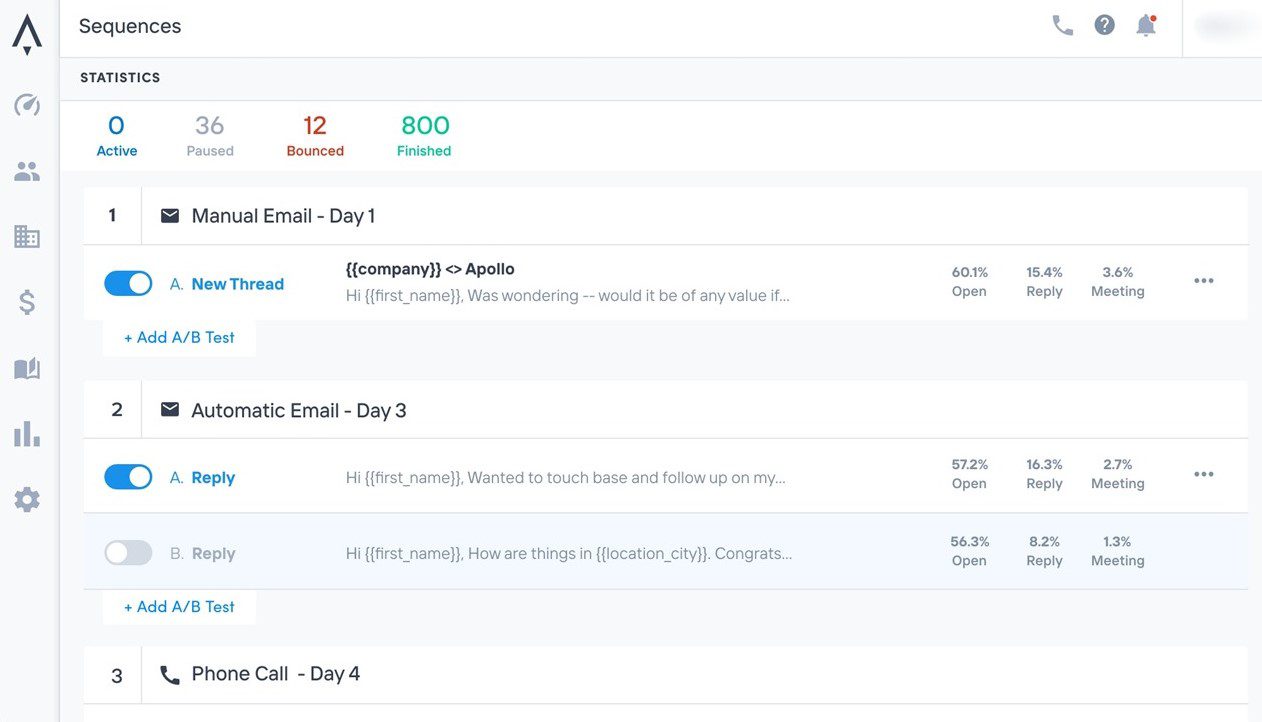
Apollo is a multichannel sales engagement platform that’s primarily cloud-based.
Its multichannel sequences—Playbooks—let you mix emails, LinkedIn actions, and calls into a single workflow. However, the Playbooks aren’t "smart," meaning they won’t adjust automatically based on your prospect’s responses like Skylead’s Smart sequences do.
On the bright side, Apollo integrates with tools like PipeDrive, HubSpot, and Slack.
It comes with A/B testing to help you optimize your campaigns. Moreover, if you’re ever stuck on how to write a message, Apollo’s built-in AI assistant is there to help.
Apollo also gives you access to its internal lead database of over 275 million contacts. But, fair warning—some users have found the lead quality to be a bit inconsistent.
Another downside is that Apollo scrapes new leads from LinkedIn using a Chrome extension, which isn’t ideal. Using it can be risky and might put your LinkedIn account in jeopardy.
Apollo pricing
| Free | $0/mo per user with 1 mailbox / 2 sequences |
| Basic | $59/mo per user with 1 mailbox / 2 sequences |
| Professional | $99/mo per user with 5 mailboxes / Unlimited sequences |
| Organization | $149/mo per user with 15 mailboxes / Unlimited sequences *3 users minimum, billed annually |
Dripify vs. Apollo
| Features | Skylead | Dripify | Apollo |
| Cloud-based multichannel outreach | ✅ | ✅ | ✅ |
| Email automation | ✅ | ❌ | ✅ |
| Email verification | ✅ | ❌ | ✅ |
| Email warm-up | ✅ | ❌ | ✅ |
| Smart sequences | ✅ | ✅ | ❌ |
| Free + paid inMails | ✅ | Free inMails only | ❌ |
| A/B testing | ✅ | Limited | ✅ |
| Integrated inbox | ✅ | LinkedIn inbox only | ❌ |
| Image & GIF personalization | ✅ | ❌ | ❌ |
| API or Webhook integration | ✅ | ✅ | ✅ |
| 1-on-1 Onboarding | ✅ | ❌ | ❌ |
Dripify alternative #7: HubSpot Sales Hub
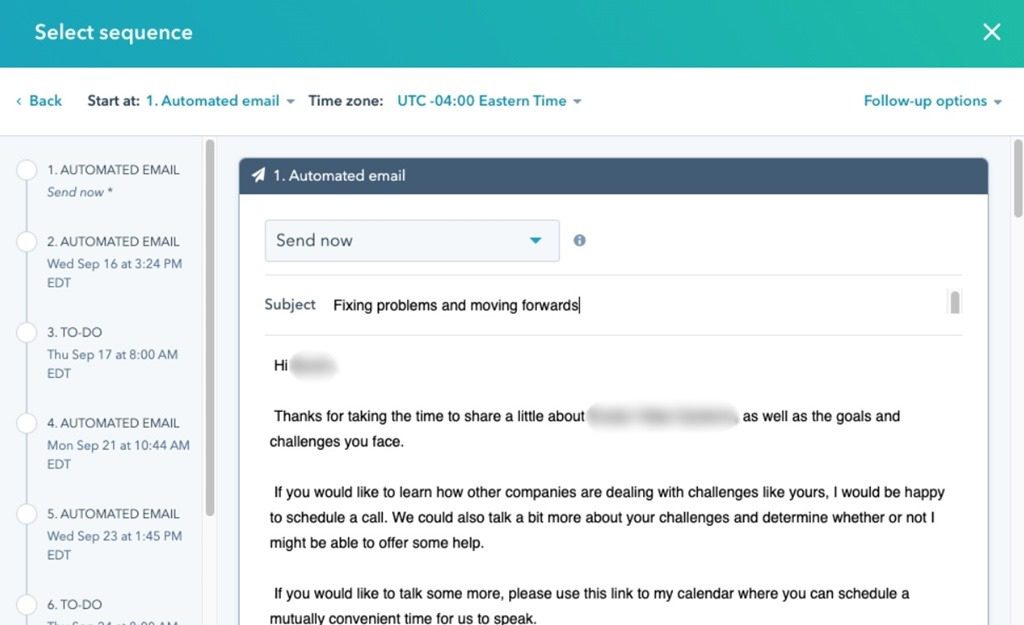
HubSpot Sales Hub is a cloud-based platform built with sales professionals in mind.
With it, you can connect up to 200 mailboxes (100 on a lower-tier plan) and send up to 1,000 emails daily (500 on a lower plan). Plus, the platform lets you create up to 5,000 sequences, albeit not smart, that include automated emails and follow-ups—ideal for scaling your outreach.
While HubSpot offers multichannel capabilities, they’re somewhat limited. You can add cold calling and LinkedIn outreach to your sequences. Unfortunately, both of these are manual steps. So, if you're looking for fully automated multichannel sequences, this might feel a bit restrictive.
When it comes to LinkedIn, HubSpot only supports connection requests and inMails. Not to mention, you’ll need a Sales Navigator subscription to access those features. While HubSpot does offer a relatively high limit on connected mailboxes, it’s still a bit limiting. Skylead, however, gives you the freedom to connect an unlimited number of email accounts.
HubSpot Sales Hub pricing
| Sales Hub Professional | $100/mo per seat / up to 100 mailboxes |
| Sales Hub Enterprise | From $150/mo per seat / up to 200 mailboxes |
Dripify vs. HubSpot Sales Hub
| Features | Skylead | Dripify | HubSpot Sales Hub |
| Cloud-based multichannel outreach | ✅ | ✅ | ✅ |
| Email automation | ✅ | ❌ | ✅ |
| Email verification | ✅ | ❌ | ✅ |
| Email warm-up | ✅ | ❌ | Costs extra |
| Smart sequences | ✅ | ✅ | ❌ |
| Free + paid inMails | ✅ | Free inMails only | Manual step |
| A/B testing | ✅ | Limited | ✅ |
| Integrated inbox | ✅ | LinkedIn inbox only | Email inbox only |
| Image & GIF personalization | ✅ | ❌ | ❌ |
| API or Webhook integration | ✅ | ✅ | ✅ |
| 1-on-1 Onboarding | ✅ | ❌ | Costs extra |
Dripify alternative #8: Salesrobot
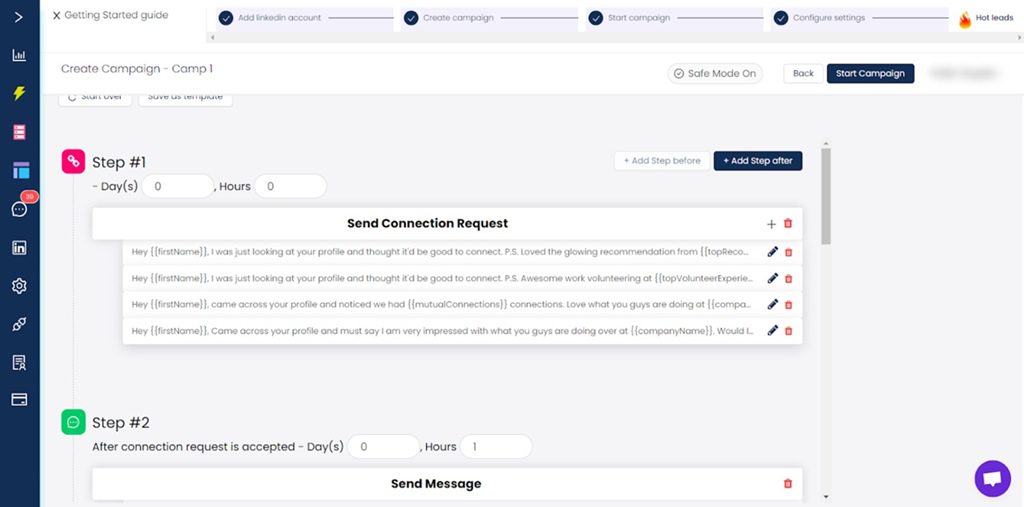
Salesrobot is a cloud-based LinkedIn and email automation tool that uses a Chrome extension to execute tasks.
It allows you to pull prospects from:
- CSV files
- Sales Navigator search URL
- LinkedIn search URL
- LinkedIn groups
- LinkedIn events
- Post comments
When it comes to LinkedIn actions, Salesrobot goes the extra mile. You can automatically:
- Like your prospect’s most recent post
- Leave an automated comment
- Follow them
- Send a connection request
- Endorse their skills
The tool supports 2-way integrations with all CRMs and outreach tools through webhooks. Not to mention, there are direct integrations with popular platforms like Salesforce, Pipedrive, and HubSpot.
Its mini CRM, equipped with smart reply detection, lets you handle everything in one place. Here, you can reply to messages, tag positive leads, and apply advanced filters to keep your outreach organized.
Downsides-wise, Salesrobot only supports free inMails, so if you need paid inMails, you’re out of luck.
It also can’t find prospects’ or verify leads’ emails unless they’re publicly available.
Lastly, since it uses a Chrome extension for executing tasks, it can potentially lead to LinkedIn account restrictions. Therefore, it isn’t a perfect Dripify alternative.
Salesrobot pricing
| Starter | $99/mo per user / 1 LinkedIn & 1 email account |
| Pro | $397/mo per user / 1 LinkedIn & 10 email accounts *billed quarterly |
| Pro+ | $497/mo per user / 1 LinkedIn & 10 email accounts *billed quarterly |
Dripify vs. Salesrobot
| Features | Skylead | Dripify | Salesrobot |
| Cloud-based multichannel outreach | ✅ | ✅ | ❌ |
| Email automation | ✅ | ❌ | ✅ |
| Email verification | ✅ | ❌ | ❌ |
| Email warm-up | ✅ | ❌ | ❌ |
| Smart sequences | ✅ | ✅ | ❌ |
| Free + paid inMails | ✅ | Free inMails only | Free inMails only |
| A/B testing | ✅ | Limited | Limited |
| Integrated inbox | ✅ | LinkedIn inbox only | ✅ |
| Image & GIF personalization | ✅ | ❌ | ❌ |
| API or Webhook integration | ✅ | ✅ | ✅ |
| 1-on-1 Onboarding | ✅ | ❌ | Higher subscription required |
Dripify alternative #9: Lemlist
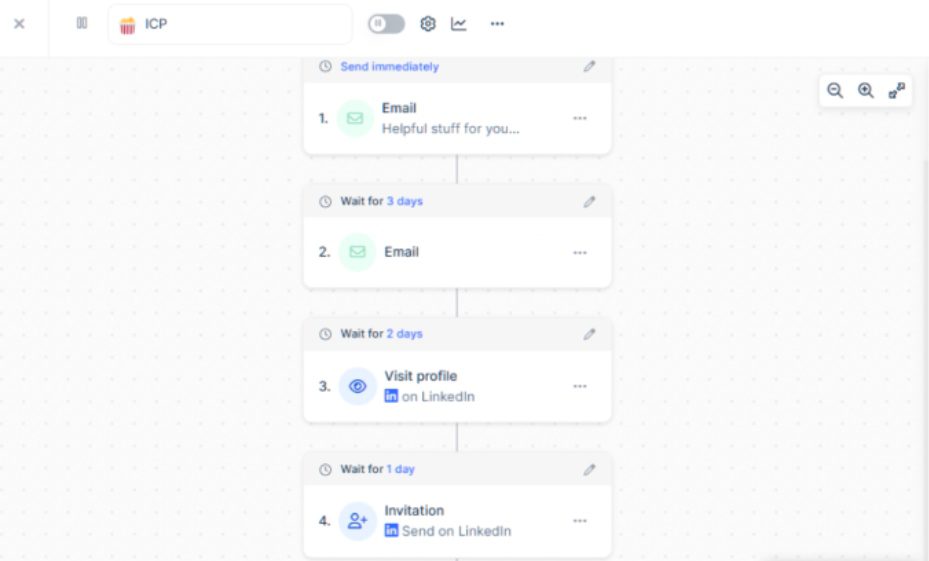
Lemlist is a cloud-based platform primarily designed for email outreach. However, with the higher-tier subscription, it expands to multichannel outreach, specifically supporting LinkedIn outreach and cold calling.
On LinkedIn, Lemlist can automatically:
- Visit leads' profiles,
- Send them connection invites,
- Send messages.
If you want to perform additional actions on LinkedIn (and make calls) using Lemlist, you can. However, you’ll have to do it manually once the tool reminds you to.
Nonetheless, this is somewhat compensated for with the ability to add conditions to your sequences. These make it possible to cover several different outreach scenarios.
When it comes to the key Lemlist feature, we must mention the so-called Lemwarm, its email warm-up. Using email warm up tools like Lemwarm, you can boost your email deliverability and keep emails from landing in the spam folder.
But where does Lemlist fall short?
For starters, its email finder and verifier, albeit useful, is quite limited. Even on the highest subscription, you're capped at finding and verifying up to 1,000 emails only. You can purchase more of these, but this will cost you extra.
Likewise, connecting up to 15 mailboxes is restricted to the top-tier plan. Not to mention, this is quite far from the unlimited number of mailboxes Skylead lets you add.
Finally, while Lemlist is cloud-based, its reliance on a Chrome extension for LinkedIn prospecting is concerning. So, if you're focused on keeping your LinkedIn account safe, this might be a dealbreaker that pushes you toward a different Dripify alternative.
Lemlist pricing
| Free | |
| Email Starter | $39/mo per user / 1 email account / 100 email verification credits |
| Email Pro | $69/mo per user / 3 email accounts / 150 email verification credits |
| Multichannel Expert | $99/mo per user / 5 email accounts & 1 LinkedIn account / 300 email verification credits |
| Outreach Scale | $159/mo per user / 15 email accounts & 1 LinkedIn account / 1,000 email verification credits |
Need more email verification credits? You can get an additional 20 for $1.
Dripify vs. Lemlist
| Features | Skylead | Dripify | Lemlist |
| Cloud-based multichannel outreach | ✅ | ✅ | ✅ |
| Email automation | ✅ | ❌ | ✅ |
| Email verification | ✅ | ❌ | Limited |
| Email warm-up | ✅ | ❌ | ✅ |
| Smart sequences | ✅ | ✅ | ✅ |
| Free + paid inMails | ✅ | Free inMails only | ❌ |
| A/B testing | ✅ | Limited | ✅ |
| Integrated inbox | ✅ | LinkedIn inbox only | ❌ |
| Image & GIF personalization | ✅ | ❌ | ❌ |
| API or Webhook integration | ✅ | ✅ | ✅ |
| 1-on-1 Onboarding | ✅ | ❌ | ❌ |
Frequently asked questions (FAQs)
1. What does Dripify do?
Dripify is a LinkedIn automation tool that streamlines outreach, lead generation, and prospecting. It automates tasks like sending connection requests, messages, and free inMails while also helping personalize messages with 15+ variables. Moreover, Dripify extracts lead information from LinkedIn and offers detailed analytics for managing campaigns and tracking performance.
2. Does Dripify offer a free trial?
Yes, Dripify offers a free trial, allowing potential users to explore the platform and its features before committing to a paid plan.
3. How long is Dripify free trial?
Dripify’s free trial lasts for 7 days.
Find your ideal Dripify alternative
We’ve gone through all the Dripify alternatives on the list. Now, it’s time to choose the one to level up your outreach.
As you make your decision, keep in mind—the right tool should save you time, streamline your workflow, and deliver real, measurable results.
Skylead checks all these boxes!
With multichannel outreach, Smart sequences, powerful personalization, and built-in analytics, it gives you everything you need—all in one platform.
Ready to supercharge your outreach, save +11 hours a week, and drive more conversions?
Give our 7-day free trial a chance and discover a smarter, more efficient way to connect with leads.
Disclaimer: Skylead is not affiliated, endorsed by, or connected with LinkedIn in any way.
Are you thinking of launching your first automated outreach campaign to reach out to your leads, book meetings, distribute content, or find new clients, ideal candidates, and backlinking partners?
We’ve got your back!
In this blog, we’ll take you through the entire campaign creation process using our powerful sales engagement tool and cold email software - Skylead - as an example.
We’ll even throw in some tips and tricks on achieving outreach success and cover use cases and outreach messages for every profession.
Let’s dive into it.
What is an outreach campaign?
An outreach campaign is an automated campaign that uses tools to streamline all outreach activities, thus allowing individuals to connect with their target audience faster. People may initiate these for email and/or LinkedIn lead generation purposes. However, they also use outreach campaigns to find new clients, nurture relationships with existing clients/customers, increase brand visibility, or promote content.
In the past, outreach campaigns revolved around individuals contacting other individuals manually, typically over the phone. Fast forward to now, we have outreach tools like Skylead to handle the reaching out part — over multiple channels, nonetheless!
The benefits of setting up an outreach campaign
Outreach automation has revolutionized the workflow of countless people! Here’s why!
Firstly, there’s the time-saving aspect. Automated outreach campaigns can be real game-changers, saving you as much as 11+ hours per week on manual work. That’s an extra 6 days each month to focus on other tasks!
What’s more, with outreach campaigns running on autopilot, you can reach a larger audience in a shorter period. This allows you to allocate resources more effectively and, thus, improve overall productivity. You can even reach people you thought were unreachable before, as email enrichment features like Skylead’s email discovery & verification can be included in the campaign flow.
Yes, as your business grows, so will your outreach. But that’s not a reason to worry! You can automate multiple campaigns at the same time and scale without compromising quality.
Finally, automated campaigns ensure no lead falls through the cracks. The system keeps things moving, whether through personalized emails, follow-ups, LinkedIn messages, or inMails.
Outreach campaign use cases
Salespeople
Sales professionals are often seen juggling multiple leads at a time. With so many leads to manage, little time is left for other tasks, plus the risk of missing important messages increases. Outreach campaigns streamline the process and ensure consistent communication across multiple channels.
Sales reps can continuously create campaigns with thousands of leads to keep their calendars consistently full. These campaigns also allow them to automate various outreach tasks, leaving them only to respond to messages and book calls.
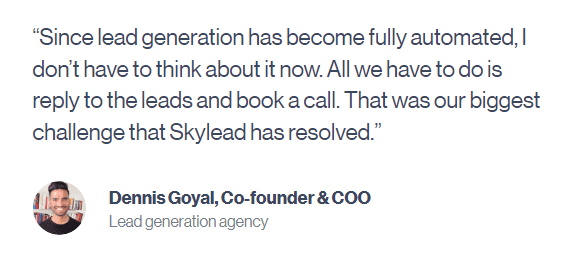
Why does this matter, though?
Because automating outreach tasks such as sending LinkedIn connection requests, inMails, messages, and emails helps sales professionals save +11 hours a week—hours they can now focus on lead nurturing.
Lastly, outreach campaigns permit salespeople to A/B test their messages. This allows them to see what works and what doesn’t, which in turn helps them optimize their campaigns for better results.
Marketers
When it comes to marketers, they can use outreach campaigns to:
- Generate leads for their sales teams;
- Find backlinking partners faster;
- Distribute content and reach wider audiences;
- Increase conversion — Marketers can leverage Skylead’s email discovery and verification feature to find their leads' email addresses. Once the tool finds and verifies emails, they can use them to create a lookalike audience on LinkedIn, Google Ads, and/or Facebook, which will result in better targeting and increased conversions;
- Expand their network and become thought leaders.
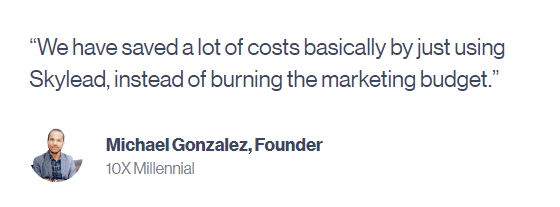
Recruiters
Manual cold outreach can be time-consuming for recruiters who are constantly scouting for the best talent. Thankfully, automation simplifies candidate engagement.
That said, recruiters can set up automated sequences to:
- Generate a large pool of candidates and pick the best from the crowd;
- Speed up the hiring process;
- Target individuals attending specific job fairs;
- Personalize the outreach to keep candidates’ interest high.
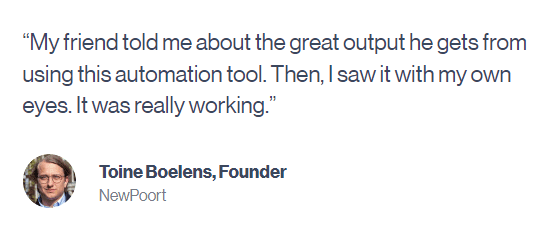
Company founders and agency owners
Company founders and agency owners typically have a full plate of managing daily operations, strategizing business development, ensuring financial health, and more. Automated outreach campaigns lighten the load and accelerate revenue growth.
If you are a company founder and have a B2B product or service to sell, outreach campaigns can help you reach out to a wider pool of leads and find clients faster on autopilot.
Meanwhile, if you are offering lead generation services as an agency, you can often white-label the tool used for campaign creation and thus help yourself to another stream of income. Moreover, outreach campaigns can also help you generate new leads for yourself and your clients!
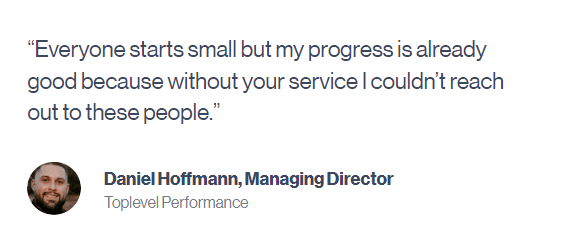
How to conduct an outreach campaign: Step-by-step guide
Now that we’ve covered the basics, it’s time to launch your first campaign! We’ll use our own tool, Skylead, to show you how you can use outreach tools to create one.
When you don’t know where to start…choose LinkedIn.
Jokes aside, in this blog, we will make a LinkedIn search-based campaign to ease you into the entire outreach campaign creation process.
However, you should know that, when it comes to Skylead, options are far more extensive. Aside from LinkedIn search, you can target leads from a:
- Sales Navigator search
- Sales Navigator lead list
- Recruiter search, Talent pool, and Pipeline URL
- LinkedIn post
- LinkedIn event
You can also import them through:
- API,
- And a CSV file.
That said, here’s how to start creating your outreach campaign.
#1 Target your audience
Start by typing a keyword in the search area.
We went by a job title.

After you click "People", choose the LinkedIn connection type you want your outreach campaign to target.

1st-degree connections are members with whom you are already connected on LinkedIn. Choose this connection type if you want to run a LinkedIn message campaign.
Meanwhile, 2nd-degree connections are leads you aren’t connected to but with whom you have mutual connections. You can’t send them a message right away. Instead, you need to connect with them first or reach out to them via LinkedIn inMail or email.
As for 3rd-degree connections, you aren’t connected to them either, but you also don’t have any mutual connections. Similarly to 2nd-degree connections, you can also reach them via email and/or inMail (free or paid).
Back to pinpointing your audience, you can also apply other filters to narrow down your search further (see the ‘’All Filters’’ option on the right).

Your search can result in thousands of leads, but LinkedIn limits the results to 100 pages, with 10 leads per page. So, if you create a LinkedIn search-based campaign, you can reach a maximum of 1000 people. However, if you're using Sales Navigator, the limit increases to 2,500 leads per campaign. Therefore, it is recommended that you narrow the list down as much as possible.
This is where defining your Ideal Customer Profile (ICP) and buyer persona comes in handy.
Your ICP is the type of company that would benefit most from your product/service, and your buyer persona is a fictional representation of your ideal customer within that company, as informed by market research and actual customer data.
That said, define your ICP and buyer persona first and use the corresponding LinkedIn filters to find them. That's how you'll target the best leads!
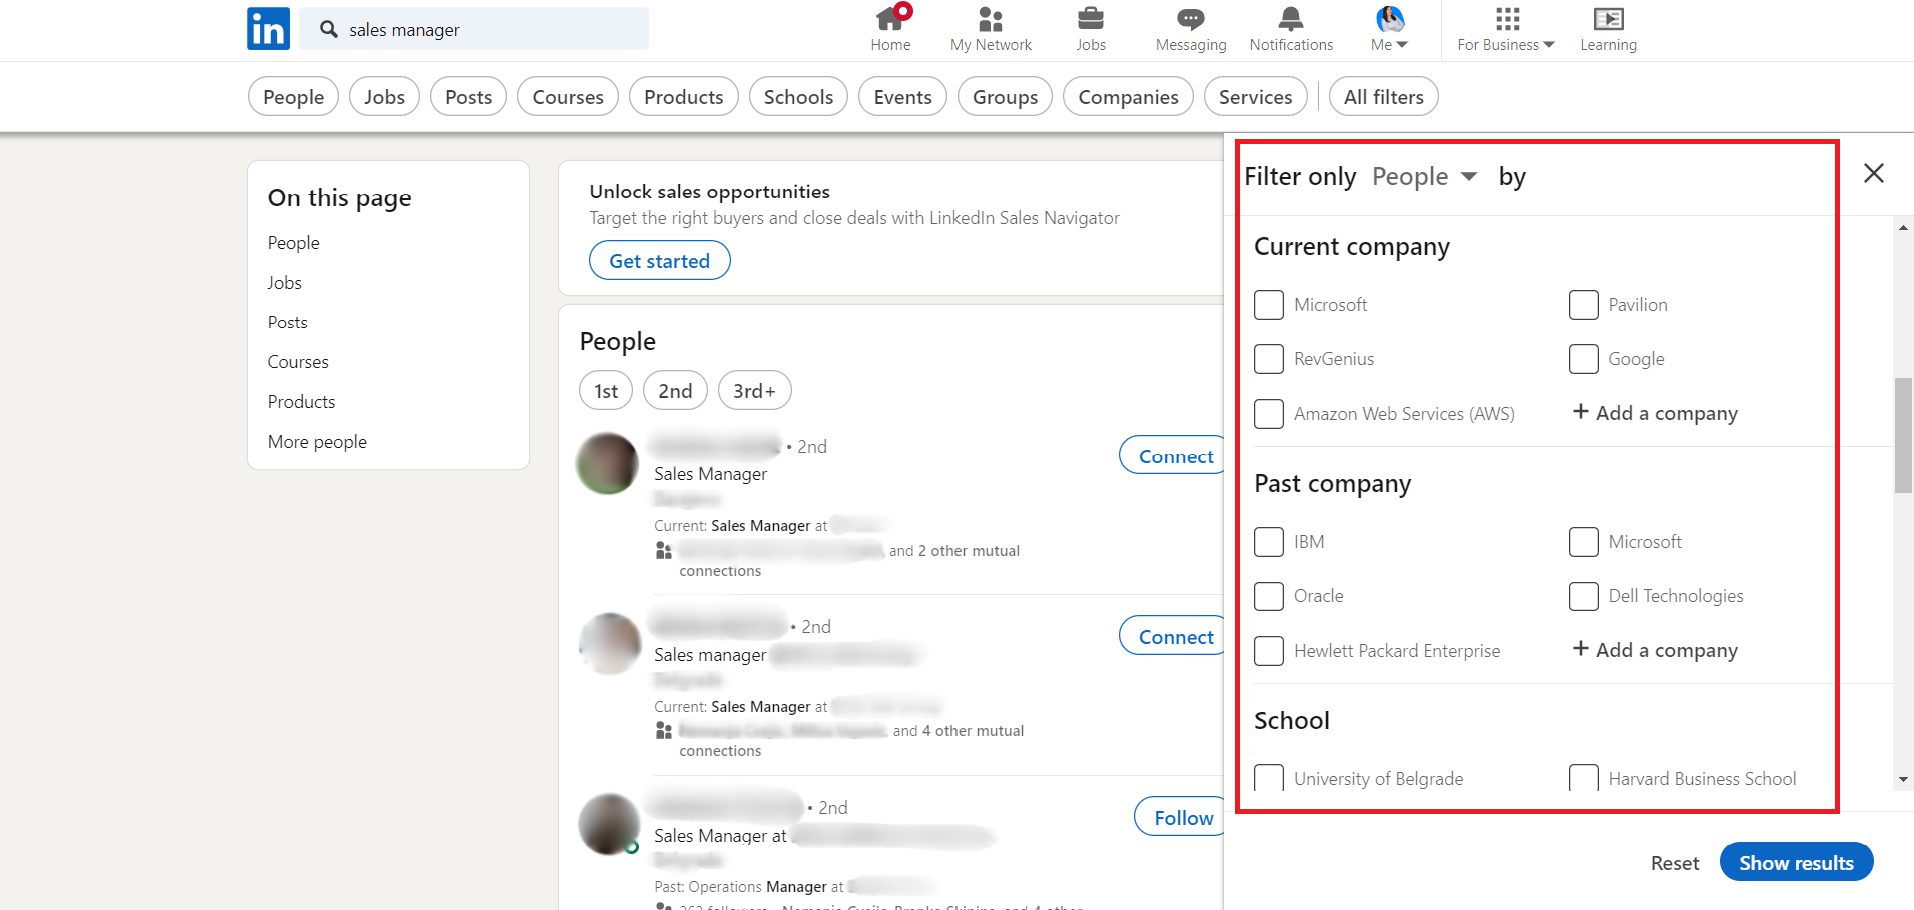
#2 Import your leads
You’ve completed LinkedIn prospecting and carefully chosen your audience. What now?
You proceed to build an outreach campaign!
To do so, firstly, go to your Skylead dashboard and locate the Campaigns page.
Once there, click ‘’Create new campaign’’.
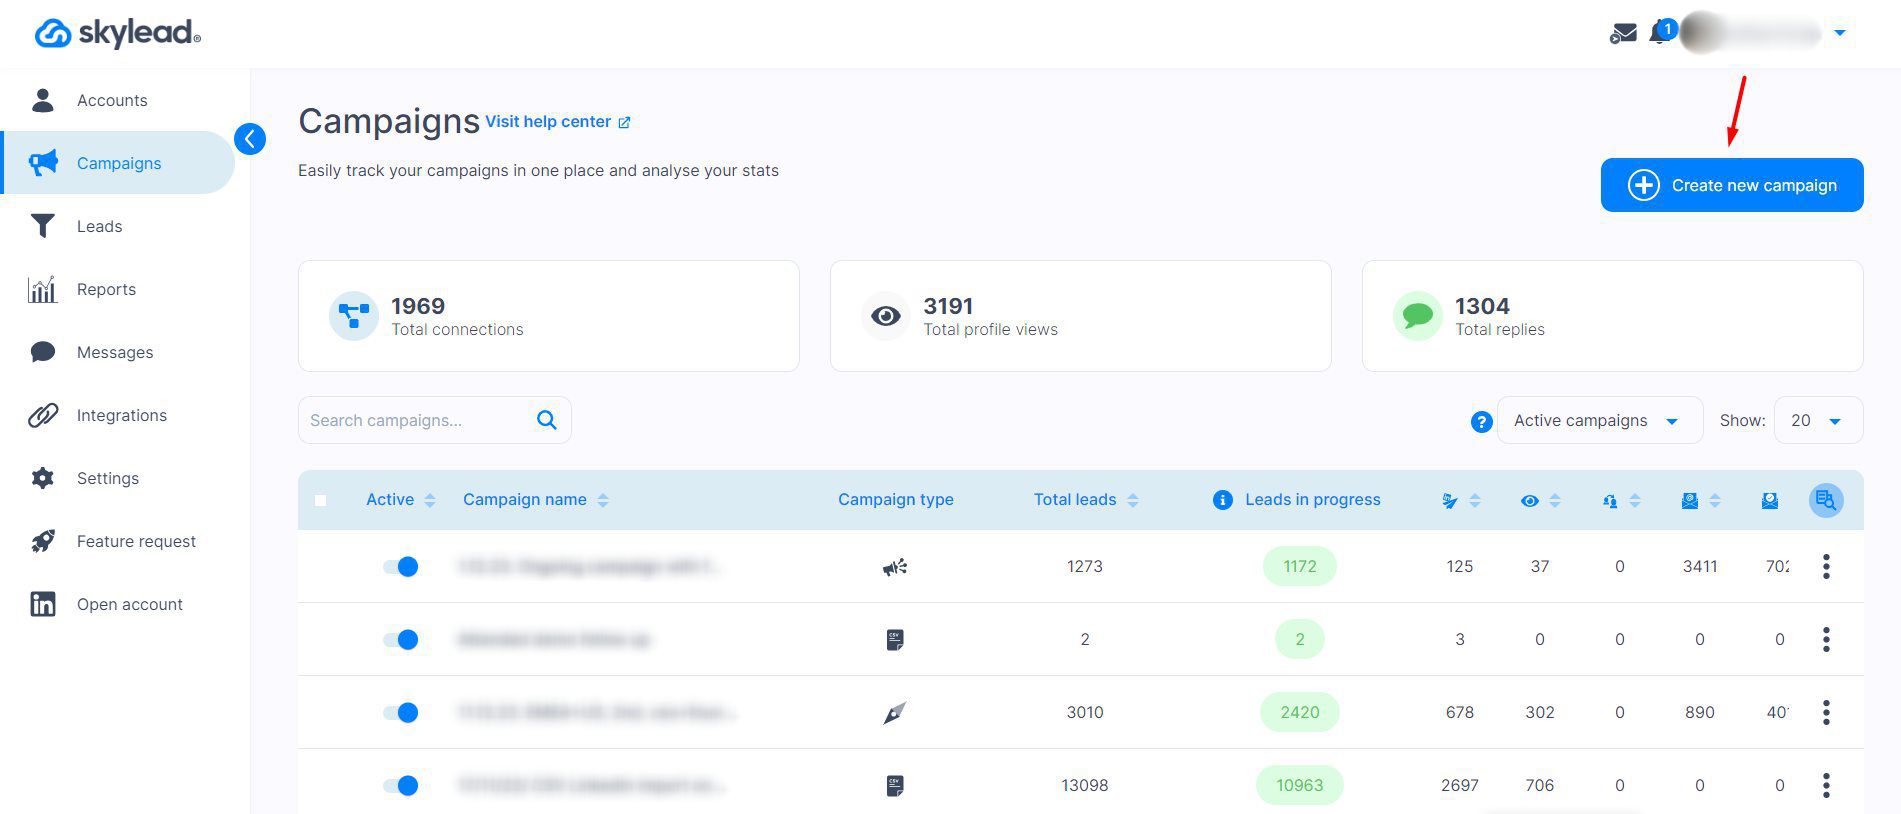
Now, go back to LinkedIn and copy the search result URL.

Return to Skylead, insert your campaign name, and paste the link you just copied.
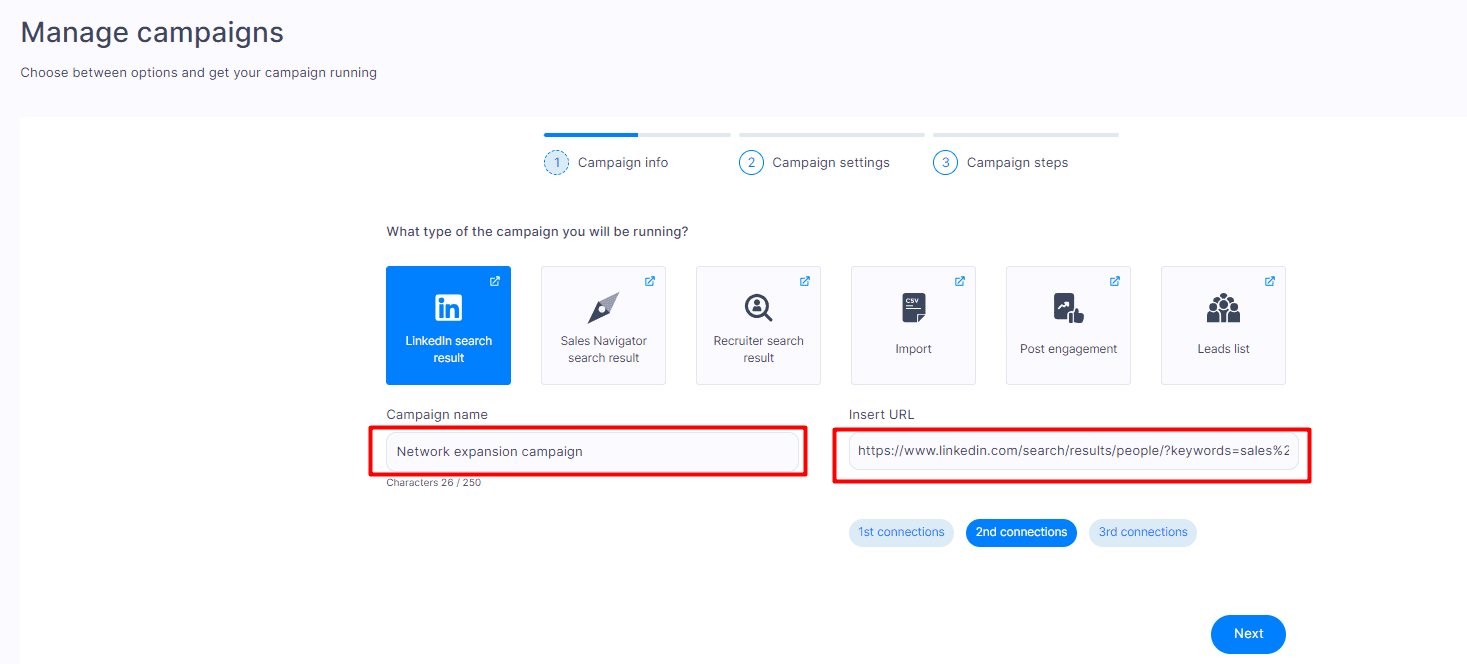
Under the URL, you’ll see a connection-type button. If you’ve selected the connection type on LinkedIn, Skylead will automatically recognize it. If not, you can select it now.
Click ‘’Next’’.
#3 Define outreach campaign settings
Now comes the time to define the settings for your outreach campaign.
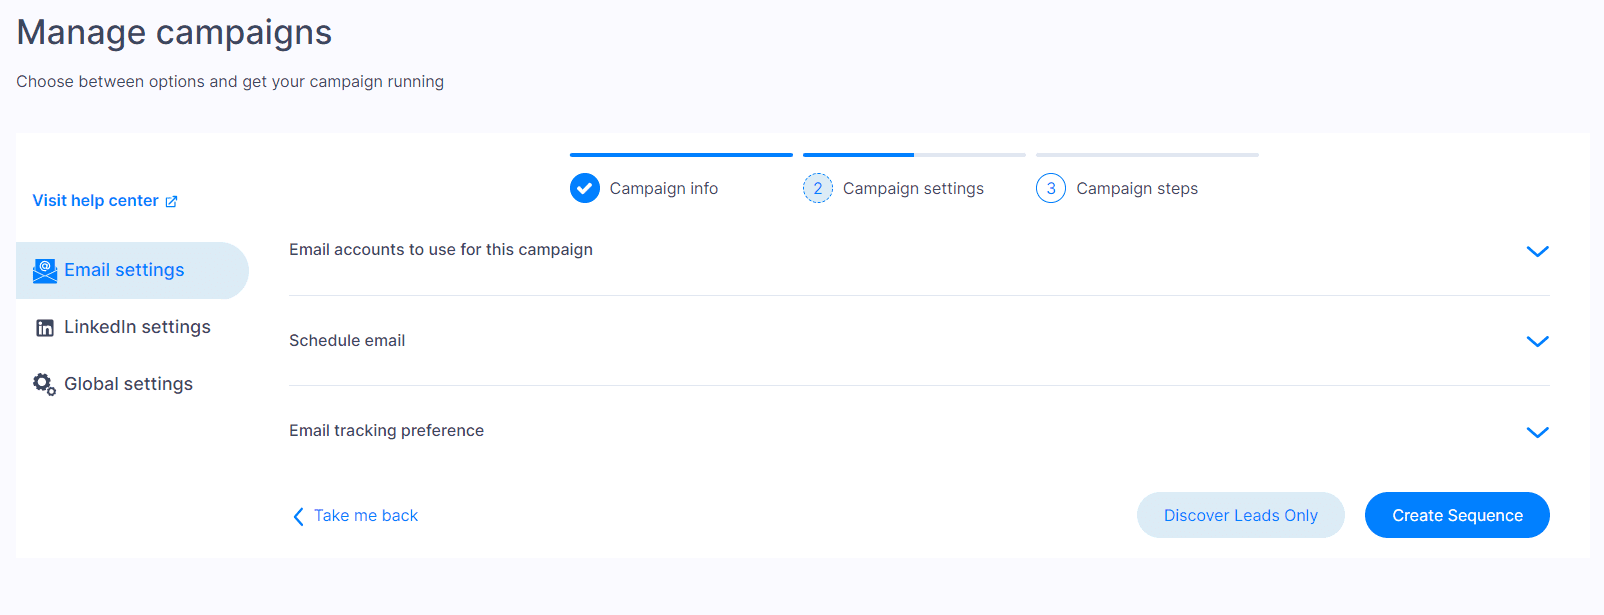
On the left side, you’ll see 3 different types of settings:
- Email settings
- LinkedIn settings
- Global settings
Email settings
If you plan to use email outreach for your campaign, firstly, click the ‘’email settings’’ button.
This is where you’ll notice 3 drop-down menus.

Expand the first menu to select the email account(s) to use in your campaign.
Skylead lets you add an unlimited number of email accounts at no extra cost.
Once added, the software will auto-rotate them so you can send tens of thousands of emails per month. This way, you can bypass the email limit while protecting your domain.
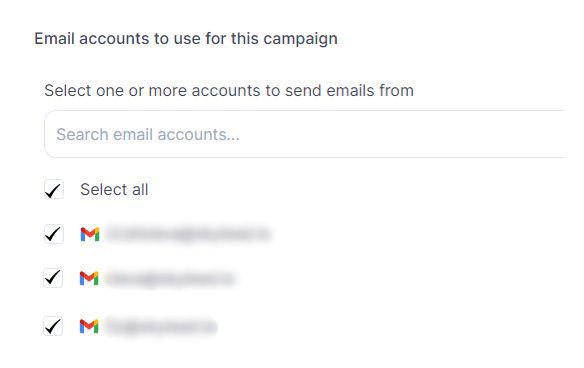
The second menu gives you the option to choose a schedule that Skylead will follow for your email outreach.
Here, you can select your default schedule or create a new one. You can also manage your team’s schedule (unless you are a one-person team).
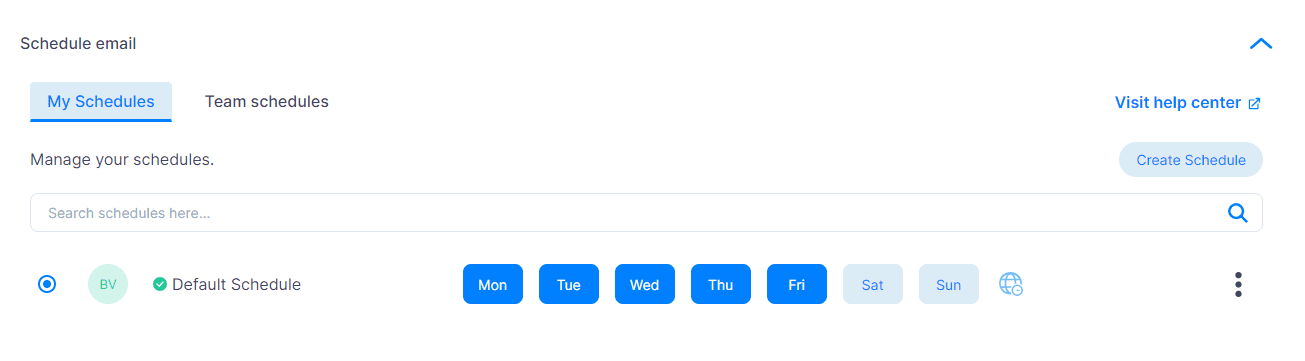
Lastly, it’s time to set up your email tracking preferences.
With these options on, you can:
- Track the number of email link clicks
- Track the number of opened emails
- Authorize Skylead to send text-only emails (no HTML) with no visuals. However, if you turn this option on, you won’t be able to track opened emails and email link clicks.
LinkedIn settings
In terms of specific options, you can customize the LinkedIn part of your outreach with:
- Discover Premium LinkedIn accounts only — Turning this one on singles out leads that have a LinkedIn Premium account;
- Discover Leads with Open Profile status only — Select this, and the tool will exclude leads whose profile is set to ‘’Private’’ (aka leads who can only receive paid inMails).
- Collect contact information — With this option on, Skylead will collect all publicly available information from the lead’s LinkedIn profile. This option implies a “View profile” step. You don’t need to add it to your outreach campaign, though; it will be executed in the background.
- Remove leads with pending connection requests to exclude unresponsive leads.
- Refresh search automatically — Turn it on, and Skylead will periodically refresh your search results URL for new leads. Moreover, if they emerge, it will automatically add them to your campaign.
Global settings
Under global settings, you can define targeting options and schedule the start of your outreach campaign.

As for targeting options, you can choose to (or not):
- Include leads that replied to your messages—applies to leads you had a conversation with via LinkedIn messages, inMails, or emails.
- Include leads found in other campaigns from your and your team's seats—this is not applicable to your first campaign, so feel free to keep it turned off. However, if anyone on your team has run outreach campaigns in Skylead in the past, we suggest turning this option off.
- Discover new leads only—If turned off, this option can also include leads from other campaigns under your seat. As such, it’s not applicable to your first campaign. However, if this is your second campaign, keep it turned on to ensure you don’t have any duplicates.
Once you’ve determined the leads to target, select the date and time when your campaign will kick off.
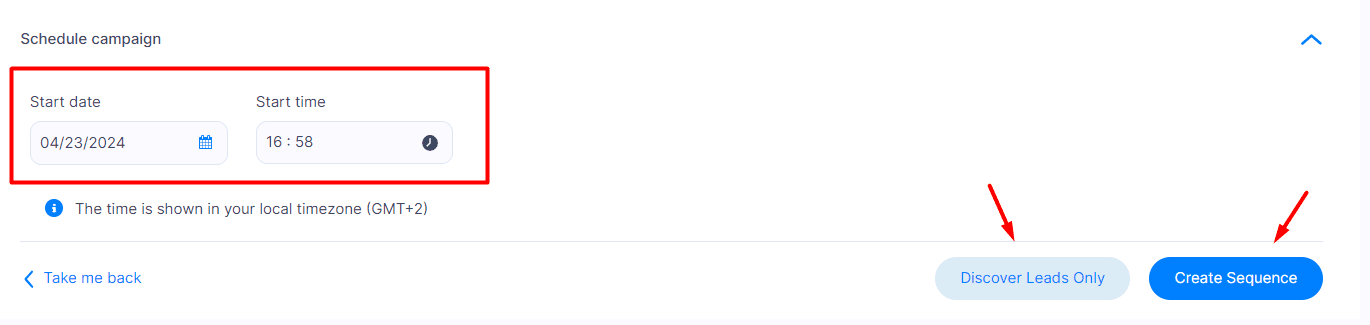
💡 Pro tip: Make sure your campaign starts running (and keeps on running) during your leads’ working hours.
If you’re only interested in finding leads and their contact information for future outreach, click on the ‘’Discover Leads Only’’ button. Then, you can find them on your Leads page.
However, if you wish to reach them out on autopilot, continue to the ‘’Create sequence’’ button.
#4 Build a Smart sequence
Multichannel outreach is currently the most effective way of generating leads, and Smart sequences represent a groundbreaking realization of that path!
It’s precisely these Smart sequences that make our outreach campaign flow. We are talking about an algorithm that lets you combine different actions and if/else conditions that unfold depending on the prospect’s behavior. But what for? To make sure you get to each of them as quickly and efficiently as possible.

Now, let’s create one, shall we?
After clicking the ‘’Create sequence’’ button, a pop-up will appear that prompts you to decide between using a sequence template or building a sequence from scratch.
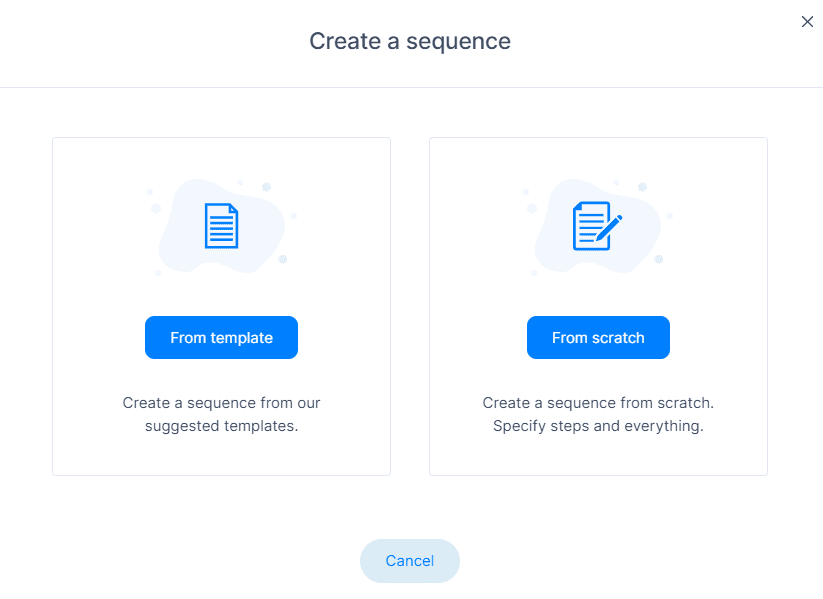
You are welcome to browse through proven smart sequence templates that our team of experts made (and tested) for you. These are templates with real data that you can use immediately.
But for the sake of this blog, we’ll show you how to create one yourself.
So, choose the ‘’From scratch’’ option.
Smart sequence builder
Upon entering the Smart sequence builder, this is what your dashboard will look like.
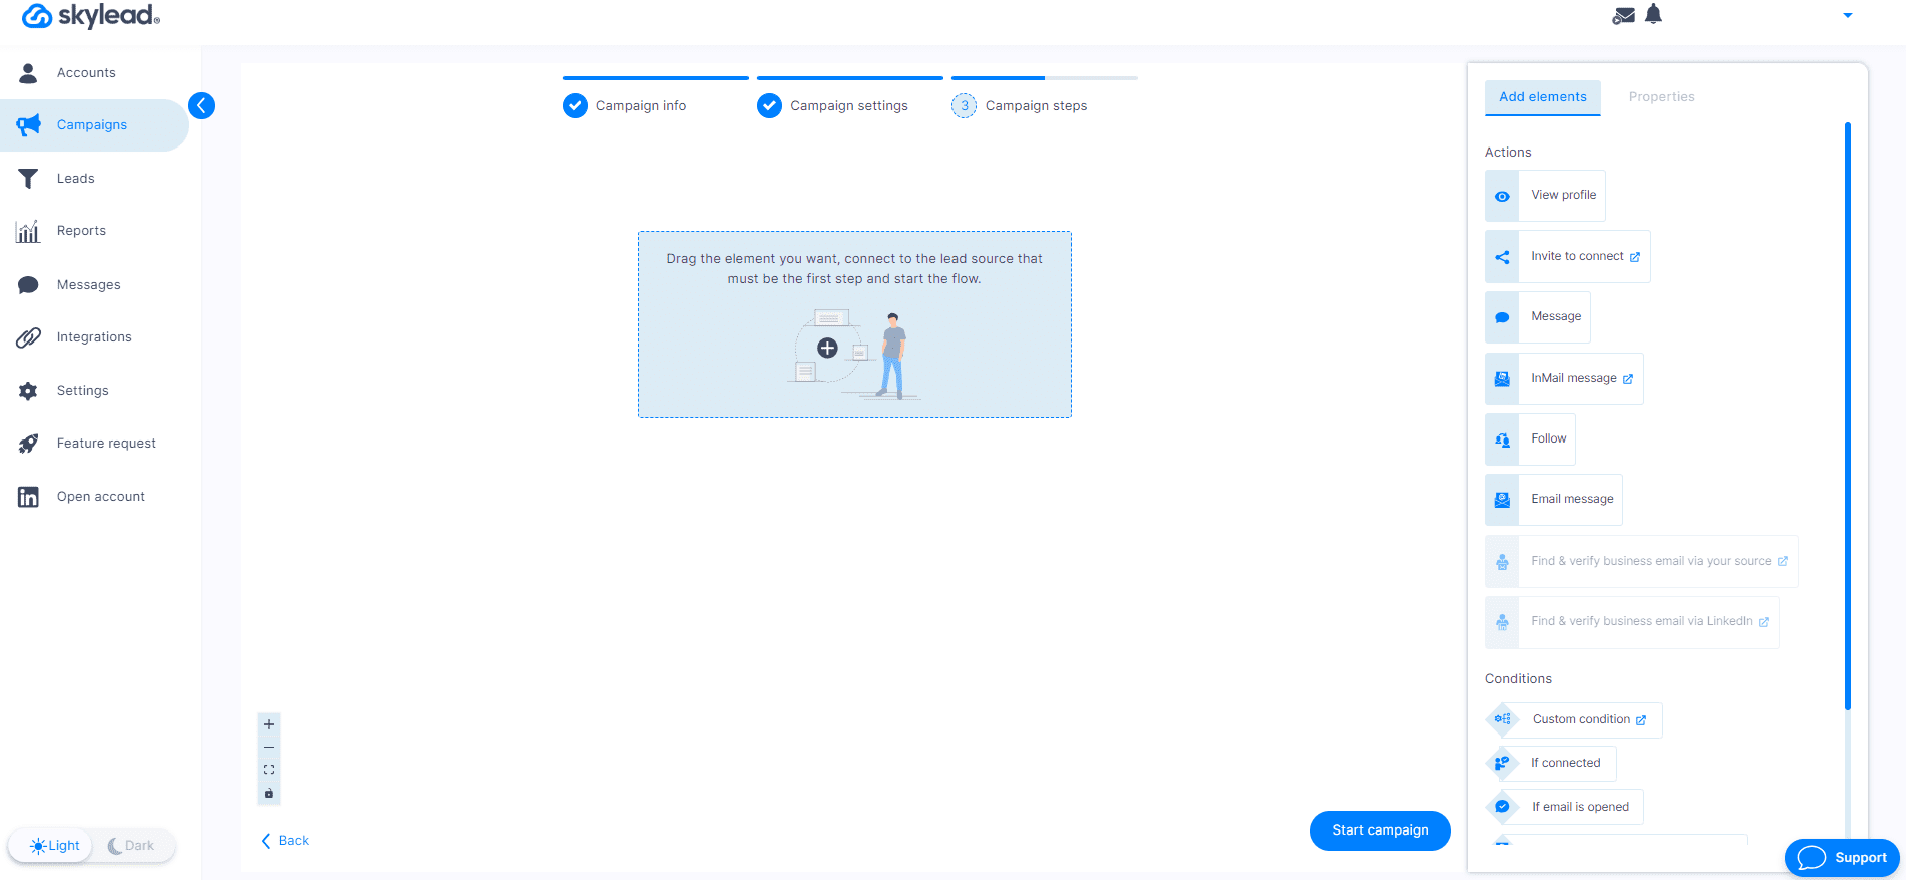
As you may see, there are actions and conditions on your right.
Drag them one by one to the workspace dashboard and connect them in a coherent way to create your outreach flow! Don’t forget to set delays between the actions.
Certain actions let you insert the message (Invite to Connect, Message, inMail, Email) and personalize it further using all the variables you need (preset and custom ones). You can also A/B test up to 5 different variants of your copy to determine which one resonates best with your leads.
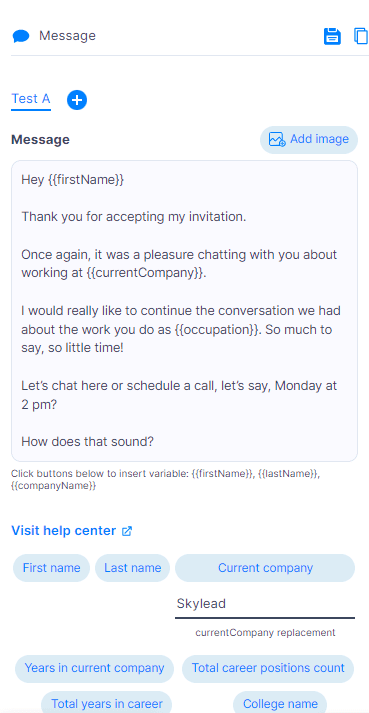
If you wish to further personalize inMails, emails, and LinkedIn messages, you can do so with Skylead’s native Image and GIF hyper-personalization feature.
To access it, click the ‘’Add image’’ button above the message editor.
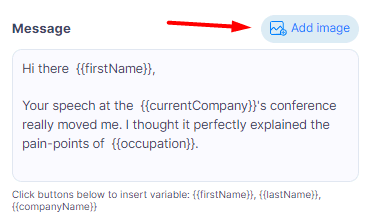
Then, you’ll be taken to a library of templates. Hit the ''Create new template''.
Next, upload the image you wish to edit.
After choosing an image, click ‘’Submit’’.
Then, a new window will open where you’ll have the option to add:
- Your profile picture (extracted from LinkedIn)
- Your lead’s profile picture
- A custom logo
- Your lead’s logo
- Text
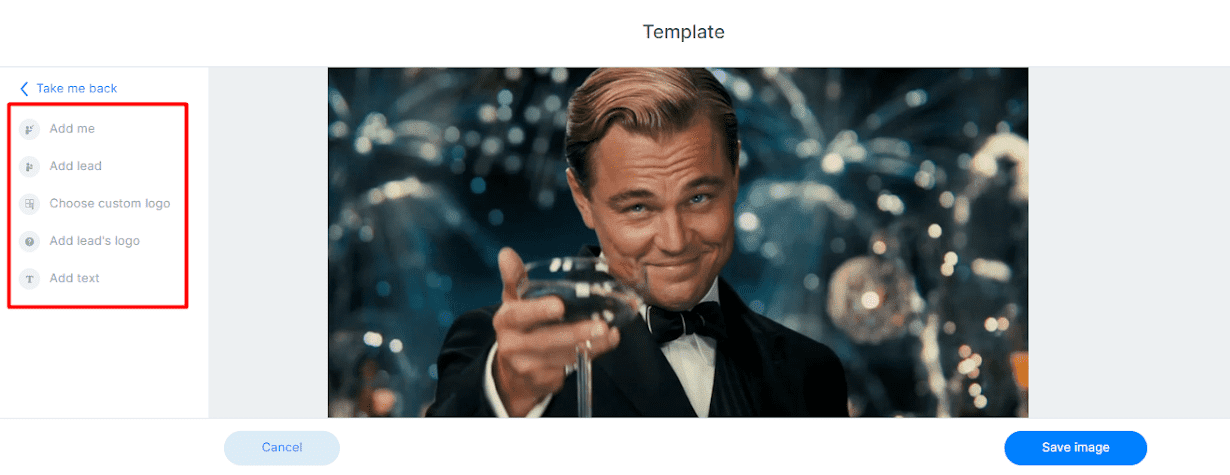
…and here’s what the final result can look like.

Of course, feel free to play around with the image editor as you see fit and create something that will keep those replies coming!
Once you are happy with the steps, your copy, and delays, you can save your sequence as a template to reuse at a later date.
Finally, click ‘’Start campaign,’’ and that’s it! Your outreach campaign has been successfully launched!
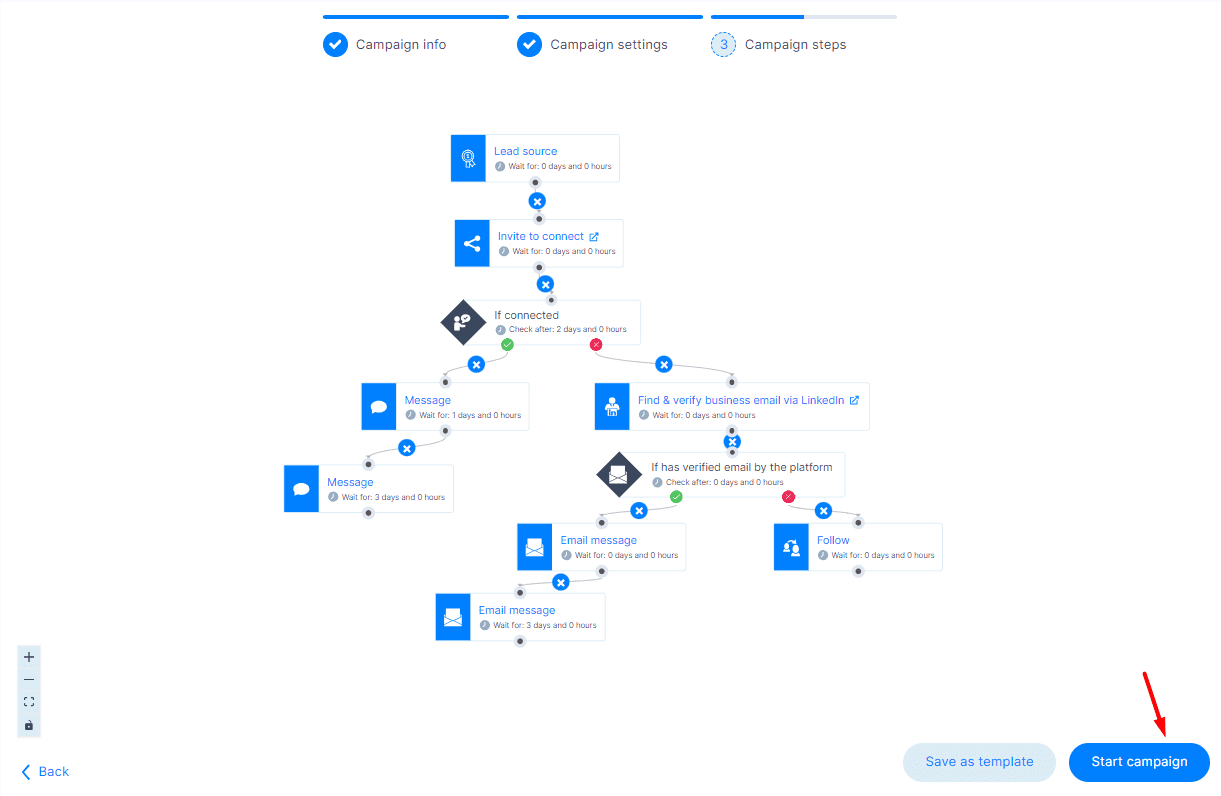
#5 Analyze and optimize your outreach campaign
The work doesn’t stop the moment you hit the ‘’Start campaign’’ button. In fact, after putting your outreach campaign in motion, it’s time to sit back and observe the results.
Luckily, Skylead has a nifty Reports page that lets you track performance in three different view modes:
- Graph
- Tabular
- Step-by-step
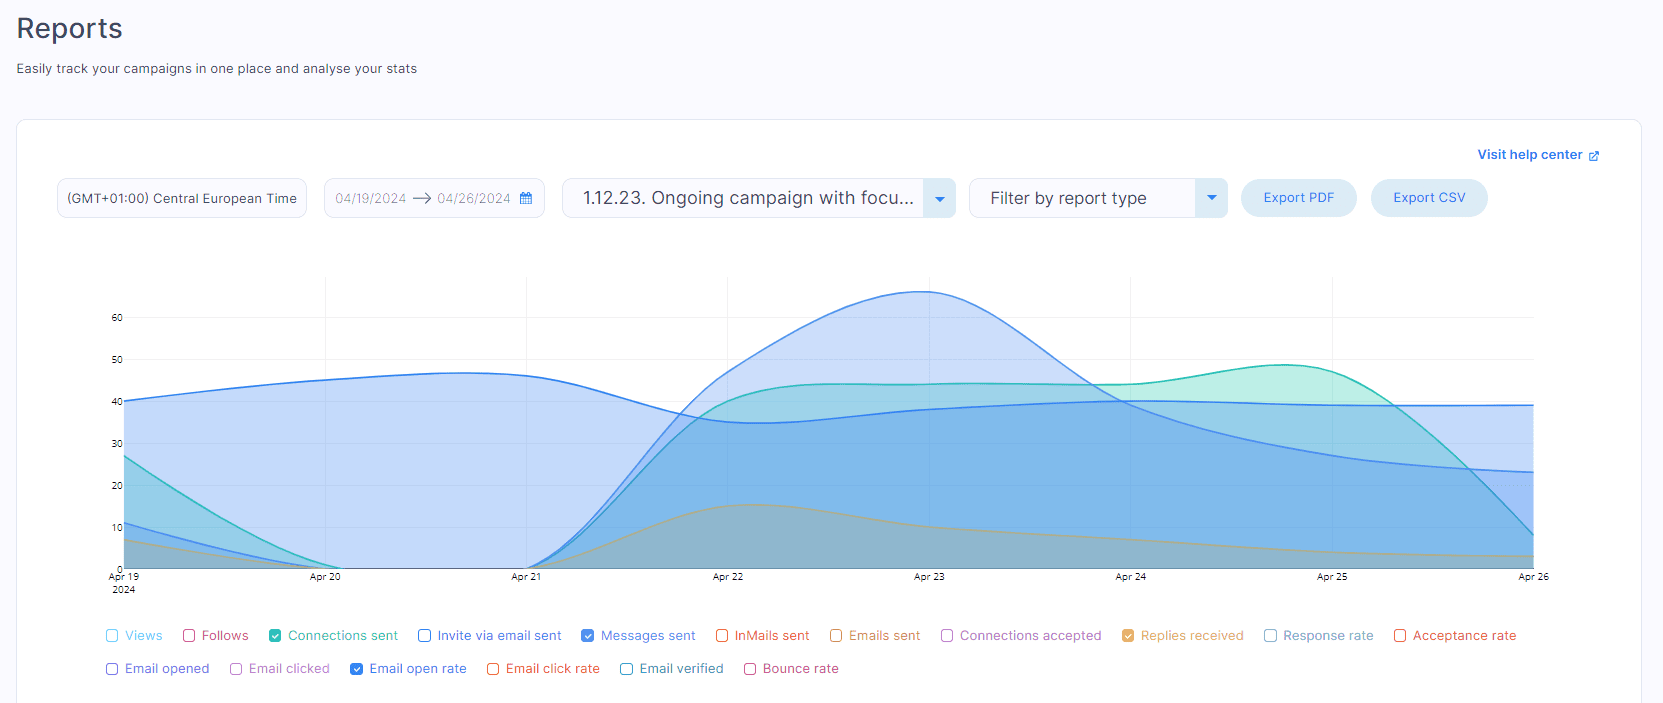
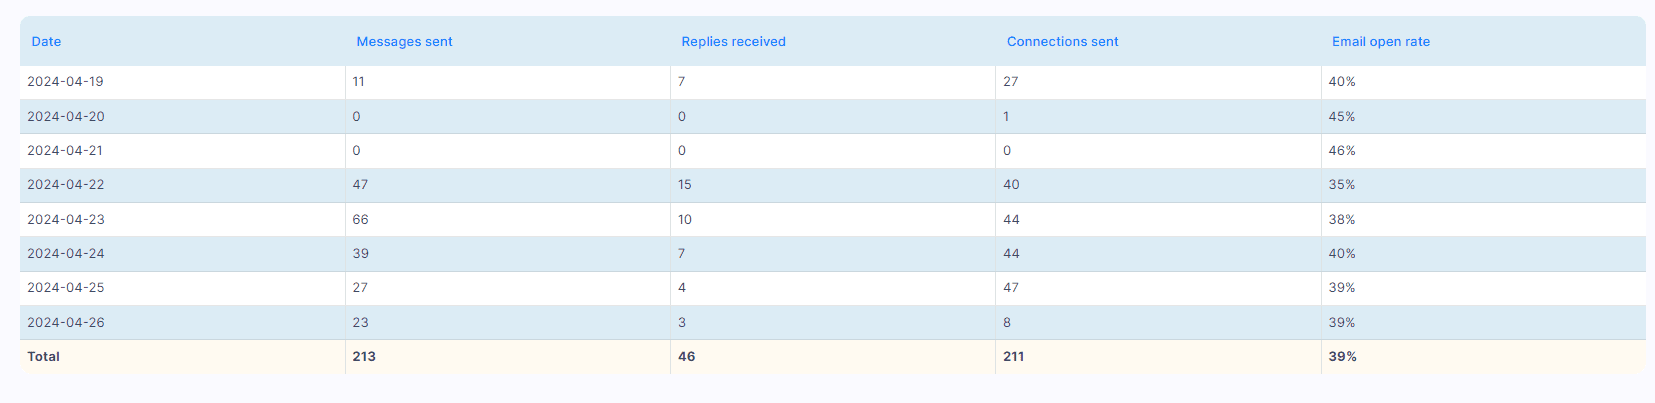
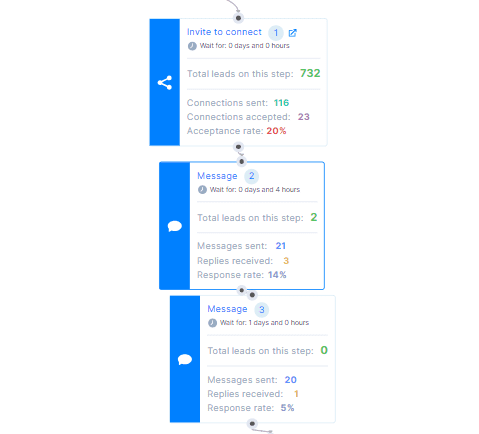
Here, you can monitor different metrics, such as your connection request acceptance rate, email open and click rates, response rate, and more.
The graph and table view differ from step-by-step campaign analysis in that they show daily fluctuations in metrics. As a result, they make it easy to spot patterns and trends. Once you’ve got a handle on these, you can fine-tune your ongoing campaign and make informed choices for the ones down the line.
On the flip side, a step-by-step breakdown really comes in handy when running A/B tests. The results produced by different variants are displayed side by side, making it simple to determine what messages work and should be used in your next campaign vs. those you should discard.
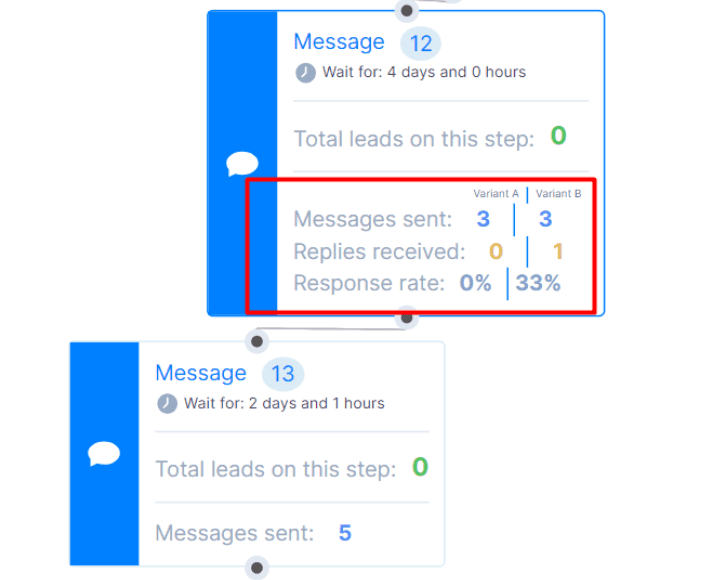
#6 Talk with your leads
Skylead automates the initial outreach. But remember, the goal is to spark conversations that you will take over. Once a lead responds, the sequence stops for them, and it’s your cue to jump in and build that relationship.
Luckily, Skylead makes it easy for you to manage these conversations! The software comes with a Smart inbox that consolidates all messages received via LinkedIn, Sales Navigator, Recruiter, and emails into one place.
Moreover, to keep things organized, you can label your chats based on their status or any criteria that suit your workflow. This can help you prioritize your responses and measure your conversion rates.
Additionally, Skylead allows you to leave notes on your chats. These can be reminders to follow up, points to mention in the next interaction...or any other information that can help you personalize and enhance the conversation.
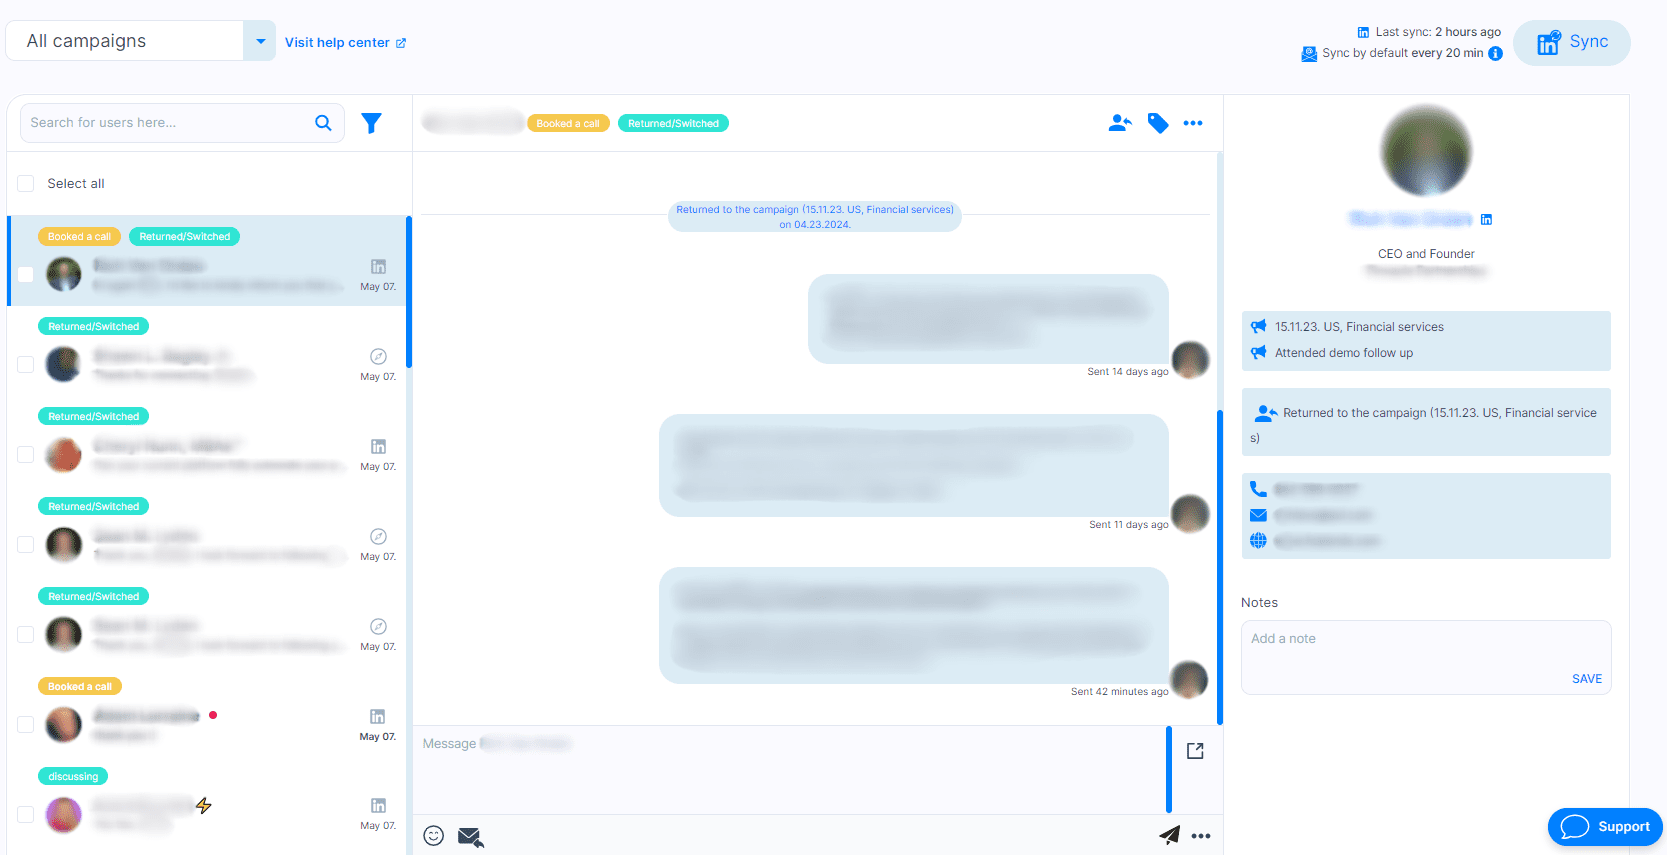
Tips for a successful outreach campaign
Now you know how to set up your outreach campaign and what to look out for. However, you have yet to learn how to make the most of your outreach.
Personalize your messages
People are more likely to respond to personalized outreach messages that feel relevant to them. So, take the time to customize your messages based on the information you have about your leads.
With Skylead, you can reach a whole new level of personalization in cold outreach. Use pre-defined variables, add custom ones if using a CSV file as a lead source, and don’t forget to take advantage of our image & GIF hyper-personalization feature. They can increase your response rate up to 63%!
Feeling uninspired? Head over to our blog to explore personalized image and GIF templates that improve response rate!
Follow up in due time
Don’t be discouraged if you don’t get a response right away. Sometimes, all it takes is a well-timed follow-up message. However, be mindful of the frequency of your follow-ups to avoid coming off as spammy. The golden rule is to wait between 2 and 5 days from the initial message. And if you aren’t sure how to write a follow up email after no response, we have a handy guide to help you out!
Outreach campaign examples and templates for each role
Remember how Skylead came with the premade templates for you to use? Here, we’re sharing some of the best-performing sequence and message templates applicable to each role and different situations.
Sequence for sales professionals
If you want to target someone in an alternative way, why not use a viral LinkedIn post that your target audience has commented on?
In that case, you can use the template below to reach out to leads who have engaged with it.
We tested it out, and our results were:
- 76% acceptance rate
- 35% reply rate
- 85% open rate
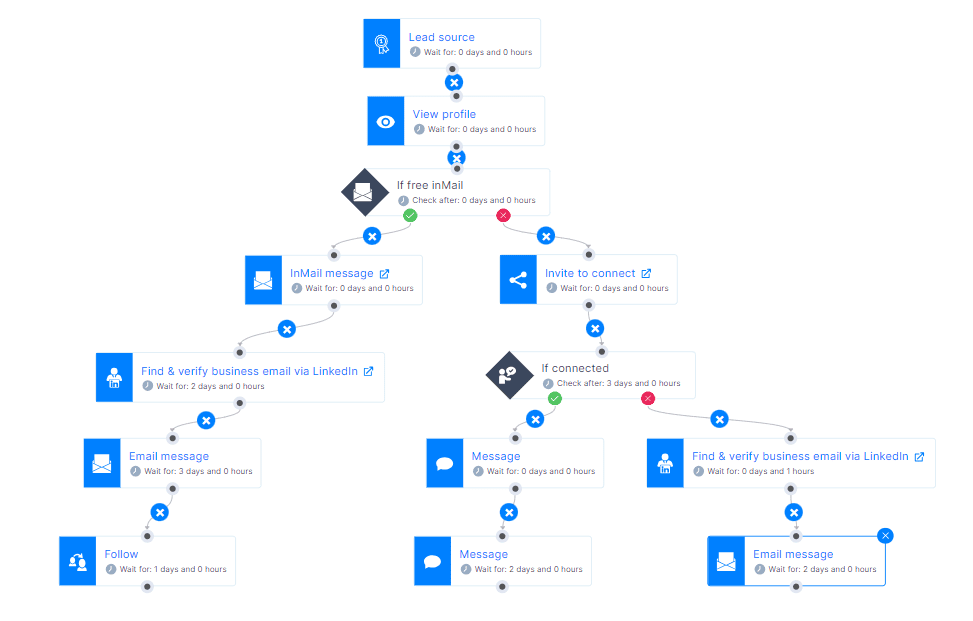
Outreach campaign template for marketers
Feel like targeting your website visitors? You might like this sequence template, which aims to do precisely that!
For this one, we had a whopping:
- 43% acceptance rate
- 23% reply rate
- 71% open rate
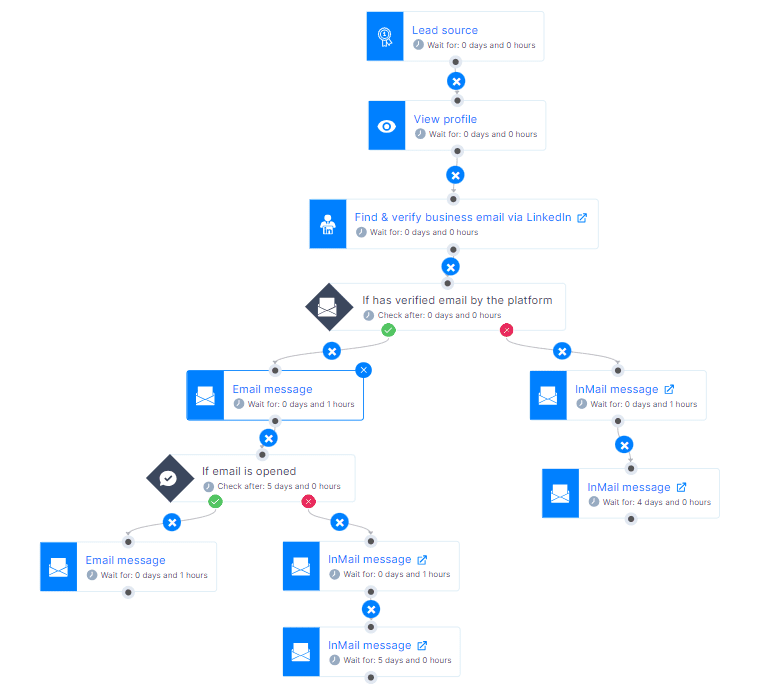
Template for company founders and agency owners
Check out this template specifically designed for reaching out to B2B founders.
We’ve run the numbers and found that, with it, our acceptance rate was 44%, reply rate 29%, and open rate 82%!
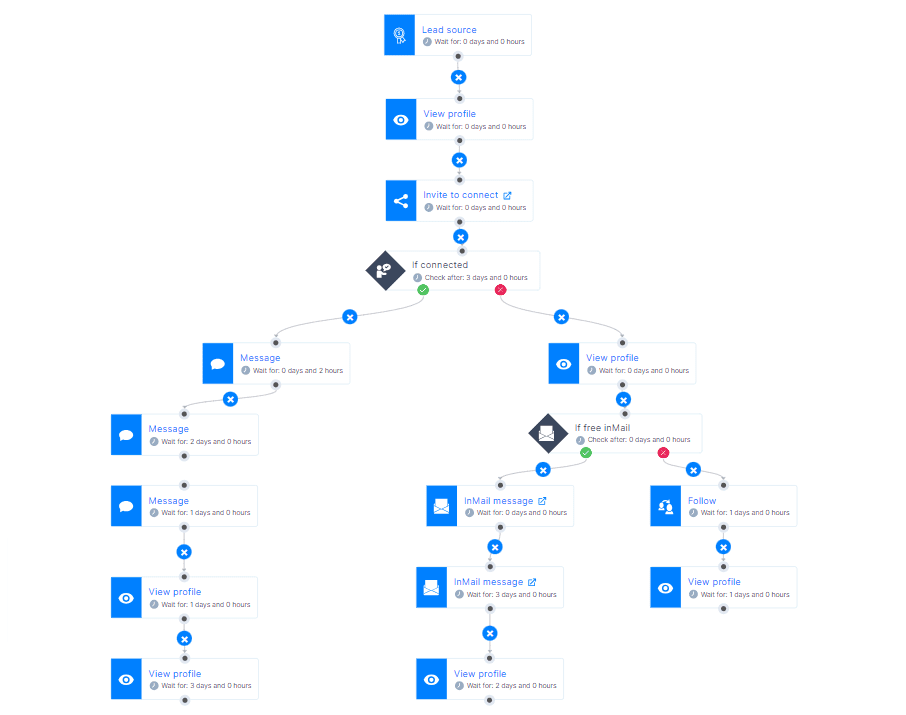
LinkedIn outreach template for recruiters
For example, let’s say you wish to reach out to your perfect candidate for the job in your company. In that case, your LinkedIn connection request can sound like this:
Hey {{firstName}},
My name is {{yourName}}, and we’re currently seeking a {{Occupation}}, and I truly believe that this role offers you a platform to leverage your skills and make a significant impact at our company.
I’d be happy to share more details about the role and benefits we offer.
Choose to use it, and you might see results similar to ours, which were:
- Acceptance rate 79%
- Reply rate 46%
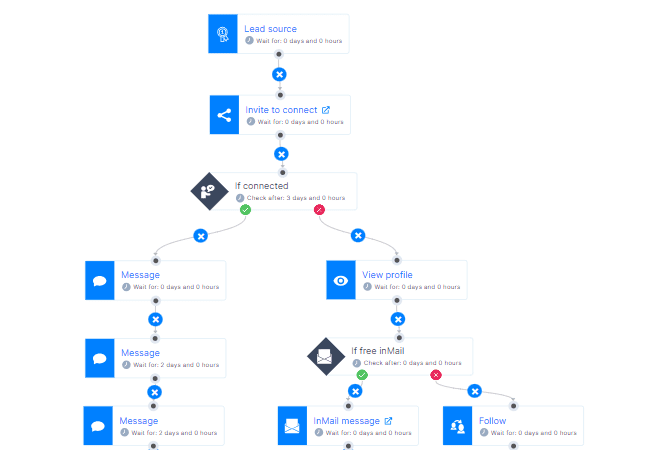
Frequently asked questions (FAQs)
1. What metrics or KPIs are most important to track the success of an outreach campaign?
Key metrics to focus on include response rate, conversion rate, and ROI. These indicators help gauge engagement, effectiveness in converting prospects, and the overall financial efficiency of the campaign.
2. How do you conduct an outreach campaign?
To conduct an outreach campaign, define your target audience and choose the appropriate channels. Create a structured plan, personalize messages, and use automation for efficiency. Monitor important metrics to adjust strategies and follow up regularly to maintain engagement and improve response rates.
3. How can you segment the audience for different types of outreach campaigns?
For successful segmentation, you must understand and divide your audience based on factors like industry, job role, company size, and past interactions. This will ensure your messages resonate more effectively with each segment and will reflect positively on response rates and campaign relevance.
Ready to splash into outreach waters?
As our guide comes to an end, it marks the beginning of your cold outreach journey.
All it takes is that first outreach campaign to get you started, and it's just a couple of clicks away.
But remember, cold outreach isn't a one-and-done type of process. In other words, you can't just build your campaign, launch it, and be done with it. It's what comes after launch that actually matters.
So, in the aftermath of creating an outreach campaign, pay a close eye on the results it brings. But don't get discouraged if everything doesn't go as planned! Instead, observe the data, learn from it, and use it to improve your subsequent outreach efforts.
And you know what the best thing is? Skylead comes with a free 7-day trial period that you can use to test out the outreach waters. Create your account now, build that sequence, and watch as your outreach — and conversions — skyrocket!
Disclaimer: Skylead is not affiliated, endorsed by, or connected with LinkedIn in any way.
If you ask yourself how to connect with someone on LinkedIn, you are in the right place. We will go over a couple of methods you can use to add someone to LinkedIn, including the LinkedIn App, so you can grow your network and prepare for LinkedIn lead generation.
However, that is not all. Keep in mind that building your network is all about building relationships. Thus, we will mention what you need to do before adding connections. Moreover, we will get into the core of what is truly important for a successful professional relationship and, therefore, a successful business.

How to connect with someone on LinkedIn?
Building your network is not just about having a large connection number. It is about establishing relationships, getting in touch with the people from your industry, sharing experiences, and growing your business.
Furthermore, 80% of professionals found networking crucial for career success*. For example, salespeople and hiring managers proved this by finding their perfect leads and ideal candidates while growing their network. And with the rise of social selling and word-of-mouth recommendations, networking on LinkedIn really did become essential for professionals in today's world.
So to take full advantage of networking, let’s start from the beginning - how to connect with someone on LinkedIn.
8 ways to connect with someone on LinkedIn
To connect with someone on LinkedIn via your PC, you can use one of these ways:
- Add connections when creating your LinkedIn account
- Send a connection request via their profile
- Connect on LinkedIn via the “People Also Viewed” section
- Send invites to people from Search Results
- From the “People You May Know” section
- Use the “More Suggestions For You” Section
- Connecting with people from events page
- Asking other network members
Add connections when creating your LinkedIn account
First, when you create your LinkedIn account, you can add connections you might know in real life. LinkedIn recommends them from the school you chose as your education or from the company you set to work in.
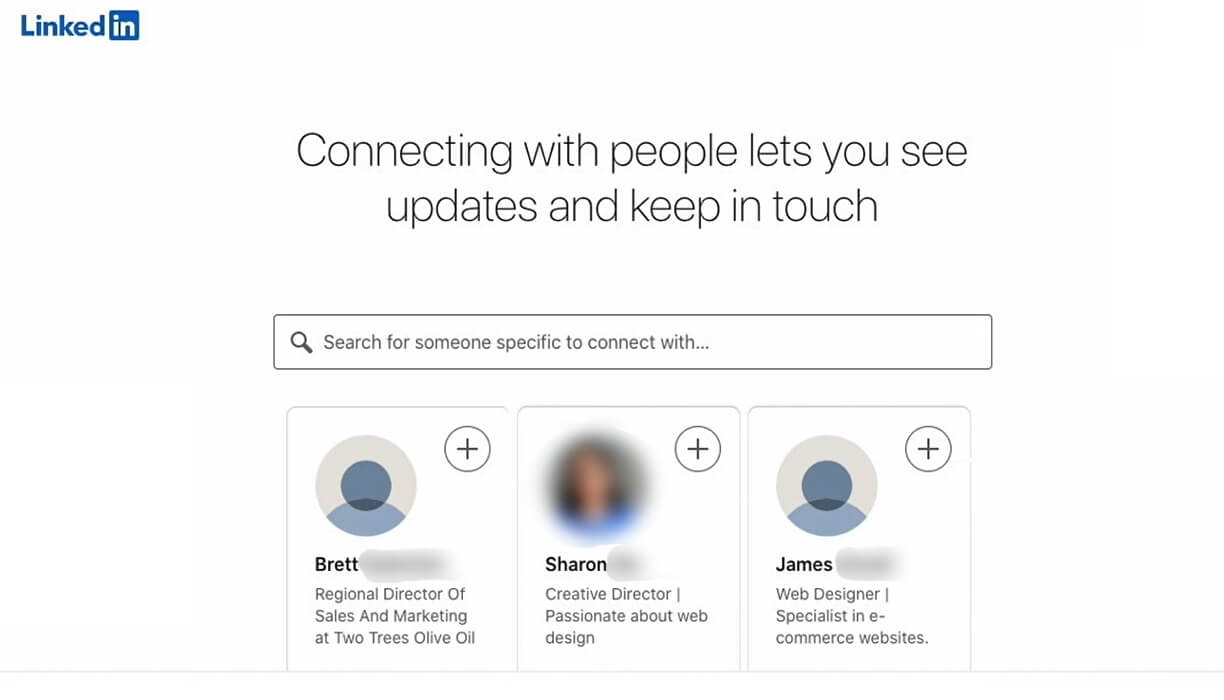
In addition, you should know that if you add people to your network using this option, you will not be able to write a personalized note. In other words, when you click the + button, the people you sent the invite to, will only get the following LinkedIn’s general message:
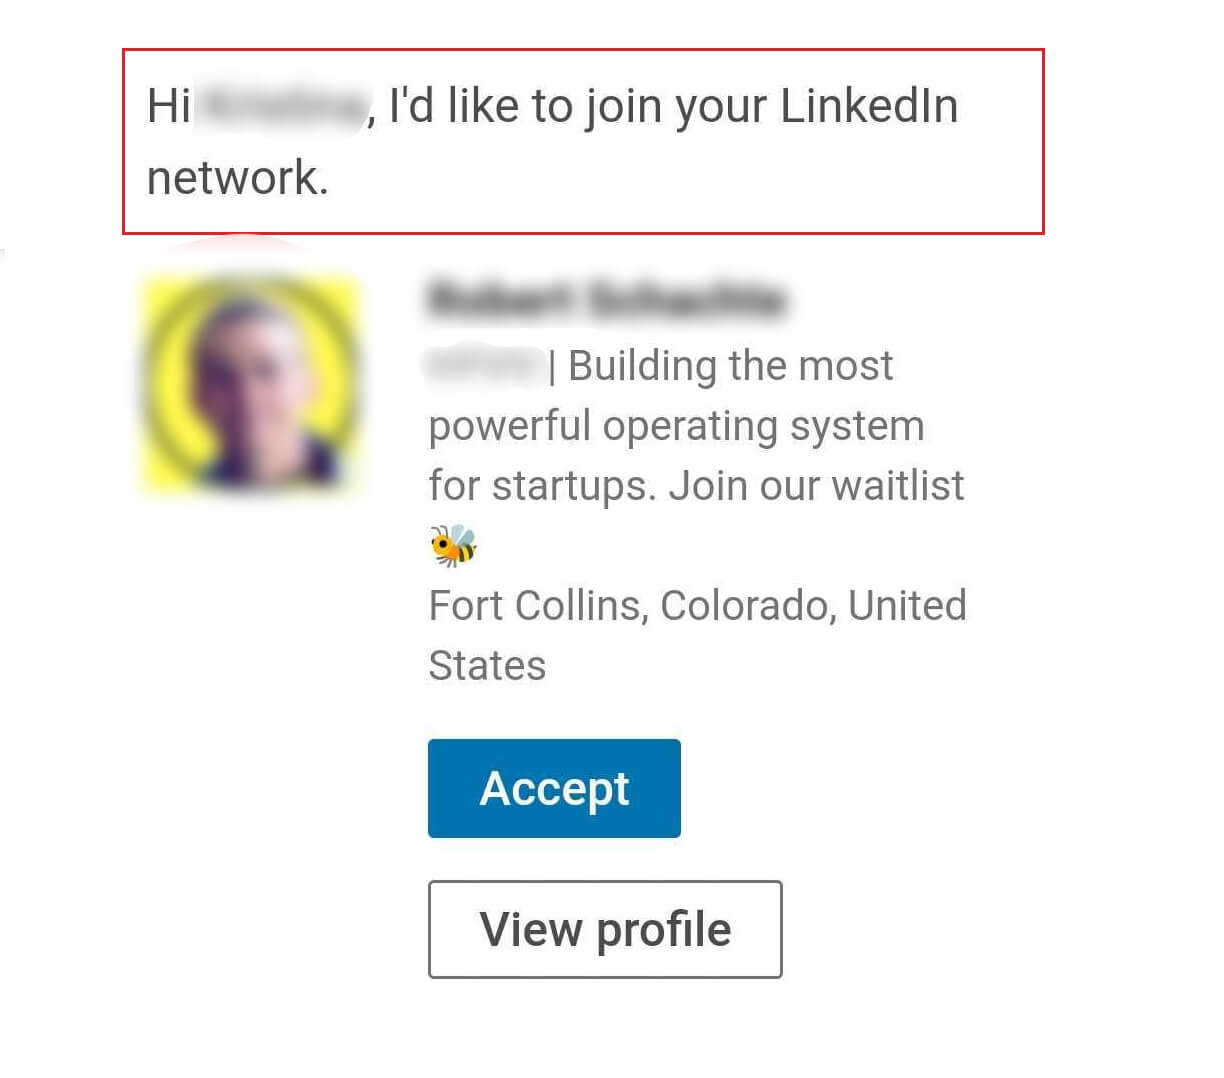
Send a connection request via their profile
The easiest way to connect with someone after browsing through their profile on the desktop is to get back to the top of their LinkedIn profile and hit the Connect button.
If you plan to connect with someone on a LinkedIn app, the process is similar to desktop. The slight difference is that you need to go to the More Options button and click Personalize Invite. Otherwise, if you click the Connect button only, your invite will be sent automatically, and you won’t be able to personalize it.
Sometimes you will notice that a LinkedIn user doesn’t have an immediate Connect button on their profile. This can happen because of two reasons:
- The user either has their creator mode on;
- Or they set the Follow button as primary via their Settings & Privacy page.
So you would need to click the More button and then Connect option from the drop-down menu. In addition, this is how to connect on LinkedIn with your favorite creators.
Here is what it looks like in the LinkedIn app. Click on the ··· button and choose if you wish to send a blank or a personalized invite.
Next, if this person is your 2nd-degree connection, you will have the option to type in the personalized message and let it be on its merry way.
To clarify, you need to write a personalized message to increase the chances of the user accepting your invite. However, there are other reasons, as well.
Message personalization
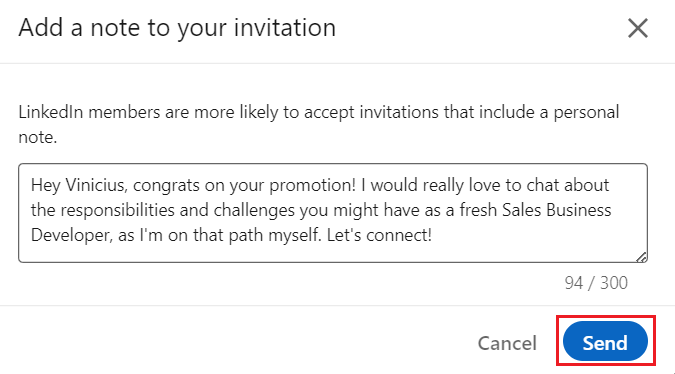
Firstly, we wish to build our network by building true relationships. Secondly, we want to decrease the chances of people ignoring, declining, and checking the “I don’t know this person” box. Too many refusals can result in a LinkedIn account restriction, as this will be one of many signals for LinkedIn that you might be a spammer.
If, however, you wish to add a 3rd+ degree connection, you will first need to answer LinkedIn's question about how you know this person.
Should you say you don’t know them, you will see the following alert.
If you have a LinkedIn Premium subscription, you will be able to send a message but you will use up one LinkedIn InMail credit.
Otherwise, you won’t be able to send messages. Instead, you can only write a note for your connection invite.
Connect on LinkedIn via “People Also Viewed” section
While we are still on the user’s profile, let’s show you another way how you can connect with someone on LinkedIn. If you look at the right end of the screen, you will notice the People also viewed section.
LinkedIn will recommend other people you can add to your network based on the user’s profile you are currently viewing. So, all you need to do is to either connect straight from there or visit that person’s profile to decide if you wish to connect with them on LinkedIn or not.
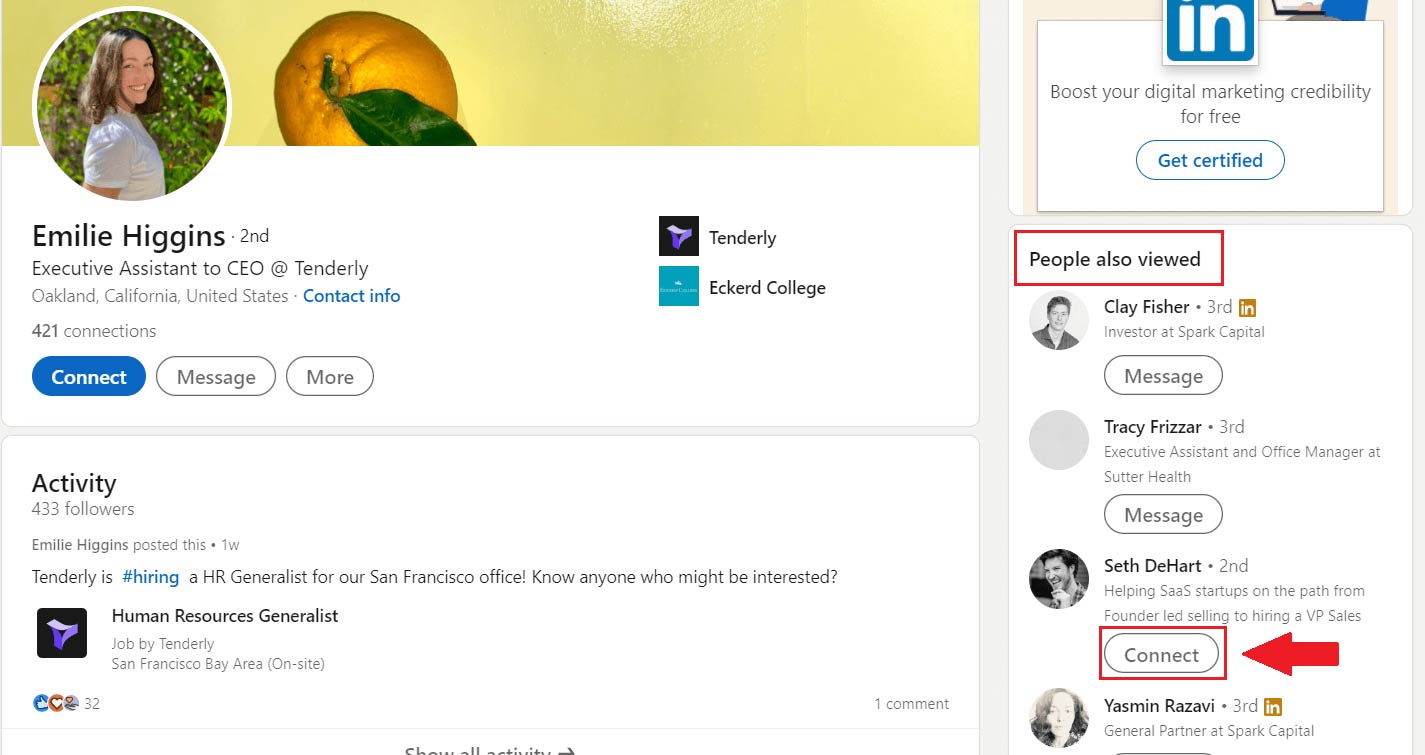
Send invites to people from search results
If you wonder how to connect with someone on LinkedIn without going through their profile, you can do so using a couple of ways. The first one is to do the "LinkedIn prospecting" of your own and add a connection from the Search Results Page. Simply click the Connect button right to their profile information.
Here is how to connect with someone on LinkedIn via search results within the LinkedIn app. Only be aware that this way, you won’t be able to personalize your message.
How to connect with someone on LinkedIn via network page
To send someone a connection request, you can also go to the My Network section at the top of the page.
Once you do, you will see the list of pending invitations and options to manage your network. From here, If you scroll down a bit, you will have two ways on how to connect with someone on LinkedIn.
How to connect on LinkedIn from “People You May Know” section
After you pass Follow suggestions, LinkedIn will present users who have similar roles as yourself and offer you to add them. Simply find the People You May Know With Similar Roles section, browse through and add a few connections by clicking the Connect button below their name.
In addition, you should know that you won’t be able to personalize invites if you send them through this method. So, to personalize your invite messages, it’s best to go to that person’s profile and connect from there.
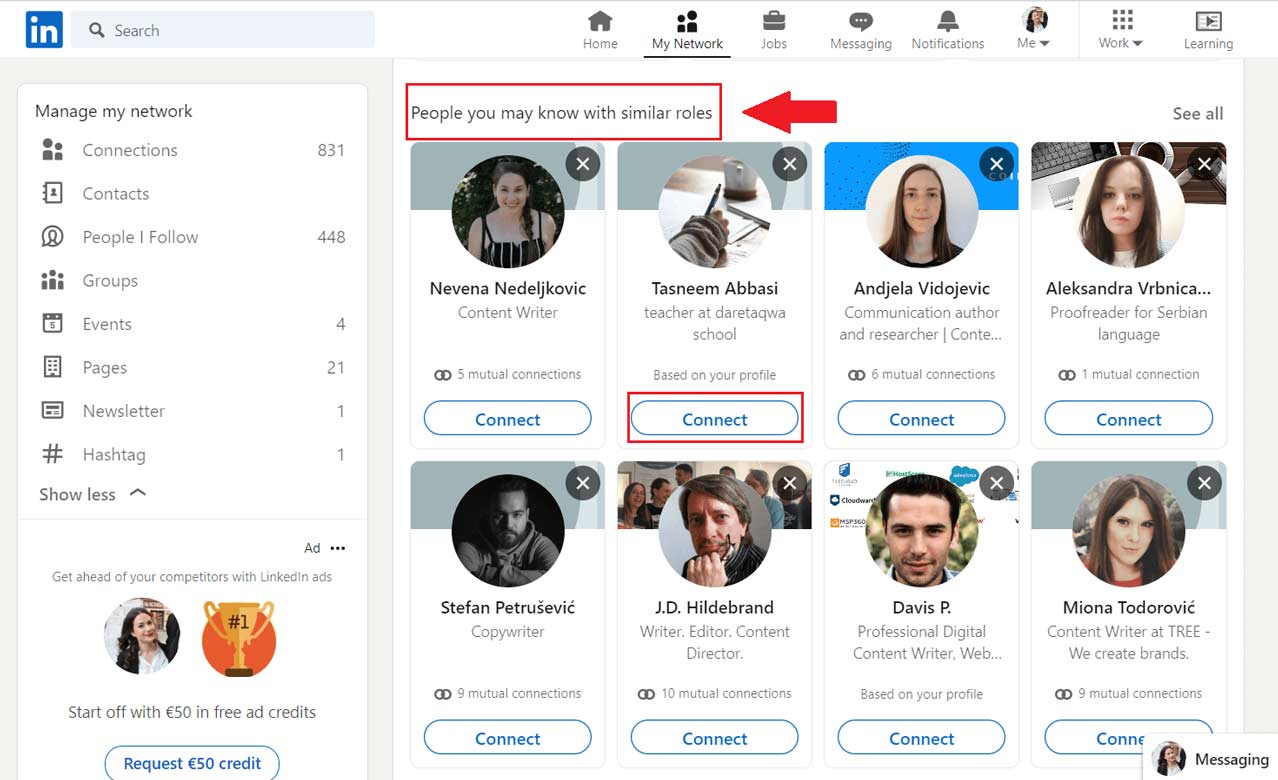
Use “More Suggestions For You” section to connect with someone on LinkedIn
If you scroll down a bit more, past the Groups you may be interested in, LinkedIn will surprise you with another suggestion section. In this case, LinkedIn will present the list of people you can add based on shared connections, mutual company, industry, or, again, job roles. Just be aware that this method does not support personalized invites as well.
Add people who joined certain events
This is a nifty way on how to connect with someone on LinkedIn from the same event you attended and mingle. Simply go to the event’s page, and join by clicking the Attend button. Once you do, look at the right side of the screen and search for the Networking option.
Lastly, browse the people who attended the event. When you find the one you wish to add to your network, click the ··· button and then Connect.

And here is how to connect with someone on LinkedIn using the LinkedIn app.

Asking other network members
Last, but not least, you can always ask other members of your network if they know anyone from your line of work or industry or if they can introduce you to someone. This is a nice way to get an introduction and connect with other people you otherwise cannot reach.
Moreover, if you are a recruiter or salesperson, this is a nifty way to get to your lead or find an ideal candidate you’d probably miss.
4 things to do before connecting with someone on LinkedIn
1. Set up your LinkedIn profile
Imagine a scenario where you get a connection request from a user with no profile, LinkedIn headline, or displayed experience to learn more about them and what they do. You wouldn’t accept that request, would you? Thus one of the first things you should do is pump up your LinkedIn profile and allow people you don’t know in real life to get to know you.
2. Craft your message carefully
Remember when we said you need to personalize your message to increase the acceptance rate and build your network more efficiently? Well, by structuring your message carefully, you can.
If you are sending the message to a person you don’t know in real life, firstly look them up and personalize your message accordingly. For example, you can research the content they created, what their occupation is, or what company they work in.
Apart from personalization, here are other things you should consider when creating your invite message:
- Clearly state why you want to connect with them;
- Write a compelling copy to catch their attention;
- Include a hook or call-to-action so you can continue the conversation once you are connected;
- Introduce yourself;
- Be polite and professional.
So, for example, you can try emphasizing your mutual connection:
Hi {{firstName}},
I noticed that {{Mutual Connection Name}} is in your network. We worked together at {{Company}}. Nevertheless, as we both work as {{Occupation}} I would love to have you in my network.
Or you can target their expertise and reach them out like this:
Hello {{firstName}},
Love the work you are doing. I followed your advice regarding {{Topic}} that you shared here, on LinkedIn, and it brought me {{Achieved Results}}. I would love to connect!
We have complete blog posts on connection request message templates and using personalization to scale up your business, so be sure to check them out.
3. Prepare to engage
After connecting with someone, it is essential to maintain and build a relationship. Thus, keep engaging with the people on LinkedIn via post engagements, an endorsement, or an occasional message. This can nourish your relationship and can lead to future opportunities.
4. Connect with someone you know first
As we mentioned previously, once you create your profile, LinkedIn will suggest contacts you might know so you can add them first. Thus, it’s better to strengthen your network with your known contacts rather than trying to add unknown people from the beginning. Try finding your coworkers, classmates, or simply your friends.
Is there a solution to send the connection invites for me?
If you plan to use LinkedIn for sales or recruiting and don’t have time to do the outreach, build your network, and personalize messages on a large scale, then meet Skylead, a sales engagement & Cold Email Software that does the outreach for you.
Let’s dive into the tool itself. We previously explained how to contact people who attended certain events. Thus, here is how Skylead can do it instead of you.
Go to the desired event, and attend it. Once you do, click the Attendees option.
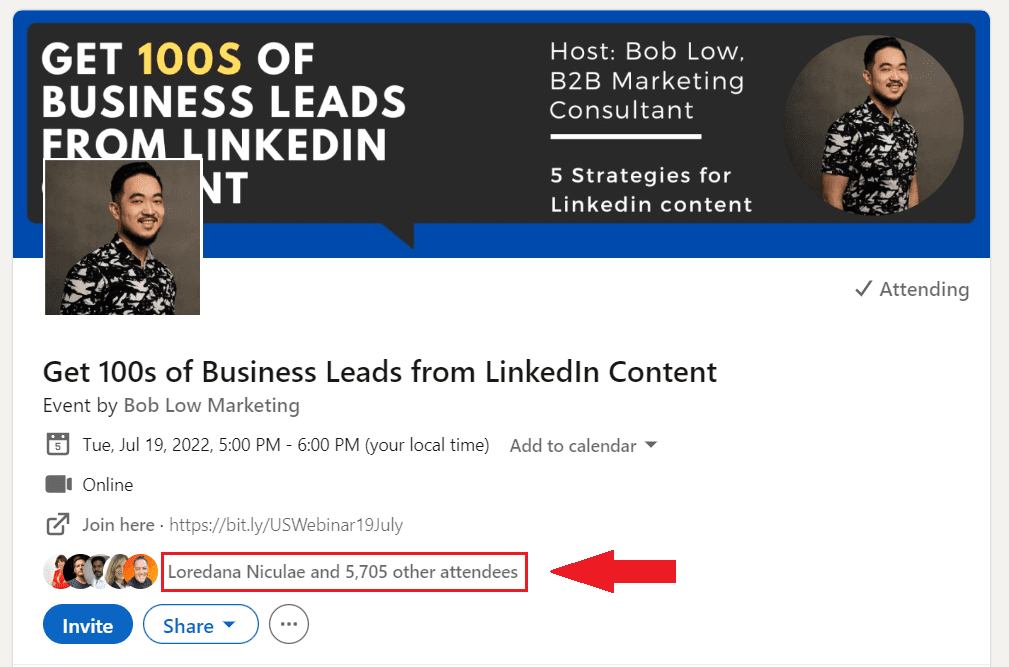
Then copy the attendees search result URL.
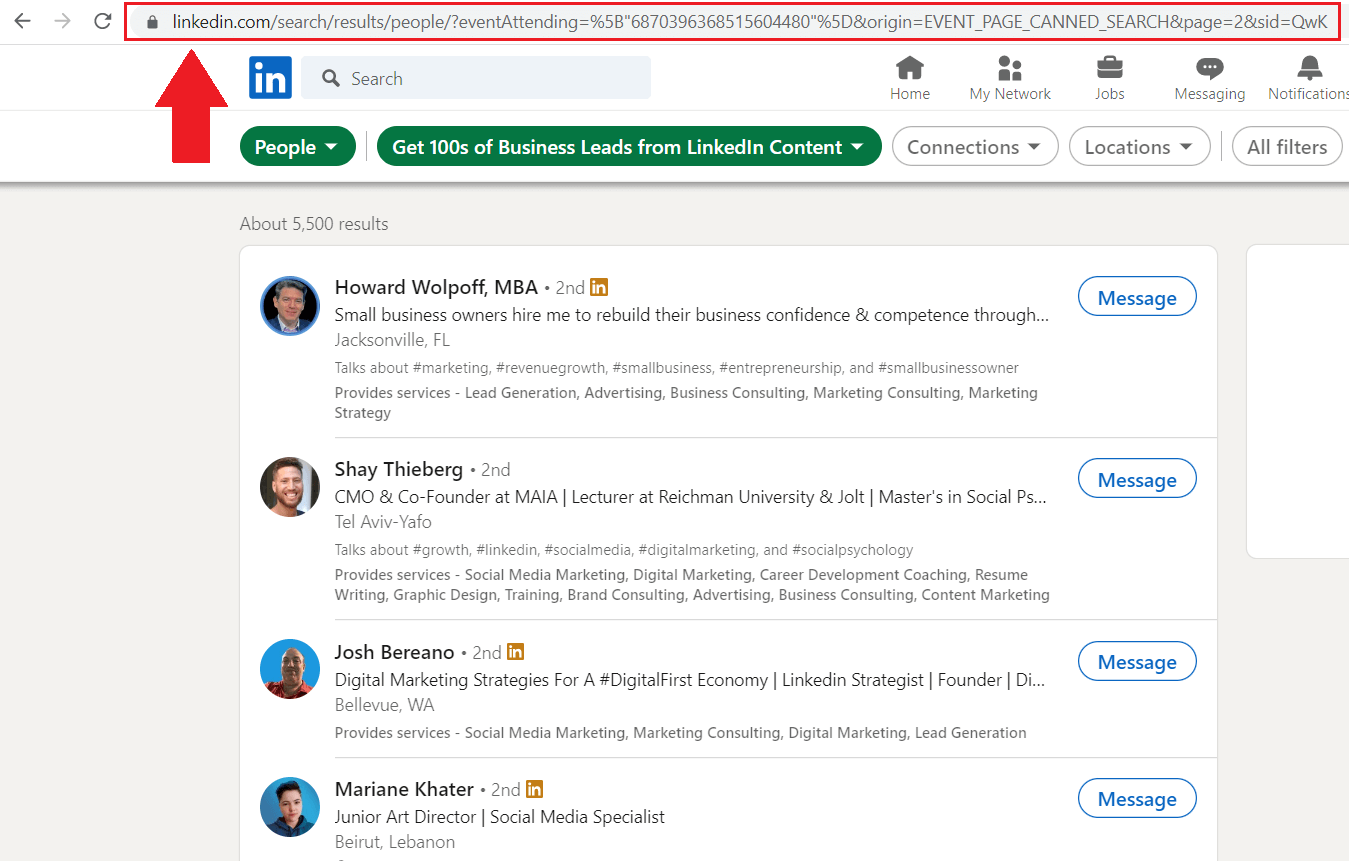
Next, go to your Skylead Campaign creator, choose the campaign source, give your campaign a name and paste the URL in the LinkedIn URL field. Don’t forget to select the Connection type.
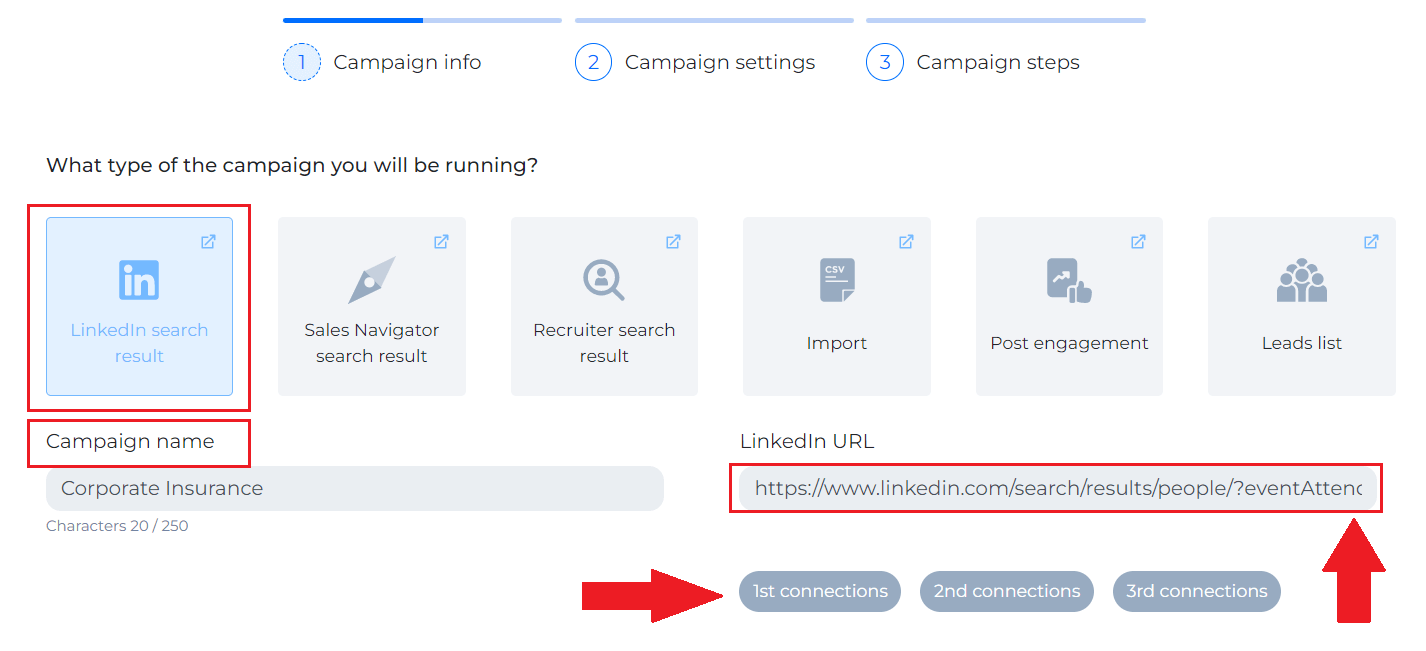
Now we are at the Smart Sequence page. From here, you can drag and drop desired actions you wish Skylead to perform.
We will start with the steps such as Follow, Find & Verify Business Email and invite them to connect. Next, we will personalize the invite message via Skylead's variables.
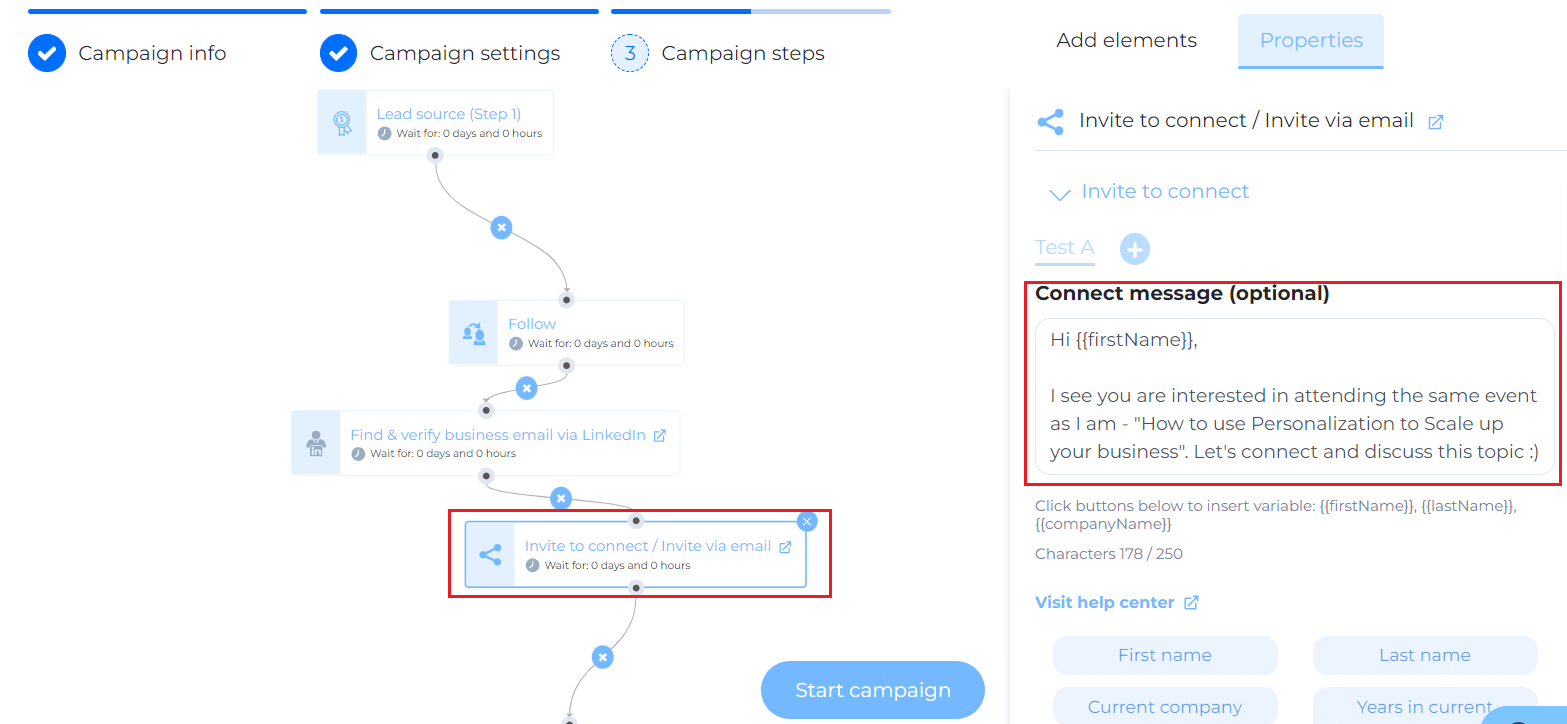
Furthermore, you’d be surprised to hear that Skylead not only sends connection invites but continues to outreach your target audience and perform other actions for you. For example, if the person accepted the invite and didn’t respond to your message, you can instruct Skylead to send a follow-up.
On the other hand, if, after a couple of days, the person doesn't accept the invite, you can check if Skylead found their email address and send them an email to multichannel your outreach.
All you need to do on your end is to determine the steps in the Smart Sequence, and Skylead will do it for you.
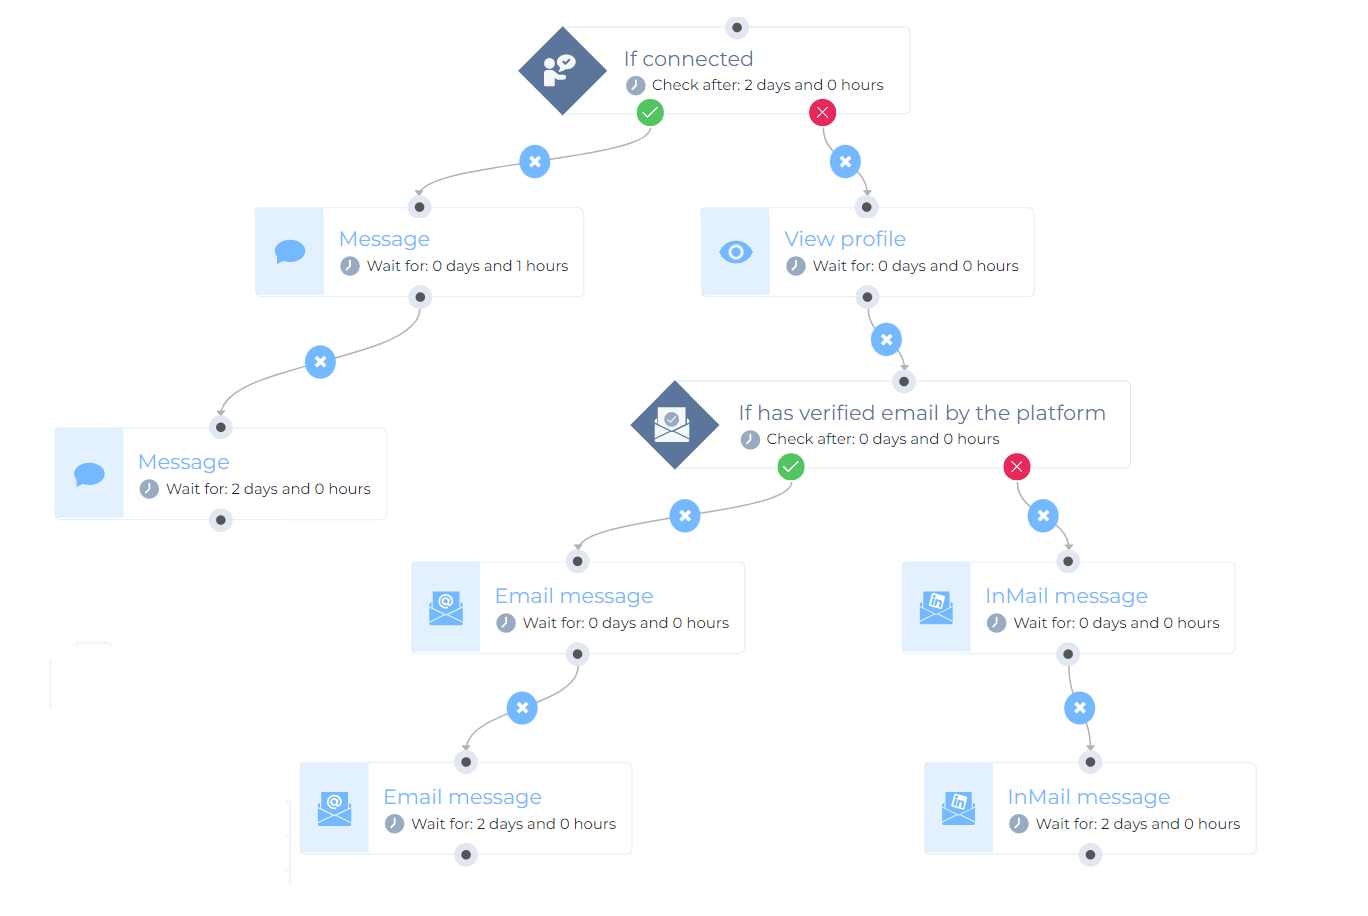
Once you set all the sequence steps, click Start Campaign, and Skylead will start to outreach your audience.
In conclusion
There are many ways you can add a person to your LinkedIn network. However, there are only 3 ways to maintain and create a strong network: politeness, honesty, and consistency in building relationships. So, to sum up…
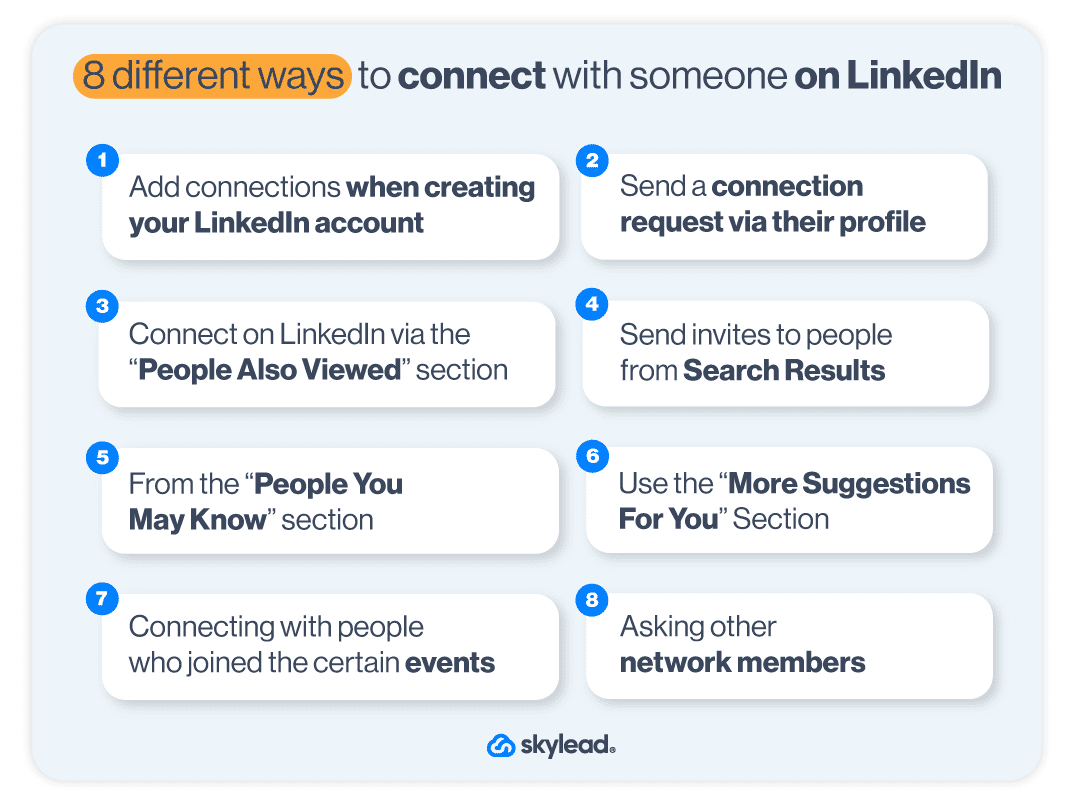
And don’t forget about the top things to do before adding someone to your network:
- Set up your LinkedIn profile;
- Craft your message carefully;
- Prepare to engage;
- Connect with someone you know first.
And if you find yourself with no time to build your network, or you simply wish to find a solution that will do it all for you, then try out Skylead, a sales engagement tool that thinks for you.
See Skylead in action! Start your 7-day Free Trial now.
Webhook? Say what?
CRM software became an essential part of the sales workflow. However, with many benefits to count for, using CRM alone simply won’t be enough if you wish to optimize your sales process.
That’s where Skylead comes in - the #1 LinkedIn Automation & Cold Email Software that helps you streamline your LinkedIn prospecting, LinkedIn lead generation and outreach efforts so you can focus entirely on closing more deals.
Only is it possible to integrate your CRM with Skylead and use them together? Why yes. Yes, it is.
Thus, in this article, we will show you the process of Skylead and CRM integration using webhooks, what data it can send to your CRM, actions you can create and how to set them up.
What is a CRM integration?
CRM integration stands for connecting a CRM with third-party systems, such as sales tools. In other words, by linking your CRM with the other tools, you allow these systems to exchange or transfer data effortlessly. As a result, you will automate and slightly change the sales process. Consequently, this will make your CRM more functional and operational.
By integrating CRM, you will experience multiple benefits. Firstly, you don’t need to navigate between the tools to find the information, as you have all the information you need in one place. Secondly, CRM integration optimizes your productivity by minimizing the time and the need to navigate between the applications. And lastly, it reduces data duplication, making your workflow cleaner.
There are two ways of CRM integration:
- Via Webhooks - triggered by the event;
- Via Open API - native integration, triggered by request.
However, not every integration can be native, as sometimes you will not have API access to your CRM. Thus in this article, we will focus on webhooks as they are a bit easier way to push your data into the CRM rather than using API.
If you haven’t already, check out our "10 best CRM software for the sales" list.
What is a webhook?
A webhook is a type of API that automatically sends the data from one application to another. It is commonly known as HTTP push API, lightweight API, or HTTP callback. Webhook serves as a tool to push data when you do not have the possibility of native integration - aka API.
To clarify, let's go over a couple of main differences between a webhook and an API.
Firstly, the API allows two-way communication between the applications. On the other hand, a webhook is a one-way street, meaning it will send the data only one way.
Also, API is request-based. In other words, one application requests from another to receive a response. However, a webhook will trigger and send the data automatically only when a specific event happens.
Lastly, API allows you to send and receive a large amount of data. Contrary to API, webhook will extract and send a small portion of real-time data.
Here is an example:
Let’s say you wish to automatically create a deal in your CRM when a lead replies to your cold outreach. Instead of CRM asking Skylead if a lead replied all the time, it would be much easier for Skylead to send the data once such an event occurs.
So instead of CRM constantly requesting data from Skylead and spending resources, it can chill out and wait for Skylead to push that information via webhook.
Still, both have their advantages and disadvantages. Nonetheless, since API spends more resources and it is more complicated to use, webhooks are regarded as a more suitable solution for real-time data transfer.
CRM integration with Skylead
Imagine you ran a cold outreach campaign with 1K contacts. In addition, you wish to single out those interested and make a deal in your CRM. How would you do it? Well, manually, and you would spend a ton of time. Not anymore. Let’s get you set up, so the webhook sends this data automatically.
What data can you push from Skylead to a CRM?
Before setting up your webhooks, you should know what data you can actually send to your CRM from Skylead. To clarify, here is the list:
- Business Email;
- Personal Email (which Skylead discovers);
- Full Name;
- Profile Picture;
- Occupation;
- First Name;
- Country;
- Current Company;
- Years In Current Company;
- Total Career Positions Count;
- Total Years In Career;
- College Name;
- Phone;
- Twitter;
- Website;
- Last Name;
- LinkedIn's Public Identifier - last part of the LinkedIn URL;
- Label Tag In Smart Inbox (labels you can use in Skylead’s chat);
- Conversation Text;
- Skylead’s Campaign Name;
- Last Step Execution Date;
- Lead ID From Skylead;
- Lead’s Status In The Skylead Campaign (ex. discovered, replied, connected not replied, etc.);
- LinkedIn Profile URL;
- Conversation Thread URL part.
In addition, you can use part of this data as variables to increase your cold outreach personalization with Skylead. Now, let’s jump to webhook creation.
How to create a webhook?
You can create a webhook in many ways. However, keep in mind that you will need to pay an additional subscription to some webhook providers. Unless you wish to program it by yourself, that is. Thus we will take Zapier as a webhook provider as an example.
Go to the Zapier and click the “Create Zap” button in the sidebar.
For the trigger, choose the Webhook option.
Under the Trigger Event, select “Catch Hook” and the “Continue” buttons.
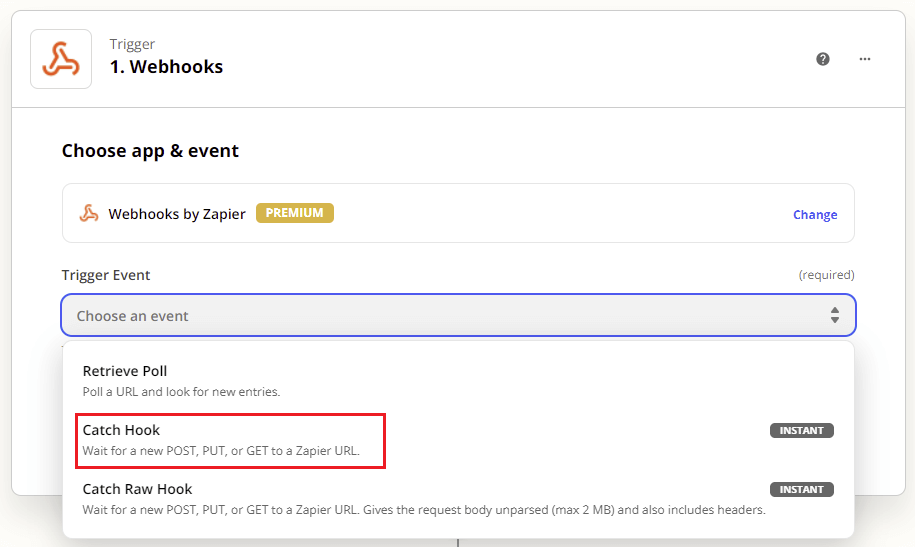
Now, Zapier has created a custom Webhook URL for you to send the data. Copy it to the clipboard.
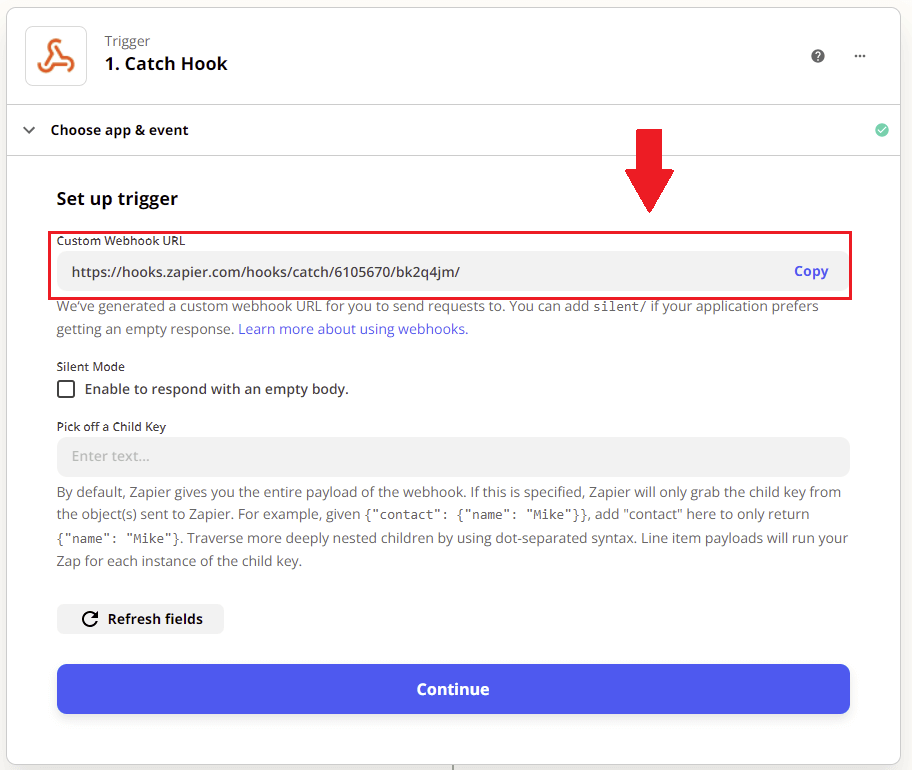
Please don’t close this window yet, as we will be back here shortly.
Webhook setup in Skylead
Open the Skylead dashboard and go to the Webhooks page.
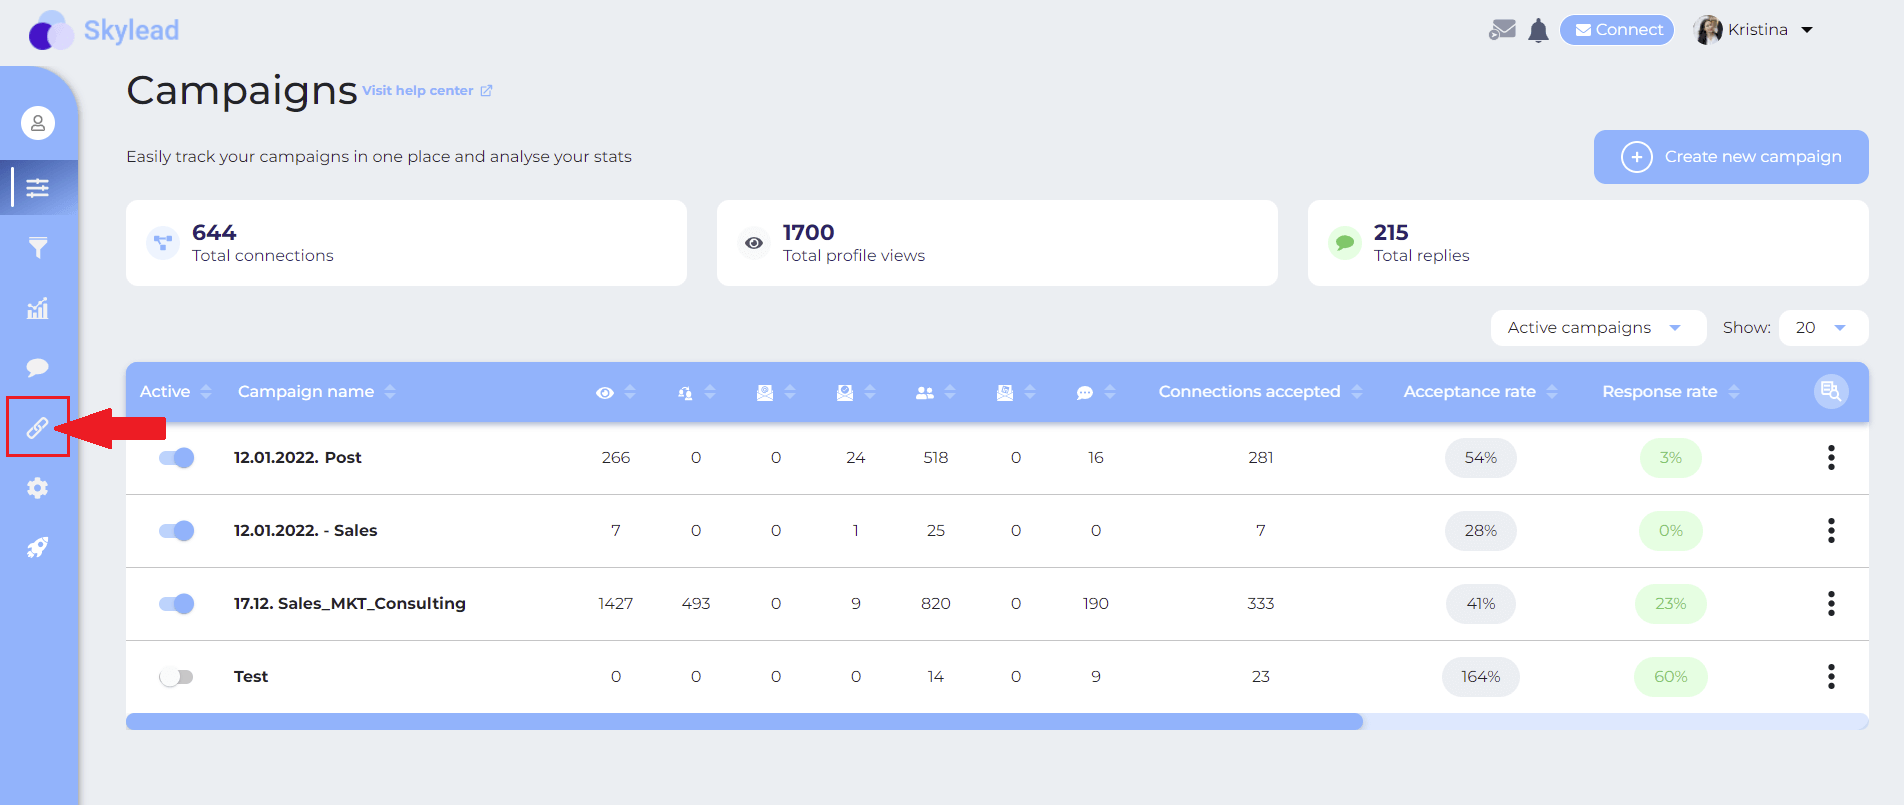
Once there, go ahead, and click on the “Create New Webhook” button at the top right of the page.
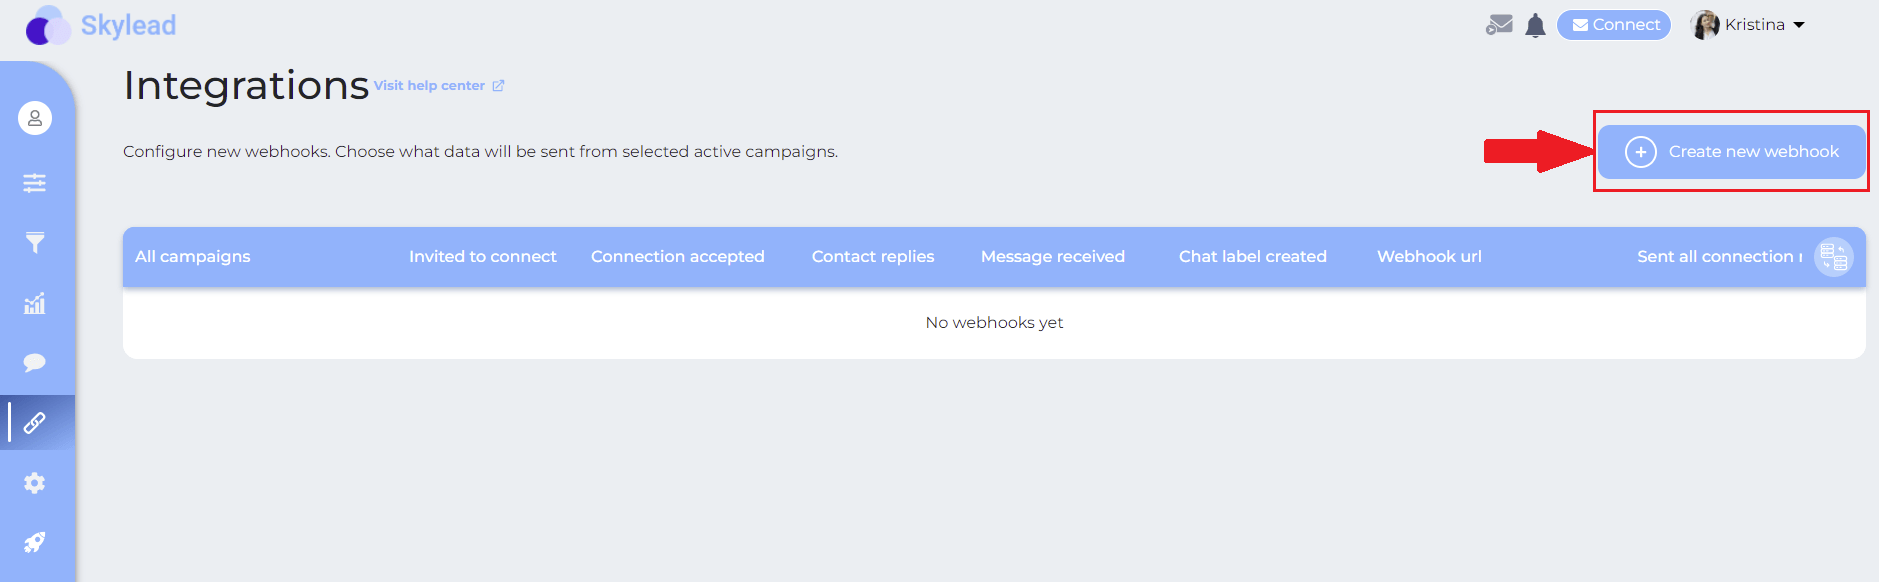
Here is where it gets interesting. Skylead will ask you what type of event you wish to occur so Skylead can send the data to your CRM. Skylead supports the following events.
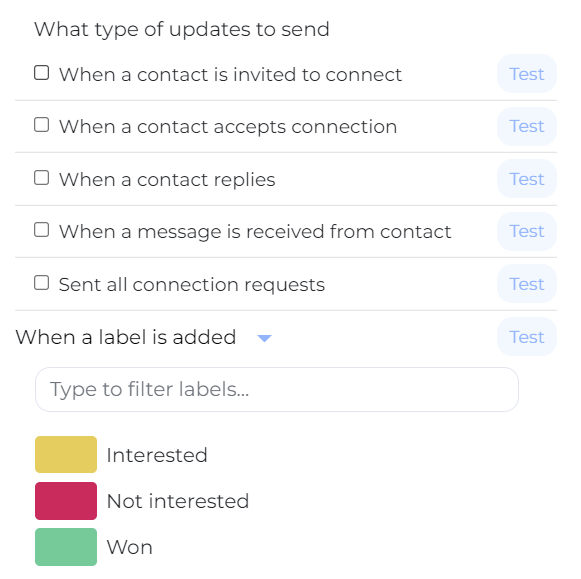
Here is what they mean:
- When contact is invited to connect - the webhook will send the data after every single invite to connect is sent.
- When a contact accepts the connection - the webhook will be triggered when the lead accepts the invitation.
- When a contact replies - the webhook will only fire when you receive the first message from your lead. This message is usually a reply to your invite to connect.
- When a message is received from the contact - each time you receive a message from the contact, the webhook will be triggered.
- Sent all connection requests - at the end of the cycle, after all the connection requests have been sent out to targeted leads, the webhook will send out the data.
- When a label is added - This refers to the labels you have available in Skylead’s smart inbox. As soon as you label a conversation with a certain tag, the webhook will fire.
The most useful events to send data to CRM are When a contact replies or When a label is added. This way, you will send data to your CRM with already warmed-up leads.
Webhook setup example
So, say, for example, you wish to create a deal in your CRM when a contact replies. Thus we will choose this option. Also, be sure to paste the Webhook URL in the "Callback URL" field, and don’t forget to test it.
In addition, you can create a webhook for your active Skylead campaigns by choosing Global Webhook. This way, you create the webhook for all past, present and future campaigns, so you don’t have to create new webhooks all over again. Or, if you wish for a webhook to fire only for some active campaigns, choose Let me select individual campaigns.
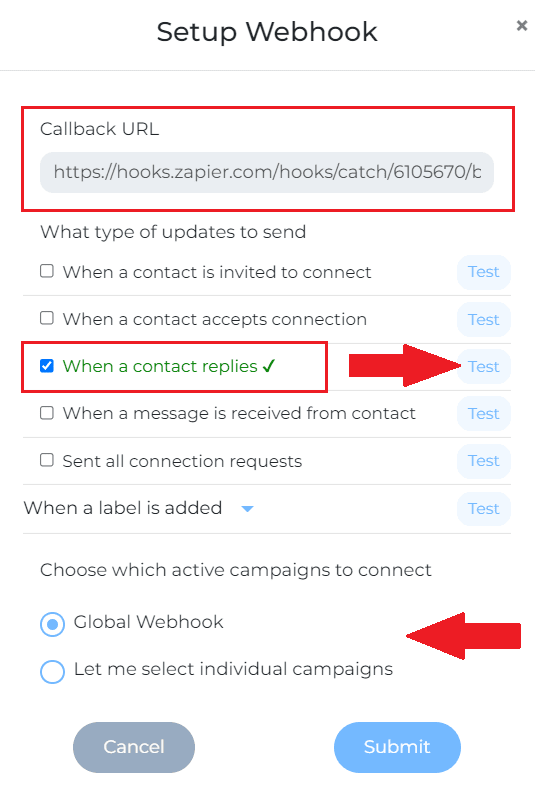
Once you have everything set up, click the Submit button.
Test your webhook trigger
After you’ve done your work in Skylead, you need to go back to the Zapier to finish the set-up there. To test your trigger, click the Continue button. Next, go ahead and click the Test trigger button.
In addition, if the test ends up unsuccessful, you need to copy and paste the Webhook URL again in Skylead. But if you copied right, to begin with, everything should be good.
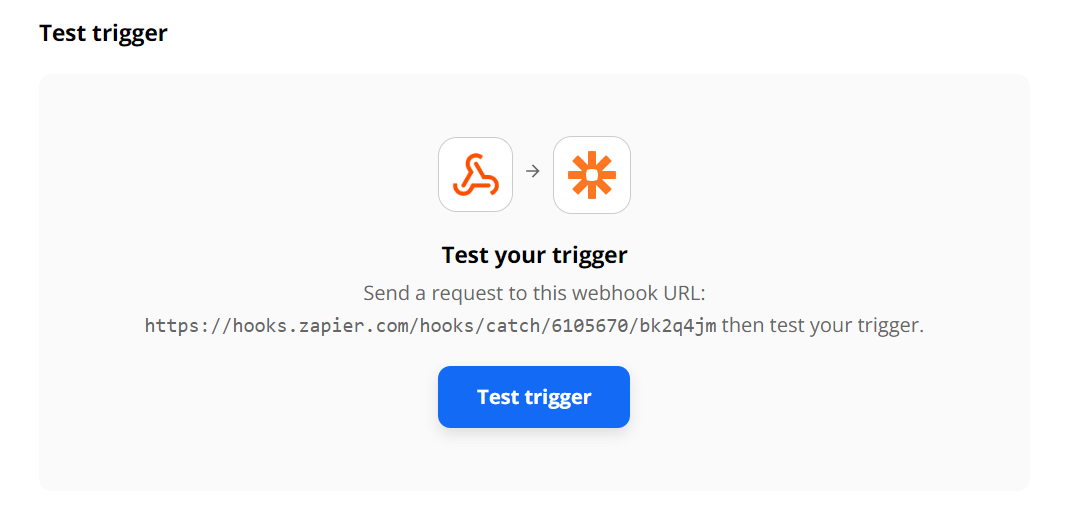
Once your test goes through, you will see all the information that Skylead can collect. Here is an example of a successful trigger test.
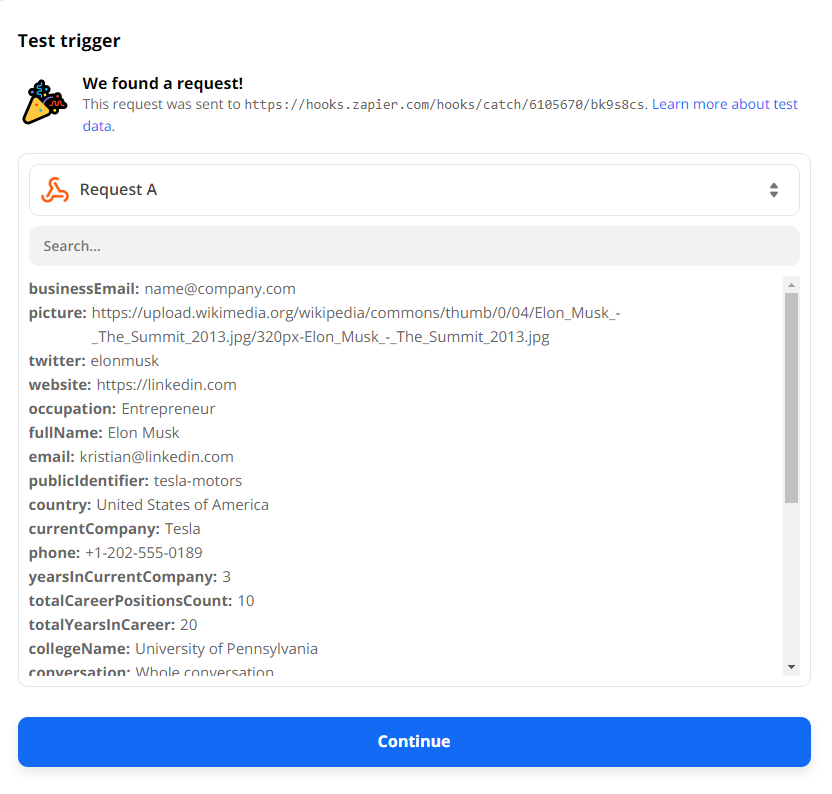
Creating actions in your CRM
Let's move on. To get to the Action stage click the + button.
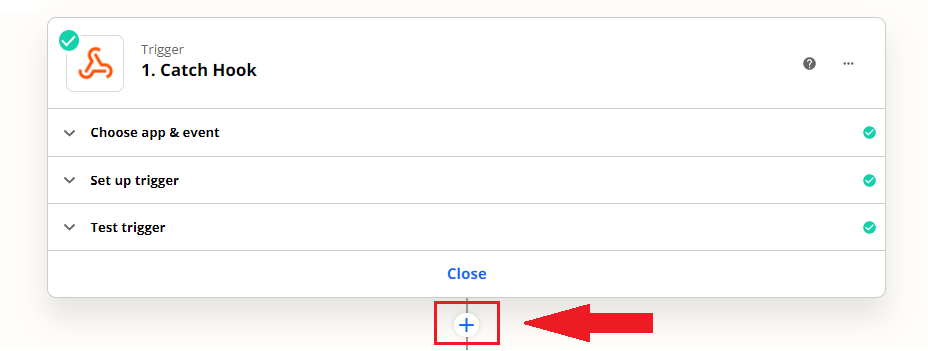
Here you can choose the tool where you want to send your information. In other words, choose your CRM of choice. For example, we will use Pipedrive.
Now, to make a deal, you can first set an action to create an organization and person page in your CRM. To clarify, this will help you link them to the deal and add more information on each.
Here is what an example lead page looks like in Pipedrive.
Create an organization page in CRM
Let's start with an organization. For an Action Event, pick Create Organization.
Then, click the Continue button and choose your CRM account. If your account is not listed there, you need to link it to Zapier first, using the +Connect a new account button.
Now, to set up action details. In the Name column, select Current Company under Catch a Hook. Please don’t worry about the name next to the current company. This is just a name drawn from your webhook test. To clarify, this serves as a parameter for any future data that will be sent to your CRM.
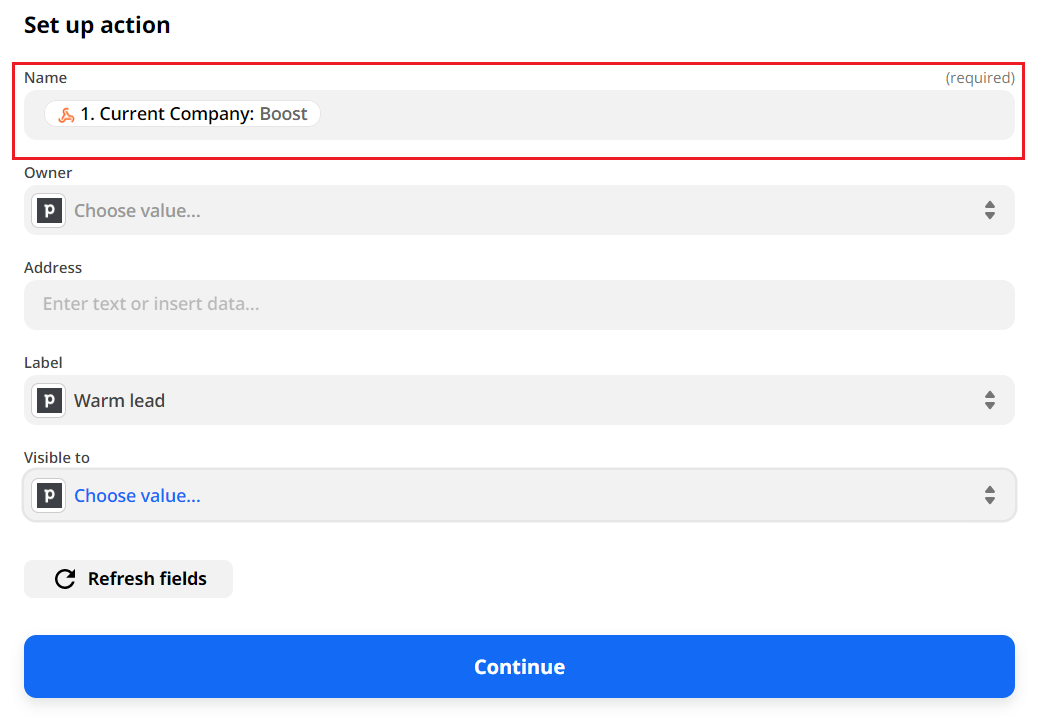
Secondly, if you wish to assign this company to a user from your CRM, select their account under Owner.
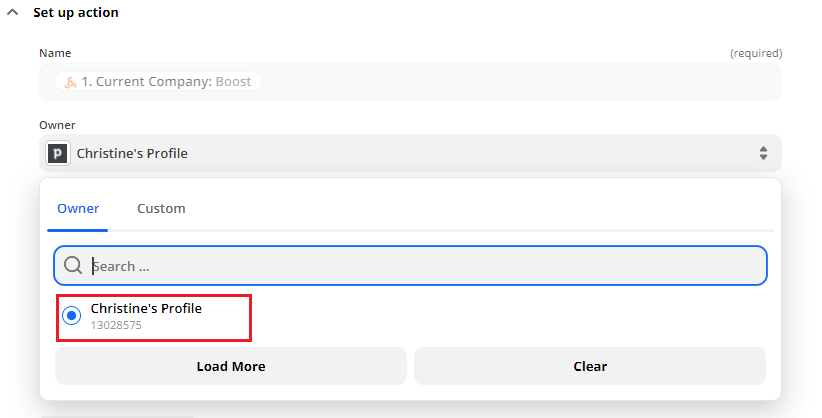
Furthermore, if you want to label the company in your CRM, you can do so by inserting the label option. After you’ve done it, click on the continue button and perform a test again.
Once you finish the test, go to your CRM and check under Organization, and you will see your test organization there.
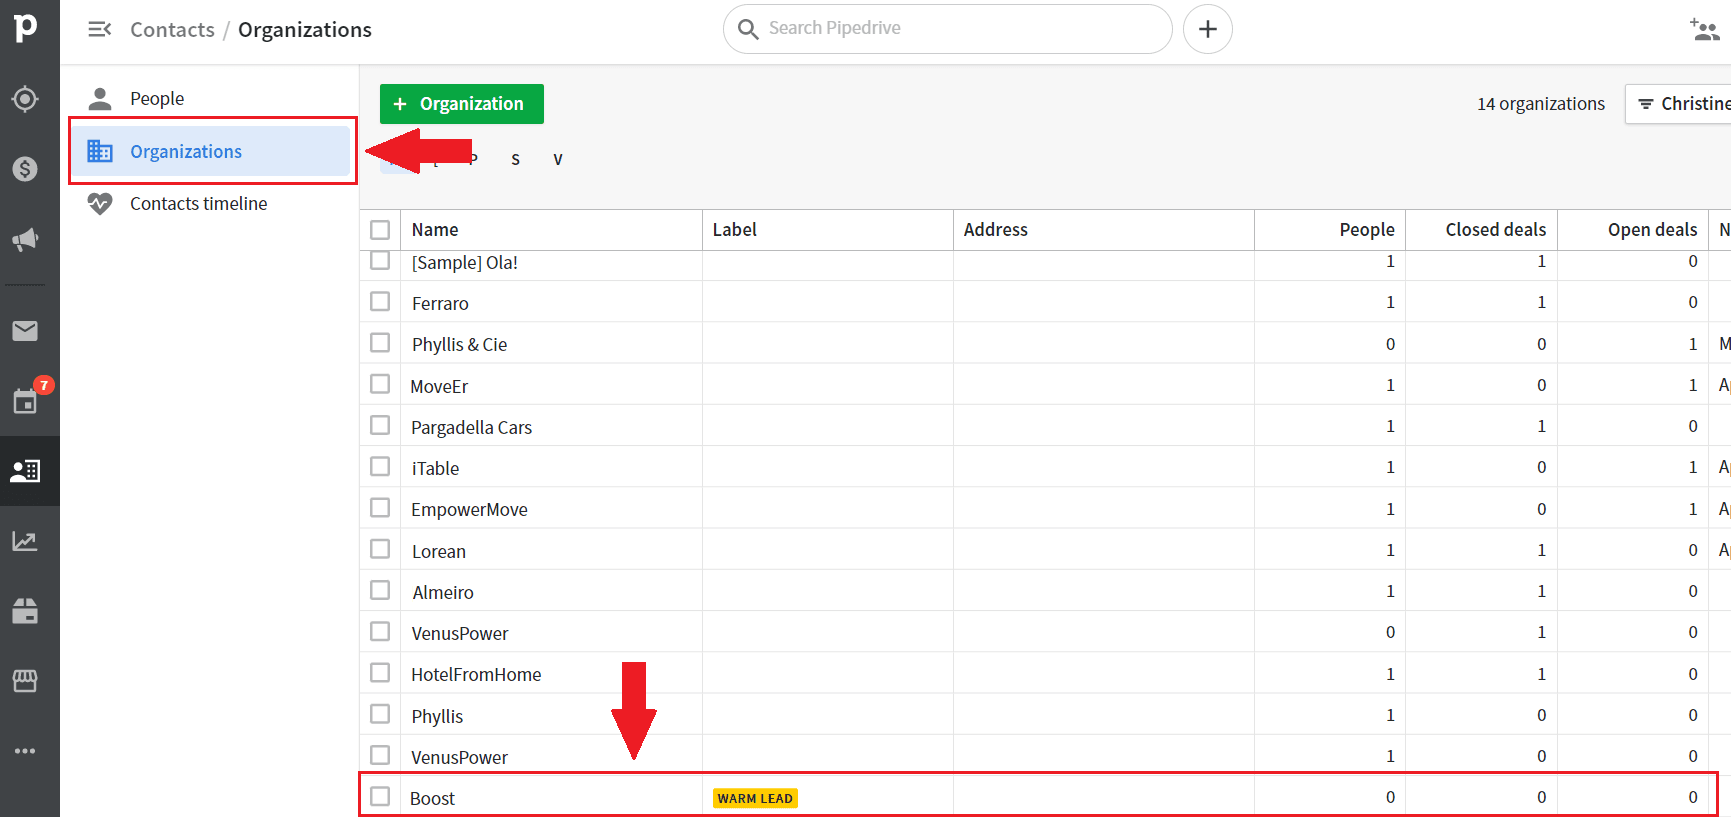
Crafting a person page in CRM
Similar to the previous step, you need to choose your CRM and click the Create Person button.

Now define the specifics of your Person page. For the name, choose the first name and/or the last name under the Catch hook from the menu. Secondly, choose the business or personal email address that the webhook caught. To clarify, if you use the Email Discovery feature in Skylead, then webhook will certainly pick this information up, and you will be able to send it to your CRM.
In addition, you can set your CRM label, who of your colleagues should be an owner, or see the Person page and access it.
On the flip side, choosing an organization field is a bit different.
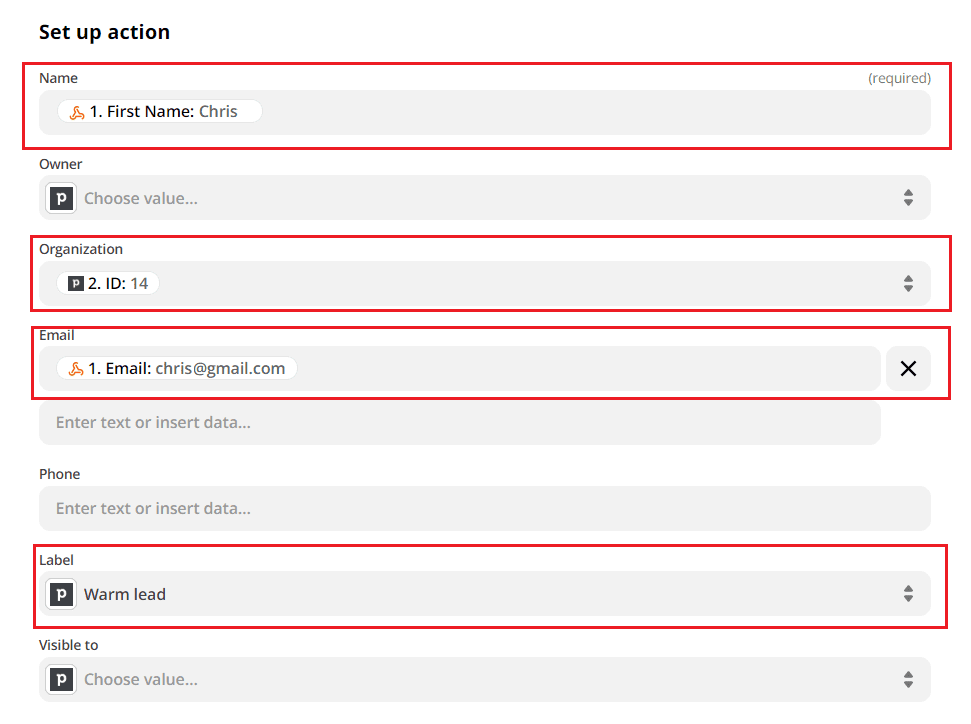
Since you need your Person and Organization page inter-linked in your CRM, you need to click Custom from the menu for this step. Then navigate to find the ID of the previous step under Create Organization in the Pipedrive. This way, the pages will be linked as soon as they are created. In other words, when Skylead sends data to your CRM via webhook.
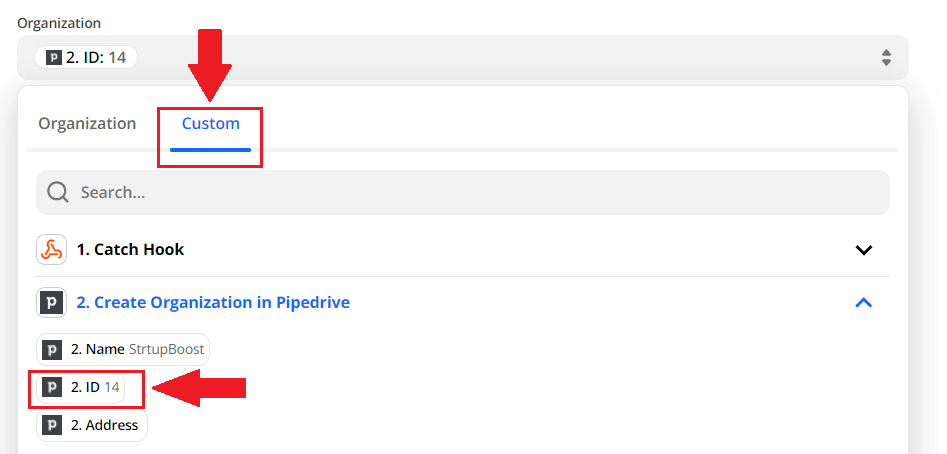
Now, go ahead and test this action. Then, go to your CRM and find that lead’s page. Here is what a newly created lead page looks like in Pipedrive after we’ve tested the action.
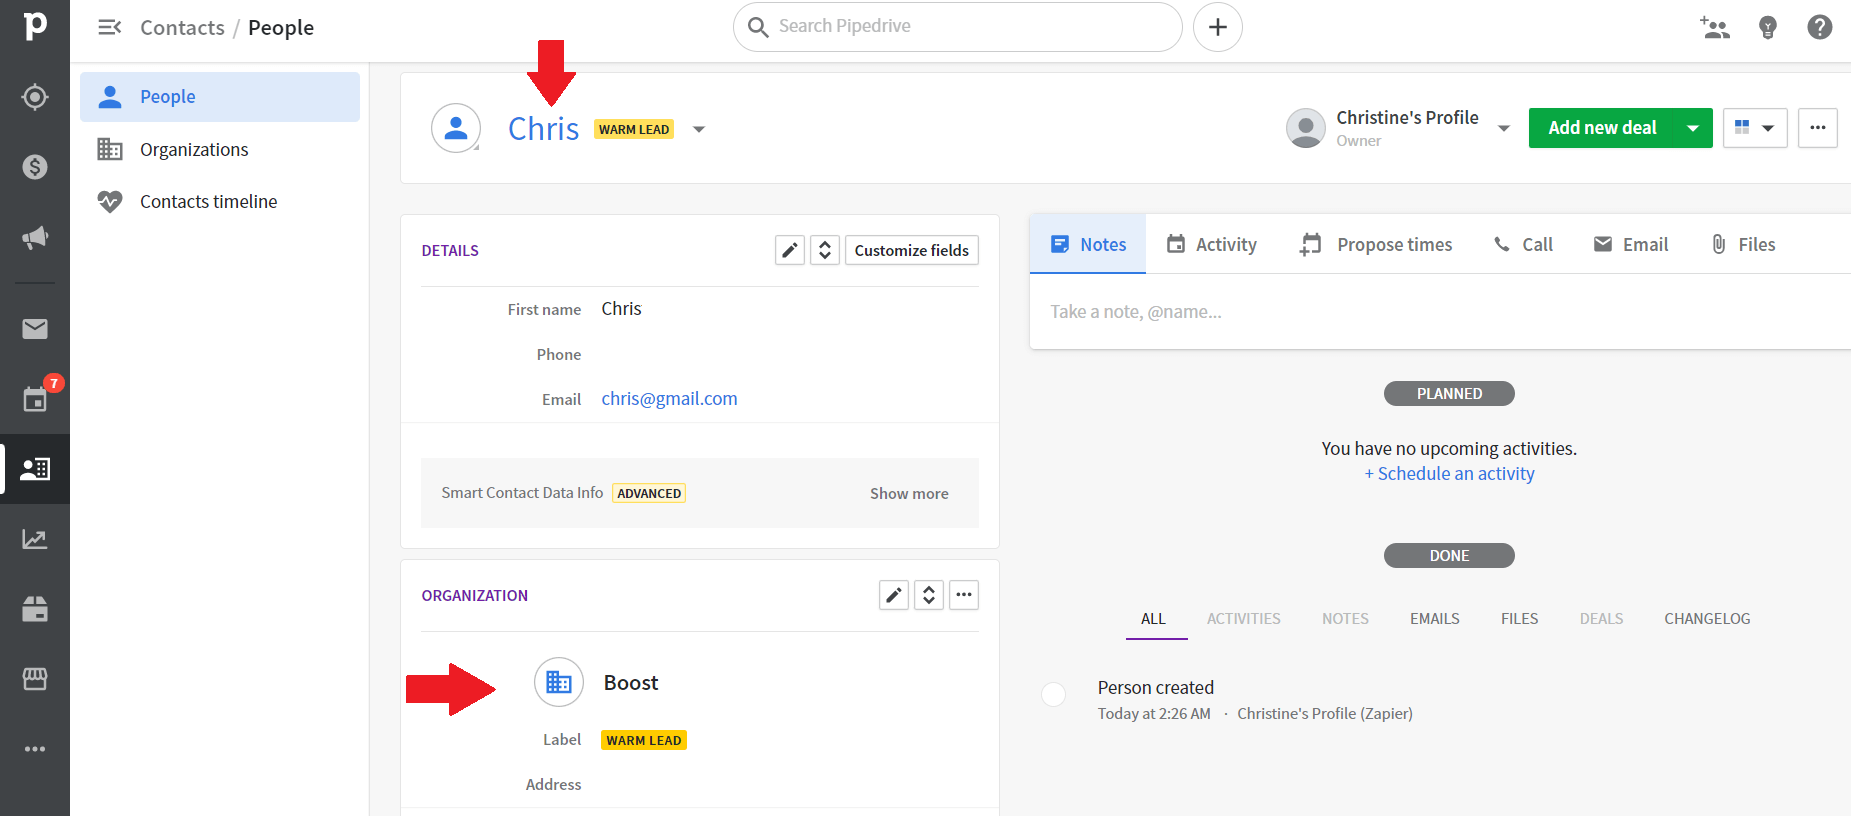
Deal creation
The time has finally come to create a Deal for your CRM. Once again, go through picking your CRM from the drop-down menu. Then, choose to Create Deal from Action event.
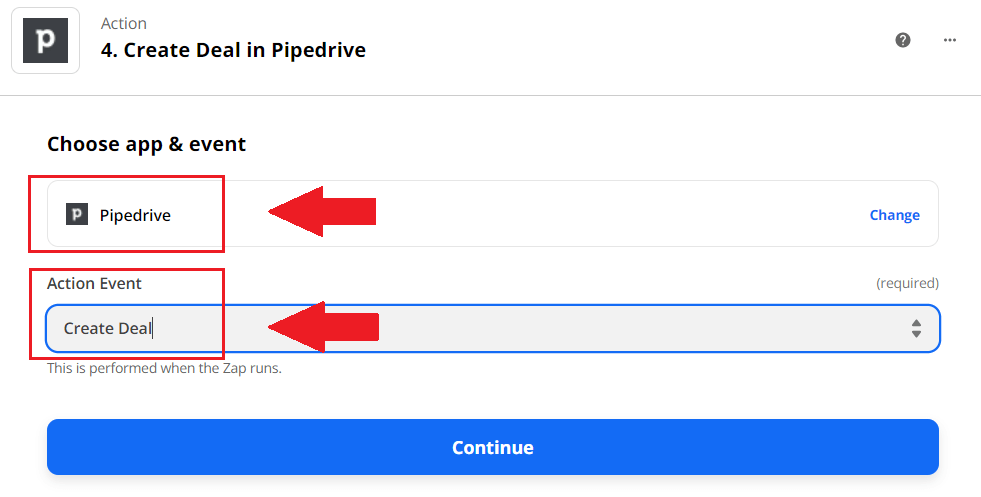
Firstly, you can choose the title to contain either a person’s name or company. Secondly, you can define the creation date by selecting the Last step executed parameter under the Catch hook.
Moving on, define the status, stage, and other values you find relevant to you. However, be aware of Organization and Person fields. Once again, you would need to link a Deal with your previous step. Thus choose Custom from the menu, and navigate to find ID both for organization and person.
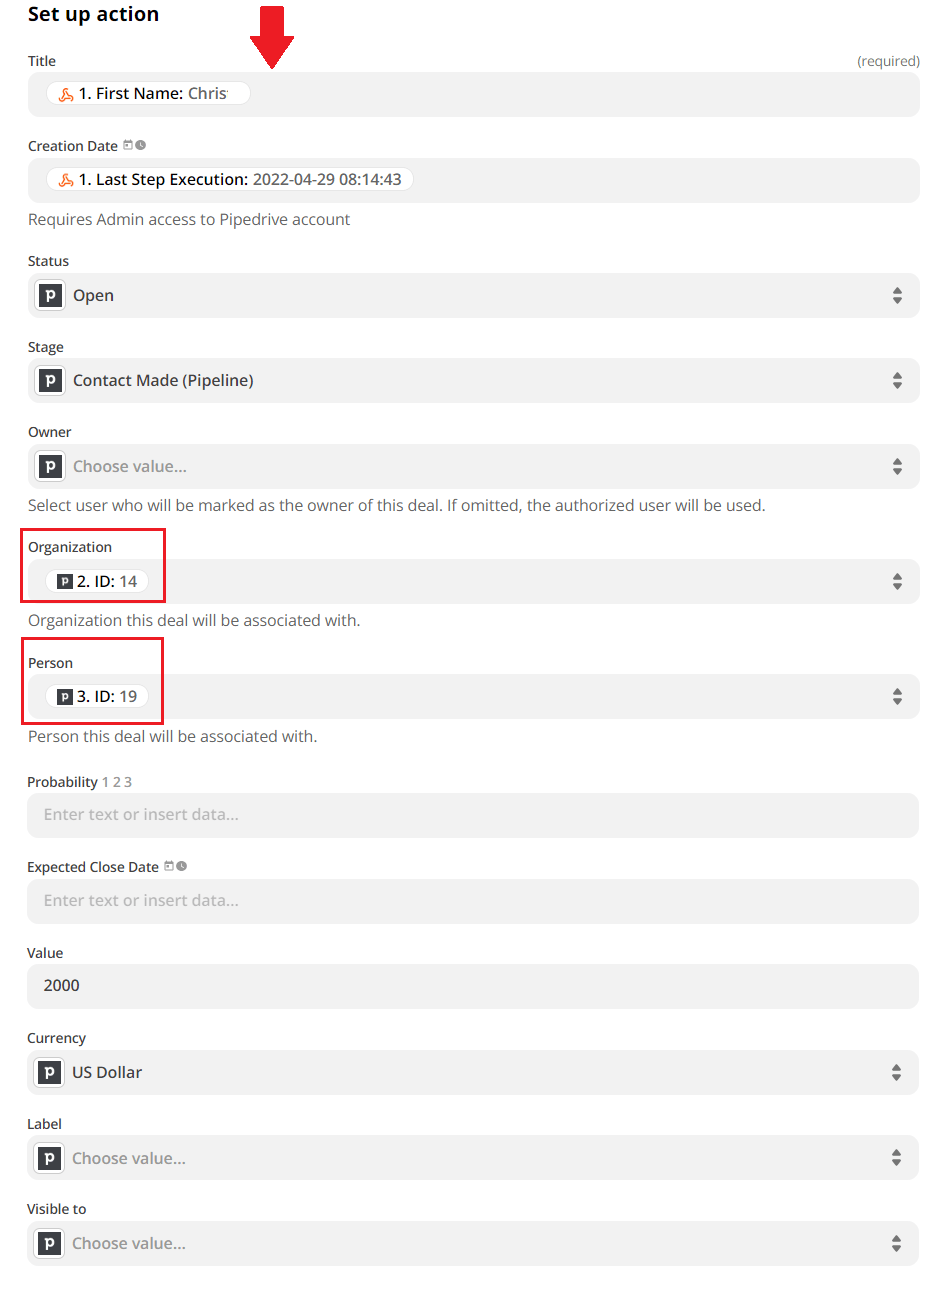
In addition, you can fill in other fields, as well. These fields are optional and entirely dependant on your business needs.
Now, you are done! The only thing left to do is to test it and see how it looks in your CRM. Voila!
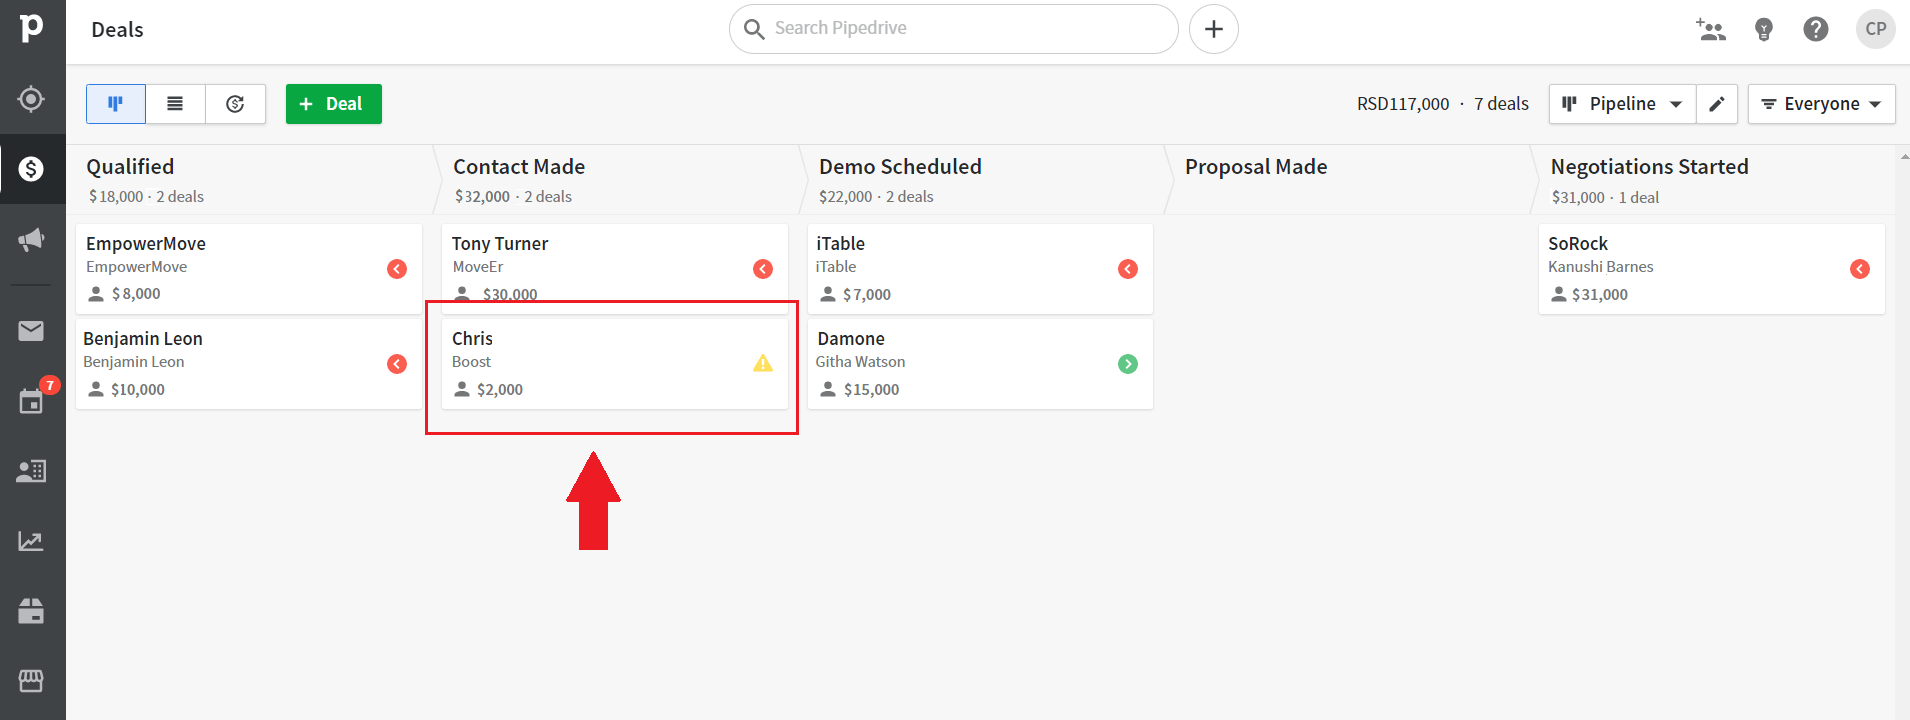
Creating additional actions
If you wish to use webhooks to their fullest, you can try out different actions, apart from creating deals, companies, and persons. Here are a couple of additional actions that you can explore and test.
Note creation
If you wish to pin a specific note to your person page in the CRM automatically, you can choose to create one in your CRM via webhook. For example, let’s say you wish to add a generic note to call every person in 20 days. Here is what the setup should look like.
Firstly, click the + button using the existing webhook flow, and select the CRM of choice. Then under Action select Create Note.
in the Content field, specify what the note should contain. Secondly, to link it to a specific deal, person, and organization, choose their IDs from previous steps accordingly.
Lastly, test the action, and go back to your CRM. You will notice that your note appeared on a specific person's page, as it should.
Update deal
This option is nifty if, for example, you wish to fire a webhook and update a deal in your CRM if you change the lead’s label in Skylead.
Here is how it should go. First, go to Skylead, and under Setup a Webhook, choose When a label is added option. Then, choose a global webhook or specific campaigns, and proceed to test it. After that, continue with creating a webhook as mentioned above.
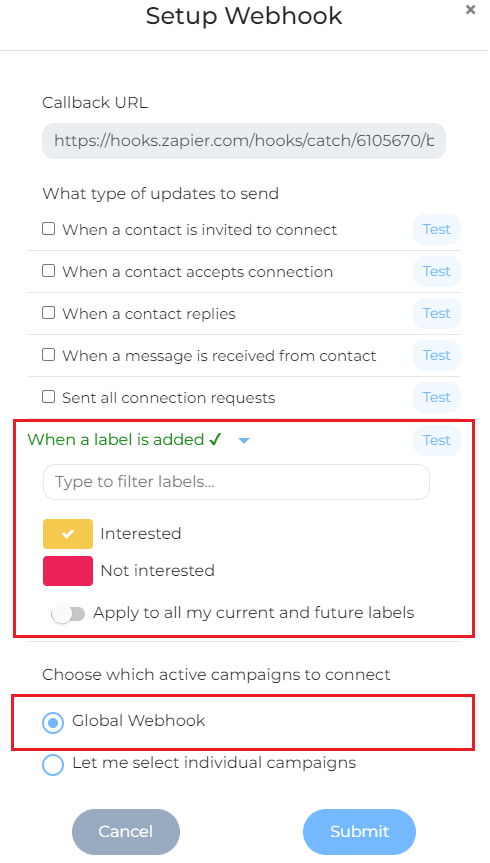
To update the deal, first, you need to create a webhook in Zapier, as we did before. Then create a Find deal in Pipedrive action.
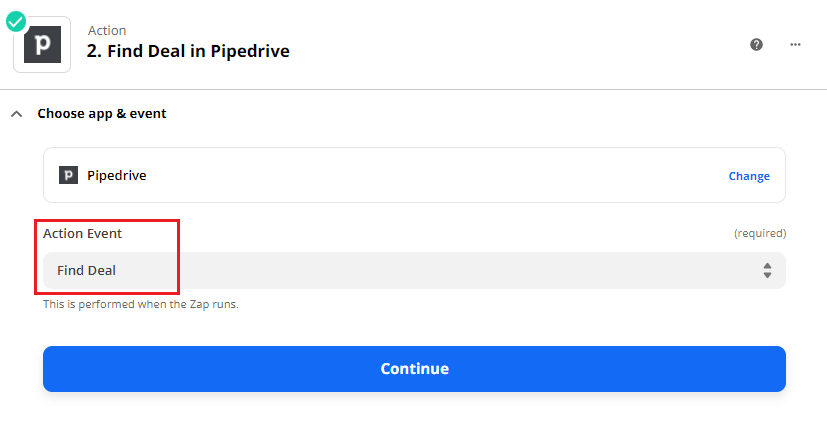
To clarify, here is what your setup could look like.
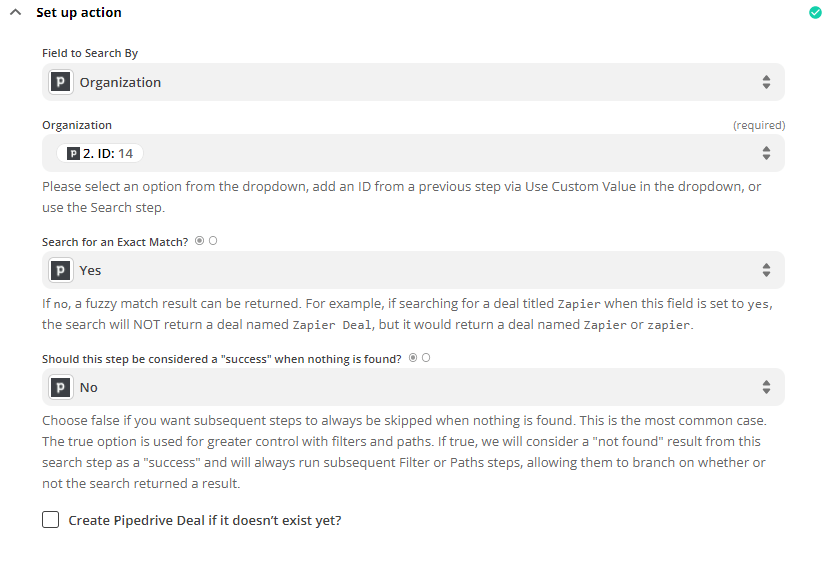
Then go ahead and test it. If the test was successful, it means the specific organization has been found. Next, create an Update deal in Pipedrive action.
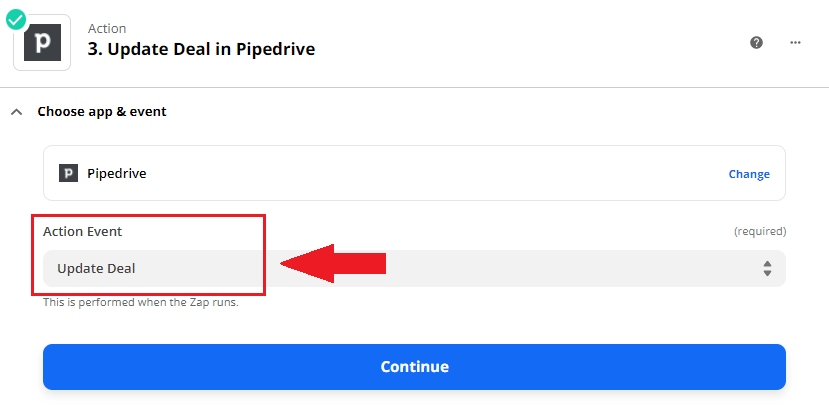
Here is how the setup of the Update deal should look like.
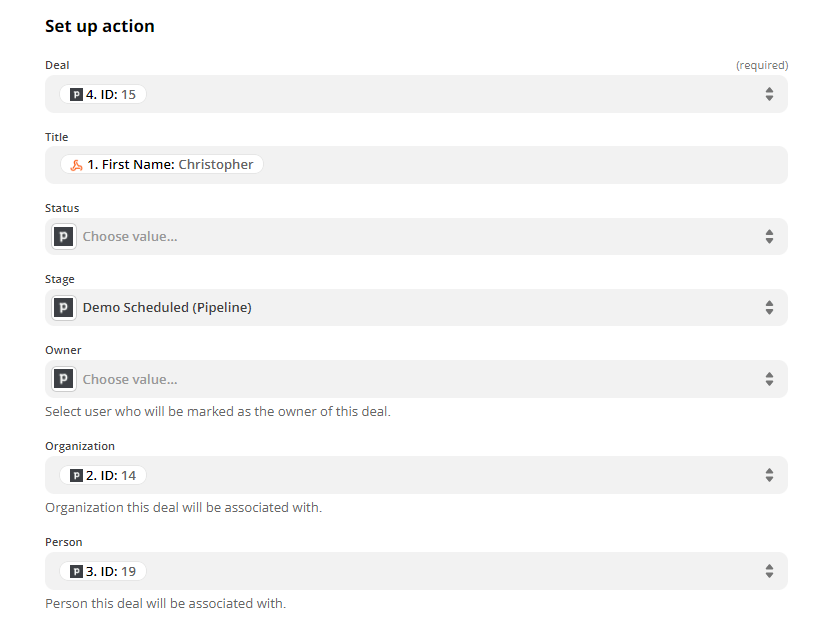
Now, go ahead and test it again. If successful, go to your CRM. You will notice that the deal has moved to the stage you set.
In summary
From now on, the sky's the limit. Webhooks may be terrifying at first, but once you get to use the first one, every other one gets easier. Luckily webhook providers, like Zapier, are user-friendly and give you a lot of room to experiment and use different options to soothe your business needs. Luckily, there are many options to choose from and play with.
Keep in mind that depending on your CRM and subscription plan, you will have more or fewer options of which data you can automatically import. But we hope this gives you a good understanding of how you can use Skylead or any other tool with your CRM.

Well, that is all, folks. Be sure to give us some love - join our community group, follow our YouTube channel or keep an eye out for our blog page - we publish blog posts every week. And if you are a fresh face to Skylead or have not started using it yet, it would be nice to have a chat. So, come and say hi using the chat on our website. Or, try out Skylead directly by signing up for a 7-day Free Trial.
CRM software and tools are definitely here to stay. There is no doubt that, with the global CRM market growth projection of $128.97 billion worth in 2028, the substantial popularity of the best CRM software is yet to come.
And with the reason. Firstly, CRM offers a wide range of benefits, including centralized data and automation of tedious sales processes. Above all, a well-implemented CRM software can reach ROI up to $45 for each $1 spent.
We all wish to jump on this train. And some of us already did. But in the sea of CRM software, how would you know which one is the best for you? Whether you are starting out or considering changing your CRM software, we’ve got your back.
Therefore, in this article we will cover some of the best CRM software, why they are the best, and how to integrate them with other tools.
Furthermore, we will cover what CRM software is, if you need it and if you should buy it. Let’s get to it!
What is CRM?
Customer Relation Management, aka CRM software, is a tool that helps companies collect, organize and manage data and streamline processes related to customers’ lifecycle.
In other words, sales terms, CRM software helps teams visualize their pipeline and organize or perform tasks related to the buyer journey. Furthermore, it pinpoints the location of specific prospects in the sales funnel, their status, the next activity the sales team needs to perform, and potential value.
CRM software substitutes various spreadsheets and documents companies use to keep up with prospects’ or customers’ data. It stores all information in one place - such as messages, meetings, pain points, buyer persona type, and, in some cases, calls with customers - everything you need to know about specific leads to help you build a relationship and close deals. Lastly, CRM software shows how effective your sales strategy is and if something in your process needs improvement.
Customer-wise, CRM software provides information about each customer, their history, and any pending tasks related to nurturing and upselling.
Why is CRM one of the most valuable assets a company can acquire?
Why CRM? To clarify, let’s check out a couple of statistics first:
59% of companies tested say that CRM helped them improve Customer Retention and Satisfaction Rate by 47% and reduce lead costs by 27%. (FounderJar)
According to Salesforce, 81% of sales representatives emphasize the importance of having a view of data across the complete customer journey.
97% of sales professionals tested think that technology and CRM software are either essential or crucial for business. (LinkedIn)
Looking at the previous statistics and many more across the internet, CRM software is an essential tool for sales teams, and for good reason. To clarify, they are not just any tool on the market - they make building the relationship and social selling easier tasks and help the sales team be more customer-oriented - which is the core point of today’s sales.
Best CRM software can…
1. Centralize and label your data
CRM keeps track of all leads’ data. In other words, CRM’s centralized storage offers salespeople all the information on every individual prospect or customer at hand so they can build relationships and close deals faster.
In addition, since the prospect base can be distinct, the best CRM software also labels and sections your customer data. To clarify, you as a salesperson must know at any given time where your prospects are in the pipeline, on what note you ended the conversation, are they warmed up, or what is the next step towards closing the deal. CRM software does this for you by analyzing and labeling existing data in the system with various parameters you set. Therefore, you can be more customer-oriented by creating different messages depending on the buyer lifecycle and more personalized outreach.
2. Automate the process
With almost every piece of data being actionable, the best CRM software can automate some tedious parts of the process for salespeople, so they can focus on nurturing prospects through the pipeline. For example, appointment scheduling, assigning leads to different sales reps, or updating and importing the prospects’ data.
3. Offer analytics to close more deals and increase customer satisfaction
We can’t stress enough how important it is to conduct data analysis. Luckily, creators of the best CRM software out there share our opinion. Hence, every CRM has an analytics or reports page to help sales teams make data-driven decisions.
In other words, CRM can help you see how many deals you won or lost, what tactic you used, deal value, and much more. Thanks to this, salespeople can adjust their approach, close more deals, and improve customer satisfaction and retention.
4. Remind salespeople of pending tasks
Sometimes we as people, amongst other work, forget to write a follow-up email or two, or simply a meeting slips out of our mind. It happens. However, forgetting such tasks can cause a lost prospect or a customer. However, CRM software offers a solution to this problem, and it is an option to alert you of actions needed for every customer in the pipeline to make sure these mistakes never happen.
To buy CRM software or to create a spreadsheet? That is the question.
Our experience says to buy. CRM software offers many useful features that you can use to streamline and automate processes and save you much more time than the spreadsheet.
However, if you are just starting out, perhaps you don’t have the necessary budget or have a small company, you might want to consider creating a CRM in a spreadsheet for yourself. It can help you understand how CRMs work and how your business can benefit from them.
Additional tip: If you want to level up but are not ready to pay for the CRM itself, try out some CRM software with free plans, such as Bitrix24, Really Simple Systems, or EngageBay.
Nevertheless, if you or the company scales up, do not dwell on these spreadsheets or free plans (unless you want to), as you might miss out on the amazing features that some of the best CRM software have.
In case you wish to buy CRM software, here are the ten best CRM software currently on the market (people’s choice).
10 best CRM software for sales
CRM software is an essential tool for every sales team. However, as prospects differ, so do the salespeople. In other words, not every CRM suits every business's needs. So, how would you know which one is the best for your business needs?
Thus we present you with the top 10 list of highest-rated, best CRM software for the sales team from various listing websites. For this article, we are going to calculate the current average rating from the most popular review sites:
Furthermore, we will list who they are most suited for, advantages, disadvantages, pricing, and additional information to help you find the best CRM software for you. Let’s get started.
Salesmate - Best CRM software for cold calling
This CRM software is great for small and medium businesses who are cold calling. In addition, Salesmate has a relatively easy-to-use interface and quick access to the features you require.
Salesmate can be integrated with Gmail or Outlook. Furthermore, each sales member can centralize prospect data, including email messages, and share them with other team parties.
Salesmate also offers reports that enable business owners and managers to track sales reps’ productivity and achievements. Team leads can also listen to calls by using the call recording option.
Advantages:
Salesmate has an option to generate tasks for you automatically. If, for example, someone fills a form on your website, that lead can directly go into Salesmate, and it automatically creates the task to follow up with that lead.
Secondly, there are calling and texting features so the sales reps can contact leads. Thus, it eliminates the need for adding other tools and saves budget, in a way.
Disadvantages:
A couple of reviewers reported a periodical system lagging. Furthermore, since every text message and call minutes have an additional price, the amount billed each month increases by that sum. This can be a problem for some users, as the amount can escalate if not properly and regularly managed.
Price:
- Starter: $15 per user / month or $144 billed annually
- Growth: $30 per user / month or $288 billed annually
- Boost: $50 per user / month or $480 billed annually
Listings rating: ⭐ 4.64
HubSpot CRM - Best CRM software for teams that are developing
There is no doubt that HubSpot surprised everyone with free access to the CRM software. However, the free version does come with its limitations.
In a free account, you get:
- Contact management
- Deal pipeline
- Quotes
- Meeting scheduling
- Live chat
- Reporting dashboard
If you wish for anything else, you need to upgrade to a paid version.
HubSpot CRM is perfect for individuals or companies that are just getting started with CRM software. Furthermore, it is useful for other medium-sized businesses that outgrew that phase.
Advantages:
HubSpot overall offers various nifty features, including sales playbooks, sequences, workflow automation, and reporting. In addition, this CRM can process up to 1,000,000 contacts and users for free and offers unlimited storage. Their Starters pricing plan is pretty fair and is somewhat beginners friendly, as opposed to other CRMs on the market.
Disadvantages:
If you wish for additional features, pricing for professional and enterprise packages is pretty steep. Furthermore, it does not directly support Dynamics 365, and pipeline and managing deals are not that intuitive.
Pricing:
- Starter: $50 per 2 users / month or $540 yearly
- Professional: $500 per 5 users / month or $5400 yearly
- Enterprise: $1200 per 10 users / month, billed yearly
Listings rating: ⭐4.504
Salesforce Sales Cloud - Best CRM software for sales experts
This is a complex and useful CRM that allows sales professionals to manage and build relationships with their prospects and customers. Salesforce Sales Cloud helps you optimize your workload, maximize your budget, and offers real-time data all in your favor so you can close more deals.
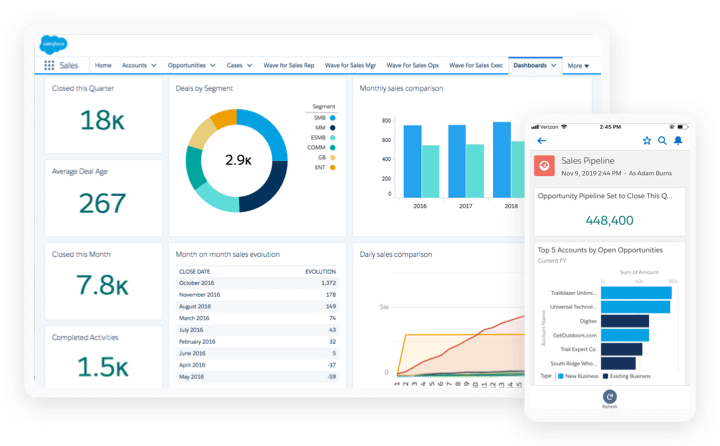
This CRM is not for beginners. In other words, they offer features galore that can be useful to sales experts already using CRMs for a couple of years, but if you are a beginner, you might want to test out and use other systems for a while before jumping to Salesforce.
Advantages:
Salesforce’s various and unique features are actually its advantage. Furthermore, they offer mobile app for Android and iOS to let you do the work on the go.
Salesforce also possesses the visual workflow drag-and-drop feature and lets you create, do and change tasks fast. In addition, Salesforce Sales cloud integrated with Slack so you can engage with prospects and customers in real time.
Disadvantages:
Salesforce is not beginner friendly and it is billed annually.
Pricing:
- Essential: $25 per user / month, billed annually
- Professional:: $75 per user / month, billed annually
- Enterprise: $150 user/month, billed annually
- Unlimited: $300 per user / month, billed annually
Listings rating: ⭐4.5
Zoho CRM - Best CRM software companies interested in contact and pipeline management only
The core functionality of Zoho’s CRM is contact management, pipeline management, and purchase control. Its dashboard is customizable, and it allows users to brand it according to their business brand.
Advantages:
One of Zoho's biggest advantages is that it allows you to reach people who use Twitter and Facebook. Furthermore, Zoho CRM tracks their actions and categorizes them as contacts so you can connect with them.
Disadvantages:
Zoho is a kind of CRM with mixed feelings - its interface is a bit outdated, it doesn't work well with extensive outreach, features are sometimes not communicating between each other, and billing annually are perhaps the reasons why Zoho is so low on the list.
Pricing:
- Free Edition: Free up to 3 Users.
- Standard Edition: 20€ per user / month or 14€ per user / month but paid annually
- Professional Edition: 35€ per user / month or 23€ per user / month but paid annually
- Enterprise Edition: 50€ per user / month or 40€ per user / month but paid annually
- Ultimate Edition: 65€ per user / month or 52€ per user / month but paid annually
Listings rating: ⭐4.292
Monday Sales CRM - Best CRM software for workflow
Before, Monday was a project management software, but now with its product development, it is much more. Now-developed Monday Sale is CRM software that centralizes your entire workflow and customer data. It allows tracking every aspect of the sales cycle, from lead generation to after-sale customer nurturing.
This CRM is best for small and medium-size businesses, and it is completely customizable.
Advantages:
Monday offers various templates that you can use for your workflow. In addition, the Monday.com dashboard is clean and straight-to-the-point, so you can easily spot any issues in your sales cycle.
Disadvantages:
Their pricing plan is confusing since they require a minimum of 3 seats, and you cannot use it as an individual (you can, but you need to pay for 3 seats). Furthermore, Monday Sell has issues with tablet and mobile device apps, and workflow automation needs additional manual work.
Pricing:
- Individual: $0 free forever (up to 2 seats), billed annually
- Basic: $8 / seat / month (3 seats minimum), billed annually
- Standard: $10 seat / month (3 seats minimum), billed annually
- Pro: $16 seat / month (3 seats minimum), billed annually
- Enterprise: Contact Monday.com for a custom quote
Listings rating: ⭐ 4.675
Zendesk Sell - Best CRM software on a budget
Formerly Base, Zendesk Sell is a CRM software perfect for small and medium-sized businesses. It provides access to all channels the sales team uses for communication including SMS, voice calls, and emails.
With Zendesk Sell, it is pretty easy to gain a full insight into the specific lead, thanks to features such as funnel tracking, customizable lists, templates, and conversion rate tracking.
Advantages:
One of the best features Zendesk Sell has is a calendar-reminder system. In addition, Zendesk Sell can be linked with Microsoft Office and possesses one tool that automatically detects duplicate leads and task sequencing.
Disadvantages:
Zendesk users reported problems such as slow loading time, mistakes in automated data entry, and issues with customer support. In addition, subscriptions are billed annually, and users need to pay more for certain features.
Pricing:
- Starter: $19 per user / month, billed annually
- Professional: $49 per user / month, billed annually
- Enterprise: $99 per user / month, billed annually
Listings rating: ⭐4.216
Copper - Best CRM software if you use Google Workspace
This is a CRM software with the main emphasis on Google Workspace. It has a well-designed UX/UI. What’s interesting about this CRM is that it contains in-app voice transcription, allowing you to take bullet points from the call right away.
Like other CRMs, Copper offers detailed reports and suggests improvements in workflow, while alerts keep you focused on the most important tasks. Furthermore, Copper is a nice CRM if you are a beginner or if you wish to change your current CRM.
Advantages:
The main advantage is that Copper integrates completely with Google Workspace - Gmail, Google Docs, and Google Sheets. In addition, the onboarding process is seamless and the system itself is simple to use.
Disadvantages:
Firstly, you are not able to attach files to emails you send in Copper. Secondly, workflow automation is a bit confusing since Copper uses rule-based workflow automation, and it may be time-consuming at first. Furthermore, another thing you might need to spend time with is filtering and extracting data.
Lastly, there is a lack of flexibility outside Google Workspace. To clarify, companies that use different email providers will not be able to integrate them with Copper.
Pricing:
- Basic: $29 per user / month or $300 annually
- Professional: $69 per user / month $708 annually
- Business: $129 per user / month (with annual commitment) $1.428 annually
Listings rating: ⭐4.53
Pipedrive - Best CRM software for multiple pipelines and customization
CRM software, Pipedrive, handles all the essential sales CRM features. It is intuitive, and you can easily separate priority deals and create different strategies for each lead.
Advantages:
Firstly, Pipedrive lets you build multiple sales pipelines and customize stages which are great for sales reps or team leads who manage various pipelines at once.
Secondly, Pipedrive’s star feature is that you can create web forms and LeadBooster chatbot, a custom chatbot to pop up next to a webform. Pipedrive then automates the process and puts lead directly into your pipeline.
In addition, Pipedrive’s powerful AI understands leads’ behavioral patterns and can give you hints on how to close deals with them.
Disadvantages:
Pipedrive can’t send a follow-up message or birthday greetings based on a date at this moment in time. In addition, users noticed some lagging issues and poor mobile app experience. Lastly, customizable reports are not available.
Pricing:
- Essential: $15 per user/month or $12.50 per user / monthly billed annually
- Advanced: $29 per user/month or $ 24.90 per user / monthly billed annually
- Professional: $59 per user/month or $49.90 per user / monthly billed annually
- Enterprise: $119 per user/month or $99 per user / monthly billed annually
Listings rating: ⭐4.446
Salesflare - Best CRM software (people’s choice)
The best CRM software on our list is Salesflare. It is a CRM software primarily for startups and small businesses, but many agencies and enterprises use it. Salesflare is intuitive and easy to use and can be integrated with more than 400 other productivity tools like Trello, thanks to Zapier.
Salesflare offers automation features, such as an automated address book, timelines, file repository, and sending emails based on triggers. It can also provide task suggestions automatically.
Advantages:
The good thing about Salesflare is that they provide dedicated support no matter the plan you choose. In addition, for all technical advice, you can even talk to developers.
Furthermore, they have a mobile app, various team access levels, and a great data gathering system. Lastly, Salesflare will automatically log phone calls or meetings, and gather contact information from email signatures, and even social media profiles.
Disadvantages:
Fortunately, there aren't many disadvantages when we talk about Salesflare - the users seem pretty content. There are, however, a couple of suggestions from them: it would be nice to have email drip functionality, and email reporting needs improvement.
Pricing:
- Growth: $29 per user / month (billed annually) or $35 billed monthly
- Pro: $49 per user / month (billed annually) or $55 billed monthly
- Enterprise: $99 per user / month (billed annually) or contact their support for custom plan
Listings rating: ⭐ 4.73
EngageBay - Best CRM software for enticing your sales team
Cloud-based CRM, EngageBay is a software that integrates sales, marketing, and finances on a single platform. The core function of this software is complete automation. Furthermore, it offers contact management tools specially designed to be simple to use. In addition, it can track web activity, email response, and analytics.
EngageBay easily Integrates with Gmail, Office 365, or any other service, with integration capabilities through Zapier or other similar integrations to further streamline your sales efforts.
Advantages:
The possibility to make a call from this CRM is a big plus, as well as an option for transcripts. In addition, what separates EngageBay from other systems is the possibility to gamify sales processes and thus keep your sales reps motivated.
Disadvantages:
A couple of lesser disadvantages came up with EngageBay. There is less troubleshooting documentation, email templates are limited, and the Chrome plugin doesn’t trigger an event, so automation needs to be done manually.
Pricing:
- A free plan is available, limited to 1,000 contacts emails
- Basic: $12.99 per user / month, $11.69 per user / month annually
- Growth: $24.99 per user / per month, $22.49 per user / month annually
- Pro: $49.99 per user / month, $44.99 per user / month annually
Listings rating: ⭐ 4.636
How to use CRM software with other tools?
We all know that only one tool won’t do if you wish to optimize your sales workflow as much as you can unless that one tool has everything you need, which is pretty rare.
So, in addition to CRM, you might be using sales engagement, meeting scheduling, or LinkedIn prospecting tools. So the question arises - is it possible to integrate them all? Short answer - yes.
Long answer? Let us show you how you can do it.
For example, let’s take our LinkedIn Automation and Cold Email software, Skylead. This tool enables you generate leads on LinkedIn, outreach them and take action depending on their behavior, all on autopilot. As Skylead fills your pipeline, it leaves you more room to concentrate on important matters such as building relationships and closing more deals.
In addition, you can connect Skylead with your CRM of choice by using webhooks. A webhook helps you transfer data to other applications immediately, when certain action happens. For example, as soon as the lead responds in a Skylead campaign, a webhook is triggered, and will automatically send lead’s data to your CRM.
Moreover, webhooks are the most common way to integrate tools directly into your CRM and push data about the leads in one place. You can create them by using tools such as Zapier. Check out our detailed step-by-step guide on integrating your CRM with Skylead using Webhooks here.
Apart from using webhooks, you can also push your prospects’ information to your CRM by using Skylead’s global BCC option. To use it, simply insert the email address you get from your CRM in Skylead’s Global BCC option. This option is available only if your CRM of choice doesn’t offer direct sync with your email but through BCC.
Example
Say, you are using the Pipedrive Essential plan. In this plan, you don’t have an option to sync your email with Pipedrive directly unless you upgrade. However, you can use their Smart BCC function to send all emails to Pipedrive.
Here is how it works: Go to Pipedrive Email Sync settings and find the Smart Email BCC address - your company account’s specific BCC address provided by Pipedrive.
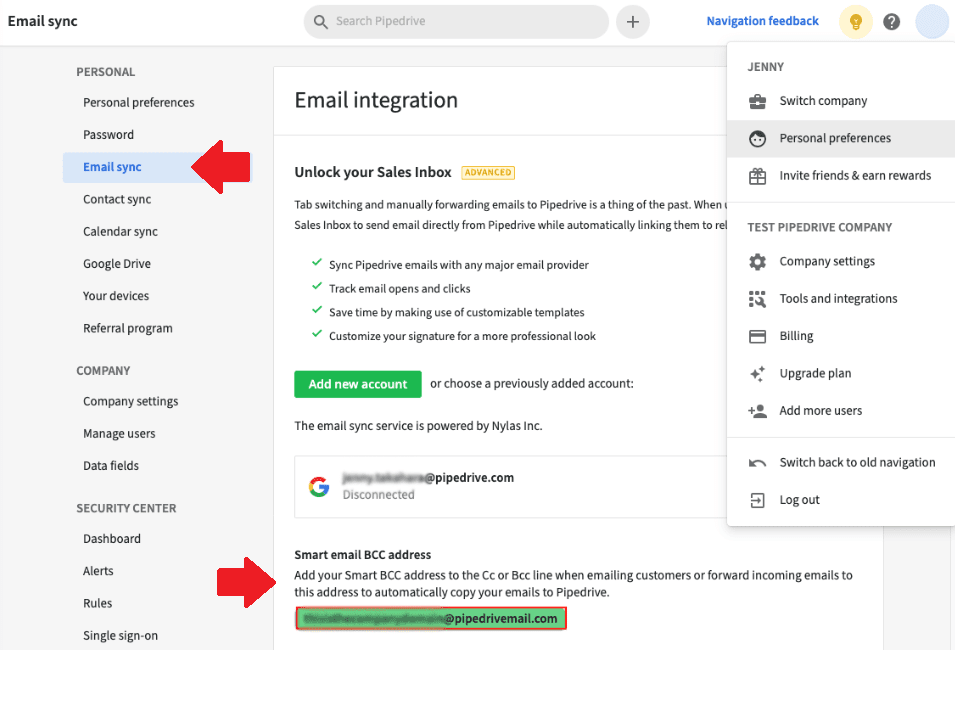
So, to send every email to the Pipedrive inbox, you need to insert this email address in the BCC field of every email manually. However, you can do this automatically if you use Skylead for your outreach.
Firstly, go to your Skylead settings and click on the Integrations tab.
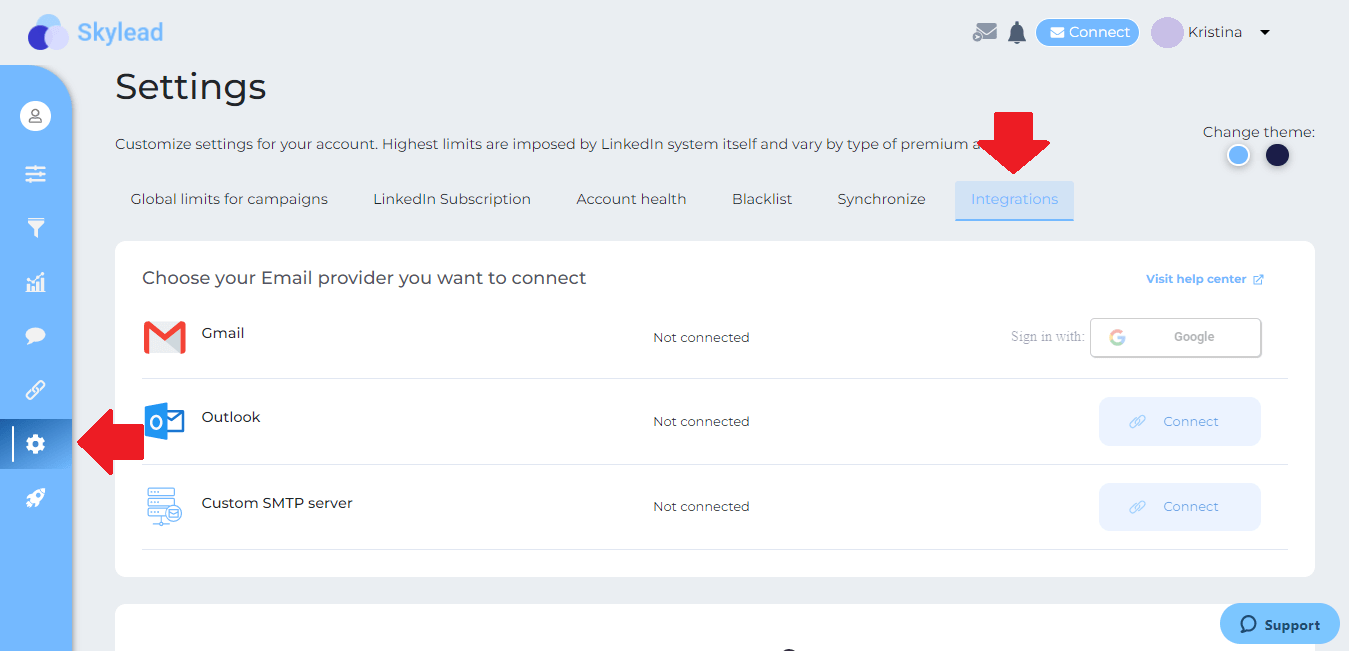
Then, scroll down to the global BCC option, take the email address from Pipedrive, and place it into the field.
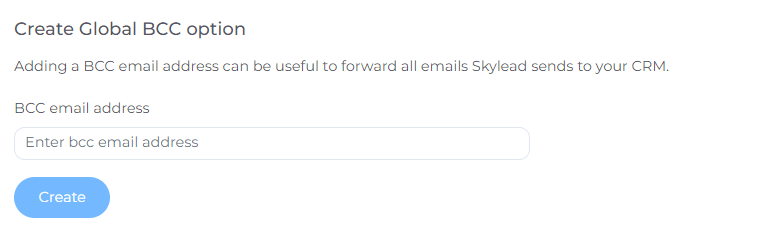
In this way, for every outreach campaign you run in Skylead using the email step, you will be able to see separate emails in your Pipedrive inbox. Moreover, Pipedrive will automatically connect them with matching leads and deals in your pipeline.
The best CRM software in conclusion
With so many CRMs on the market, it can be daunting to go through every single one of them. But if we take software listing websites into the account you can more or less see the situation on the market.
So, let our list be your guide to narrow your choices, or figure out what other solutions are out there. Thus, here is the short overview of the best CRM software currently on the market.
| CRM Software / Listing Website | G2 | Capterra | GetApp | Software Advice | Software Suggest | Average Rating |
| Salesforce | 4.2 | 4.4 | N/A | 4.25 | 4.9 | = 4.5 |
| Hubspot CRM | 4.4 | 4.5 | 4.5 | 4.52 | 4.6 | = 4.504 |
| Salesmate | 4.6 | 4.7 | 4.7 | 4.7 | 4.5 | = 4.64 |
| Zoho CRM | 4.0 | 4.3 | 4.3 | 4.26 | 4.6 | = 4.292 |
| Monday | 4.7 | 4.6 | N/A | 4.6 | 4.8 | = 4.675 |
| Zendesk Sell | 4.2 | 4.3 | 4.3 | 4.28 | 4 | = 4.216 |
| Pipedrive | 4.3 | 4.5 | 4.5 | 4.53 | 4.4 | = 4.446 |
| Copper | 4.5 | 4.4 | 4.4 | 4.38 | 5 | = 4.53 |
| Salesflare | 4.8 | 4.7 | 4.7 | 4.72 | N/A | = 4.73 |
| EngageBay | 4.6 | 4.6 | 4.6 | 4.58 | 4.8 | = 4.636 |
Wish to use an advanced outreach tool in combination with your CRM software and close even more deals? Then, try out Skylead for free - an outreach that thinks for you!
Disclaimer: Skylead is not affiliated, endorsed by, or connected with LinkedIn in any way.
One of the most commonly used LinkedIn prospecting hacks for getting qualified leads is targeting people who attend specific LinkedIn events.
Why is that?
LinkedIn events represent an excellent way to find people from the same or similar industry in one place. Usually, professionals attend webinars and other types of online networking and learning opportunities to expand THEIR knowledge and expertise. However, when it comes to using events for LinkedIn lead generation, you need to think the other way around - what does your target audience want to hear and what kind of topic would gather them in one place?
Furthermore, by attending a LinkedIn event with your ideal leads, you have a direct insight into their concerns, needs, and room for improvement. Use this information to reach out to the attendees, further investigate their pain points, and finally, offer your product as a solution to their problems.
Last, but not least, targeting LinkedIn event attendees turns out to bring high acceptance and response rates, all of which directly influence your conversion. Our Sales Team reports several campaigns in which they reached out to people who were at a specific LinkedIn event with the following results:
- January 2022 - acceptance rate 75% / response rate 41 %
- November 2021 - acceptance rate 66% / response rate 51 %
- September 2021 - acceptance rate 74% / response rate 43%
What are LinkedIn events?
LinkedIn events help organizations and individuals deepen their relationships with the target audience through virtual gatherings around a specific topic. Although LinkedIn started rolling out the events feature in late 2018, the pandemic definitely sped up the entire process of switching from live to virtual webinars, masterclasses, and gatherings of any kind. And LinkedIn turned out to be the perfect platform for it for many reasons.
LinkedIn events are free of charge and available to all LinkedIn users.
Benefits of using LinkedIn events for lead generation
- Find leads from over 200 world countries in one place.
- You can either organize the event with the intent of drawing your ideal customers or simply attend an existing event that gathers your target audience.
- LinkedIn events give you valuable insight into your target audience’s needs, room for improvement, and pain points.
- Referring to a LinkedIn event you and your lead attended in a cold outreach message gets you a step closer to the conversion.
How do I find a LinkedIn event?
There are two ways to find the most suitable LinkedIn event.
- Use LinkedIn Search to find future LinkedIn events.
- Check out past events (whether you attended them or not, all that matters is that you signed up for them).
Find future events
#1 Run a blank search or enter your keyword(s) into the search bar.

#2 Click the “Events” tab and check out all future LinkedIn events.

#3 The list of events looks like this on LinkedIn. Pick the one you wish to attend.
#4 Click the “Attend” button.
This is the only way to see the event attendees.
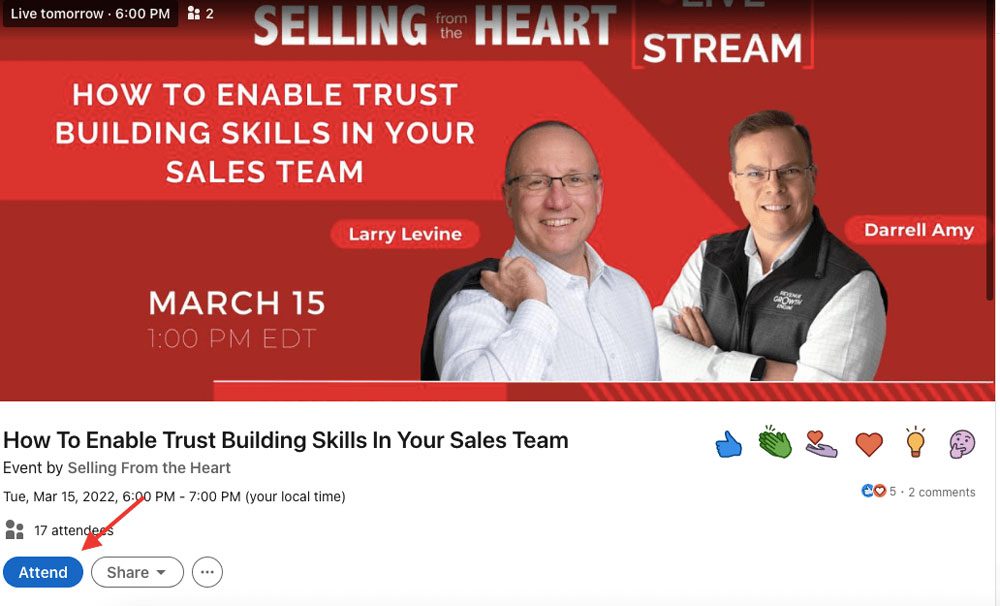
LinkedIn will give you the option of adding the event reminder to your calendar.
Down below you can find information about the event, speakers, and the organizer too, so you can check them out on LinkedIn before joining.
#5 You have two options to see the attendees.
Click on the link below (where it says the number of attendees) or on the “Networking” section on your right. This is how you see the list of attendees and apply LinkedIn filters to narrow them down as close as possible to your Buyer Persona.
Also, on your right, there is an option of directly messaging any event attendee or sending a Connection Request. This is your opportunity to engage, chat with your attendees and build a community around the event you joined or maybe even created yourself.
However, the practice shows that it is better to engage after the event, as you will have more room for personalization and to be as specific as possible when it comes to making references to something that was said or asked at the event itself.
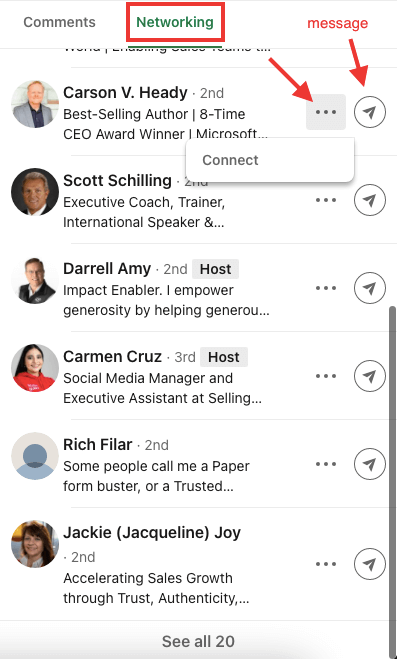
#6 Let’s say you decided to go with the list of LinkedIn attendees and you clicked one of the two above-mentioned links.
This is how you apply any of the LinkedIn filters to your list of leads.
You can narrow them down by the following filters:
- Connections (whether they are your 1st, 2nd, or 3rd-degree connection)
- Connections of (in case you have a shared connection)
- Locations
- Current Company
- Past Company
- School
- Industry
- Profile Language (what language is their profile in)
- Open To (if they set their profile to be open to “Pro bono consulting and volunteering” or “Joining a non-profit board”
- Service categories
- Keywords (any keywords that you find suitable for your search)
Find a past event
#1 If you wish to target leads from a past LinkedIn event, click here and go to your LinkedIn feed page.

#2 Scroll down and check out your “Events” section on the left.
#3 You’ll see the list of ALL events - future and past.
The rest of the process is the same as above.
How to reach out to LinkedIn event attendees?
Reach out to LinkedIn event attendees:
- Manually
- Using a Sales Engagement Platform such as Skylead
Manually
When we talk about reaching out to leads manually, we refer to either writing to them directly on LinkedIn or exporting their contact information one by one in a .CSV file. Then, you can import the file into a Sales Engagement Platform and make the entire outreach process faster and easier.
Use a sales engagement platform
#1 If you decide to use a Sales Engagement Platform, you can also copy your final search results’ URL.

#2 Paste the link into Skylead.
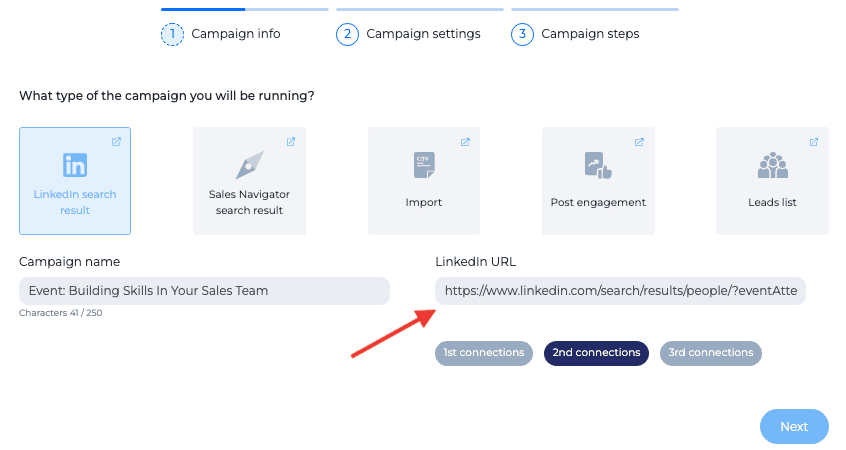
#3 Choose “Collect Contact Info” (optional). This way, Skylead will download all publicly available data such as your lead’s email, phone number, website, etc., depending on what your leads made public on their LinkedIn profiles.
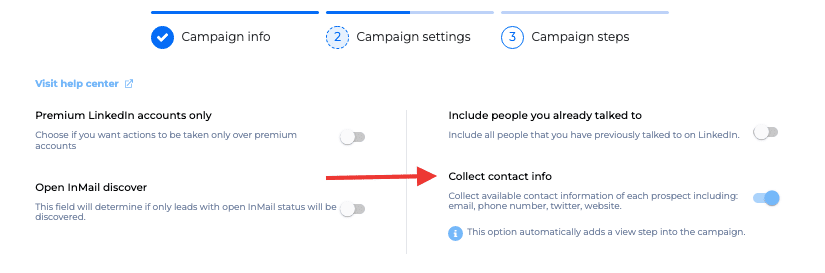
Go ahead and make your Smart Sequence.
Smart Sequences are based on algorithms that track your lead’s behavior and act accordingly. This way, they assure the highest number of touchpoints with people you wish to reach out to. Smart Sequences work on an “if/else” principle, where if the condition for one path is not fulfilled, the algorithm searches for its alternative.
Here’s an example of a simple Smart Sequence.
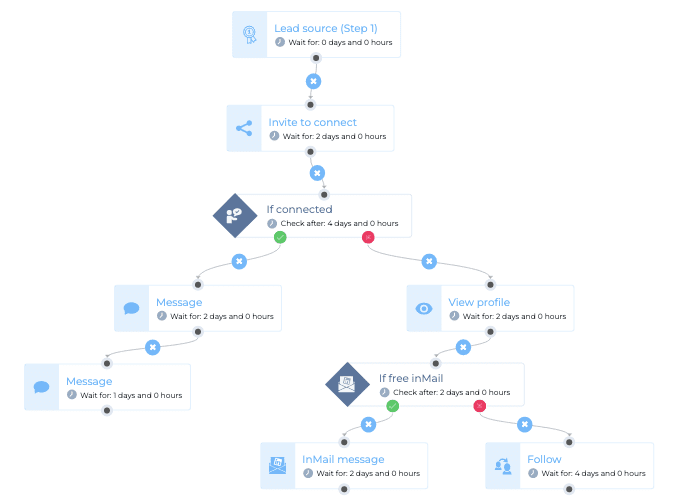
If you wish to learn more about how Smart Sequences work check out our solutions page.
LinkedIn templates for approaching a LinkedIn event attendee
A LinkedIn event that you organized, attended, or are planning to join or conduct can be used in so many ways in your outreach. Either way, making a reference to it is a huge plus, and people who participated will be more prone to talk to you if you mention it.
Here are 6 situations how to use a LinkedIn event reference in your outreach.
Scenario #1 You attended the same event as your lead
Template
Hello {{firstName}},
I saw that you too attended the {{eventName}} event!
What resonated with me the most is {{somethingThatResonated}}!
It would be awesome to connect with you! 😀
Example
Hello Mario,
I saw that you too attended the “How To Enable Trust Building Skills In Your Sales Team” event!
What resonated with me the most is their Trust Equation and the way Darrel explained it!
It would be awesome to connect with you! 😀
Scenario #2 Ask for feedback on a certain LinkedIn event as a conversation-starter
Template
Hello {{firstName}},
I am curious to hear what resonated with you the most from the {{eventName}} event since I saw you attended it too!
Would love to keep in touch!
Example
Hello Sonya,
I am curious to hear what resonated with you the most from the “How To Enable Trust Building Skills In Your Sales Team” event since I saw you attended it too!
Would love to keep in touch!
Scenario #3 You are the event organizer and want to hear feedback from people who attended it
Connection request template
Hey {{firstName}},
I just wanted to thank you in person for attending the {{eventName}} event! It was truly a pleasure having you there.
Let’s stay in touch!
Connection request example
Hey Jenny,
I just wanted to thank you in person for attending the “How To Enable Trust Building Skills In Your Sales Team” event!
It was truly a pleasure having you there.
Let’s stay in touch!
LinkedIn message #1
Once you get accepted on LinkedIn, use personalized Images or GIFs to improve engagement. Since we started using this feature, our response rates went up by 63%.
This is one example to get inspired by, but the more creative you get the better.
Scenario #4 Use a LinkedIn event that has to do with your product/service and ask for feedback on your product/service
Connection request template
Hey {{firstName}},
I saw that you attended {{eventName}} on LinkedIn!
Would love to hear the most useful tips you got from it!
Let’s connect 😀
Connection request example
Hey Tom,
I saw that you attended “How To Enable Trust Building Skills In Your Sales Team” on LinkedIn!
Would love to hear the most useful tips you got from it!
Let’s connect 😀
LinkedIn message #1 template
Hey {{firstName}},
Thank you for accepting my connection request!
I am still super-curious to hear your most valuable takeaways from the {{eventName}} event. For example, I personally found {{takeawayThatStoodOut}} surprising!
Anyways, I {{yourOccupationExplained}}. I would love to share the solution we have and hear your feedback on it too!
LinkedIn message #1 example
Hey Tom,
Thank you for accepting my connection request!
I am still super-curious to hear your most valuable takeaways from the “How To Enable Trust Building Skills In Your Sales Team” event. For example, I personally found the fact that they never mentioned how this process works during the onboarding period surprising!
Anyways, I help small-to-medium-sized Sales Teams optimize their schedules. I would love to share the solution we have and hear your feedback on it too!
Scenario #5 You want to network before the LinkedIn event
Template
Hello {{firstName}},
I saw that you also signed up for the {{eventName}} event.
I already attended an event {{organizer’sName}} organized on {{topic}}. {{yourFeedback}}.
Let’s keep in touch!
Example
Hello Angela,
I saw that you also signed up for the “How To Enable Trust Building Skills In Your Sales Team” event.
I already attended an event Darrel organized on the time-management of medium-sized Sales Teams. He was amazing!
Let’s keep in touch!
Scenario #6 Promote your LinkedIn event by targeting people who are attending an event similar to yours
Suggestion: Use LinkedIn InMails to reach out to your leads if you don’t have any more Connection Requests available, you wish to reach out to people who are generally getting lots of requests, or who are your 3rd-degree connections.
Also, LinkedIn InMails work well if you need more characters for your message or your lead doesn’t accept your Connection Request in a timely manner. Aside from paid InMails included in your premium LinkedIn plan, you can also take advantage of free InMails (800 for each paid LinkedIn profile) for users who set their profiles to “open to free InMails”.
We have 13 additional InMail examples you can check out.
LinkedIn InMail template
Subject line: {{company}} + {{yourEventName}} = {{benefit}}
Hey {{firstName}},
I saw that you attended the {{eventName}} event. Did you find it to be useful for the {{lead’sIndustry}} industry?
Hopefully yes, because I have something even more specific for you! We are organizing {{yourEventName}}, a LinkedIn event that will give you {{uniqueSellingProposition}} specifically for your industry. We would really love to have you there!
Would you be interested in hearing more?
LinkedIn InMail example
Subject Line: FlyHigh + SaaSEnMasse = 20+ additional calls in 3x less time
Hey Nicolas,
I saw that you attended the “How To Enable Trust Building Skills In Your Sales Team” event. Did you find it to be useful for the SaaS industry?
Hopefully yes, because I have something even more specific for you! We are organizing “SaaS en masse”, a LinkedIn event that will give you a step-by-step guide on 5 prospecting hacks specifically for your industry. We would really love to have you there!
Would you be interested in hearing more?
Summary
In the sea of professionals using the platform, it is getting harder and harder to find qualified leads. Sales reps are trying to get as creative as possible and to think strategically about where their target audience gathers. Reaching out to people who attended specific LinkedIn events is sure one of the best places to start.
Have in mind that you can always target a future event, a past event, or even create one of your own that will attract your potential customers.
And if you decide to speed up annoying sales processes, and put more focus on building meaningful relationships and closing the deal, sign up for Skylead's 7-day free trial!
If you are asking yourself "How can I use Buyer Persona to boost sales?" or "What is a B2B Buyer Persona, at all?" then you are in the right place.
Buyer persona became a popular term that got tossed around in marketing teams, but then it landed in the sales lap and made them question their entire existence. Well, it wasn’t that dramatic, but it did make the sales teams think twice about who they should target when doing outreach.
Did you know that 56% of the companies that used buyer personas generated higher-quality leads?
Yes, Buyer Persona is that useful. Therefore, if showing you how to make an ideal customer profile was like taking your blindfold off while playing darts, going through how to create a B2B buyer persona for sales will be like placing the laser on your dart to make sure you hit the bull’s eye.
What is a B2B buyer persona?
Let’s start with the definition. A Buyer Persona is a description of a person who is your ideal customer with all behavioral, demographic, firmographic, and psychographic characteristics. In other words, a buyer persona mirrors who your perfect buyers are, from age, location, their likes and dislikes, goals, and wishes to challenges and motivations.
Buyer Persona is based on existing customer research and other data that might help you define your ideal buyer persona in detail.
There is a common misconception that Buyer Persona and Ideal Customer Profile are the same. However, there is a big difference between them. In short, ICP represents the company profile, and Buyer Persona focuses on the particular type of person’s profile only. Similar to Ideal Customer Profile, Buyer Persona is a perfect representation of the customer who has the shortest buying cycle, highest LTV and is a preacher for your product.
Did you know that 3 to 4 Buyer Personas usually represent 90% of the company’s sales?
If various customers use your product for different aspects of their business, or they simply differ in their position, you might want to think about creating multiple personas. Whatsmore, it is pretty common to have a couple of buyer personas for the sales team.
Example:
Let’s say you have project management software. Your software could be used both by programmers, sales, marketing managers, and alike. Each of these managers presents an individual buyer persona with different wishes, goals, and challenges.
Benefits of having buyer persona for sales
Do not think that Buyer Persona is the document you are going to create, look at it a couple of times and never use it again. Buyer Persona is a powerful document, and it is of great help when you are doing outreach. Why? Because of all the benefits listed below.
Provides details for prospecting and outreach
Buyer Persona provides context for your sales team to zero in on who exactly they should outreach to while outreaching. It will provide you with information such as age, position, industry, education, and consumer patterns to use for prospecting to your fullest.
Personalized approach
Once you have identified Buyer Persona, you will have access to information such as their pain points, challenges, and what type of person they are, so you will know exactly how to personalize your approach and present your product or service in the most alluring way to the prospect. Maybe you can throw in additional personalized images or GIFs according to their liking to improve the response rate.
Improves productivity
Having a Buyer Persona means that the sales team will ultimately ease up their process, improve productivity, results, and lower the time spent on their efforts. In addition, they will attract high-quality leads with more ease, who will ultimately have a higher retention rate.
Addressing customer’s problems
We all know that the core outreach rule is focusing on customers and addressing their problems instead of your own. B2B Buyer Persona will keep you on the right path to doing just that. Whenever you create your outreach message, ask yourself if it addresses the challenges or emphasizes how to reach goals listed in Buyer Persona documents. If it does not, get back to the drawing board.
How to create a B2B buyer persona?
Buyer Persona isn’t hard to create. However, it does take a little bit of time to get it right with all the information you need for the outreach. Luckily, we are here to explain six easy steps to create this useful piece of documentation.
1. Customers breakdown
Before jumping into the details of your B2B Buyer Persona, you need to break down your current customer database into groups. To do this, you need to decide on the broader criteria by which you will break them down and then move on to more narrow criteria.
Example (part 1):
Let's say your broader criteria is the length of the buying cycle. We can agree that some buying cycles are longer than others. Since you are looking for a shorter cycle for your future customers, this is a nifty point to start at.
The following step is to define your second and third criteria to deepen the breakdown.
Example (part 2):
Let’s say from this short-buying-cycle group you have different industries. Naturally, your following criteria would be to break the customers down by industry and then by decision-making role.
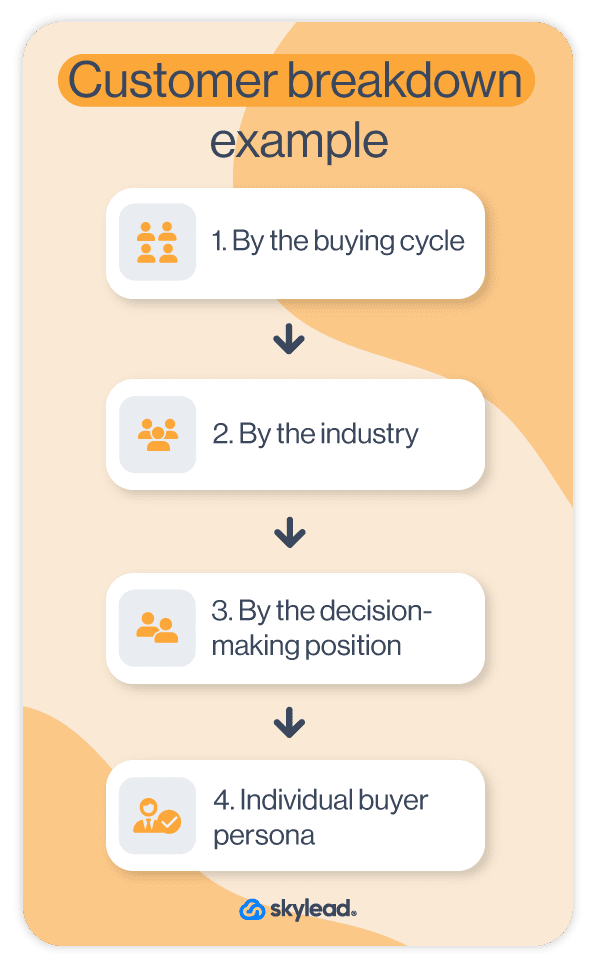
If, however, you do not have current customers, you can start with an industry breakdown and proceed to the decision-maker division.
2. Demographic parameters
Now you have a rough draft of B2B Buyer Persona. So, it is time to assign them demographic attributes. The key is to notice the pattern these customers have - their age range, interests, or location. If you are unable to pinpoint these patterns, here is the list that will help you out:
- Age
- Location
- Company type
- Function
- Seniority Level
- Job position
- Industry
- Years of experience
- Education
- Role in Buying process
- Recent life event
In case you do not have your current customers or customer insight, fear not. You can use the combination of Google Analytics and LinkedIn to gather this kind of information. If you are using Google Analytics, simply jump to your existing Audience Insights section (or ask your marketing team to do it for you :).
For LinkedIn, simple filter options will do the trick.
3. Psychographic parameters
To fill in the picture, you would need additional personal information. Psychographic characteristics are a great way to do it, as it will help you perceive your B2B Buyer Persona as more human, which will also humanize your approach.
Dedicate your Buyer Persona a name to start with, and then proceed on with:
- Likes And Dislikes: It is far easier to talk to someone whose general preferences you know, rather than hope that you won’t mess up if you mention something they do not like.
- Character type: This will give you an insight into how you should approach the person and construct your social selling. You can use 16 Personalities or similar to determine character type.
- Brand and influencers: You can choose the general ones or narrow them down. In addition, choose brands or influencers similar to your business to adjust your sales pitch.
- Work motivation: Information such as what drives them to go to work every day and what they like to do the most.
- Story Behind Buyer Persona: You can write a short description of what led them to a current position, what is their main trait, how many years they’ve been doing business, and so on.
- Preferred means of communication and Social Channel use: It’s also a good idea to find out where the ideal buyer spends time online and how they like to communicate so you know whether you should use multichannel outreach.
How to come by this kind of information?
If you have current customers, the best way to gather this kind of information is by simply talking to them. Here are a few key points to talk about with your customers:
- Means of communication they prefer;
- Social Media they consume the most;
- What is considered to be an achievement in their job role;
- Their motivations;
- What tools do you use as part of your daily routine? Why?
- What they like and dislike most about the job and communication with people;
- How they would describe a product’s purchasing journey;
- How would they describe their working persona;
Through these questions, the idea is to understand your potential customers’ true behavioral patterns and motivations. The more qualitative and quantitative detail you gather from this conversation, the better you will be prepared for these types of B2B Buyer Personas.
If you do not have your customer base or someone from your buyer persona to talk to, you can use LinkedIn to search for this kind of person and see what they write about in their post and gather information from there.
4. Identify buyer personas’ goals and pain points
In most cases, your prospects’ goals will be your own. Keep in mind, you are not just a salesperson, but the helping hand, a friend in need for their business efforts.
That is why you need to identify their goals, priorities, challenges, and pain points. Furthermore, depending on their pain point, you can adjust and personalize your outreach more to pinpoint and present what your prospects are looking for.
This is where conversation with your current customers comes into play once more. What you need to keep an eye out for is what are...
- your challenges?
- long-term and short-term goals?
- technology and tools used to achieve your goals?
- your work priorities?
- the influences of your purchasing decision?
Additional Note: If you do not have current customers, reach out to your leads anyway. You would be surprised how many people on LinkedIn will be willing to help by just telling them that you are doing the research.
5. Common objections and value proposition
Sometimes when you talk with customers, they will speak about your product or service. Let them, because they will reveal much about your product itself, and the problems it solves for them.
Furthermore, ask them about what they dislike about your product. It is important to understand negative viewpoints to bulletproof your outreach message. The message with this information will be a valid and irresistible value proposition for the B2B Buyer Persona.
Now is the time to ask one last tricky question: What do they usually say when they try to decline the offer from a salesperson? This is perhaps the most valuable information since they will list of objection handling situations that you can prepare for when you outreach this type of B2B Buyer Persona.
6. Assemble your B2B buyer personas
Gather your findings in one place and start building your B2B Buyer Persona. Keep in mind that every piece of information we mentioned above is applicable in practice, be it for outreach or prospecting. You can always go into even more details when defining a B2B Buyer Persona, such as marital status and so on, but the information mentioned above should be your core guide.
With this information, you have a specific description of your potential customer. Give your Buyer Persona name and surname, a picture, and you are done - at least with this one 🙂 Remember to repeat the process in the first step to create a couple more Buyer Personas for the outreach.
B2B buyer persona example and template
Here is an example of how it looks when you sift through the information and present them neatly in the document. A sight for sore eyes, isn’t it?
We’ve even created the template for you. You can download this buyer persona by clicking here. Click on the “Make a copy” button, and it shall be done.
How to use B2B buyer persona in lead generation?
Creating a Buyer Persona can be challenging, but now the real fun begins - it is time to put it into practice.
Remember that these are your IDEAL Buyers. However, if the person outside of your Buyer Persona is interested in your product or a service, do not discard them and proceed with the sales process.
Here is how you can use your Buyer Persona to find leads, create personalized messages and outreach them with more ease.
1. Find leads matching buyer persona using LinkedIn
There are two ways to find leads: by LinkedIn basic account search or Sales Navigator Search.
Find leads using LinkedIn basic search
Go to your LinkedIn account and research the position defined in your Buyer Persona document. Once you do, use additional filters available to narrow down the search according to your Buyer Persona, such as location, industry, and so on.
When the search is complete, create a CSV file with every prospects’ first name, last name, profile URL, and email if you can find it. Additionally, you can import variables such as Value proposition from your B2B Buyer Persona document. Save this file for the next step.
Find leads using Sales Navigator
Go to your Sales Navigator account and click on Lead Filters.

You will see the filters list you can use, so insert all the ones from your Buyer Persona document, such as Education, Years of Experience, Job title, etc.
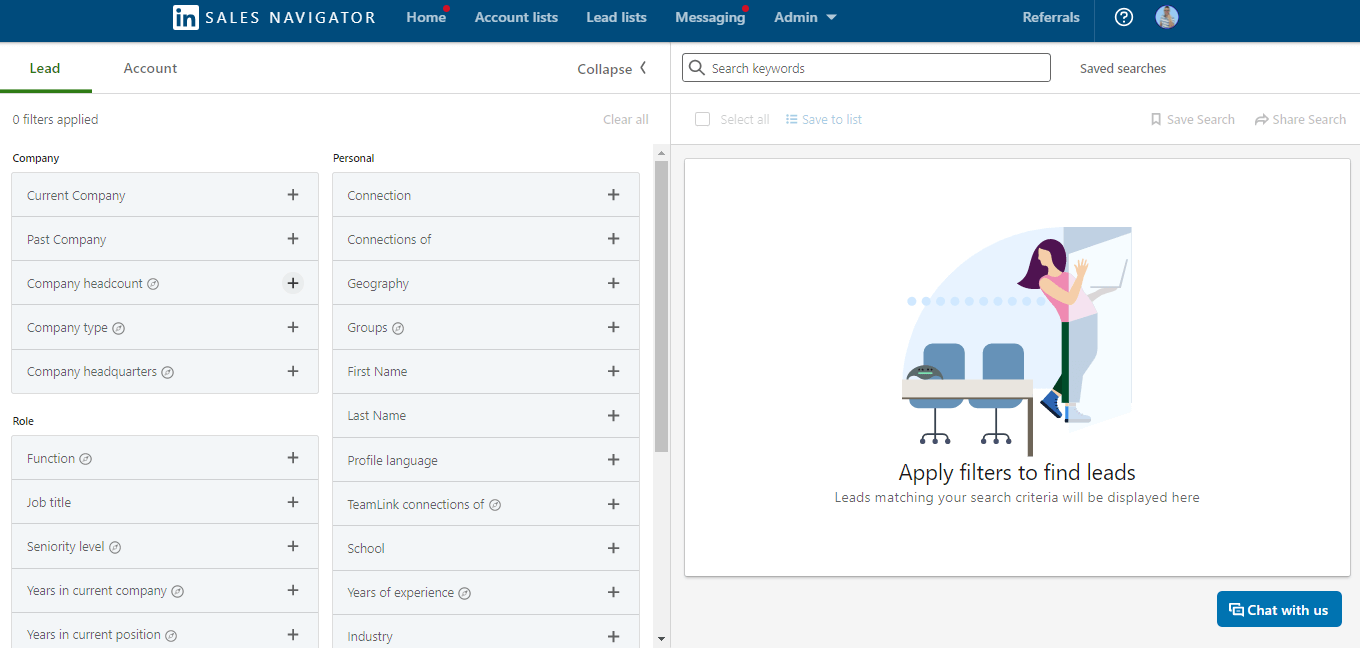
Once you’ve filtered out the search, hit the “Save Search” button to save leads to the lead list.
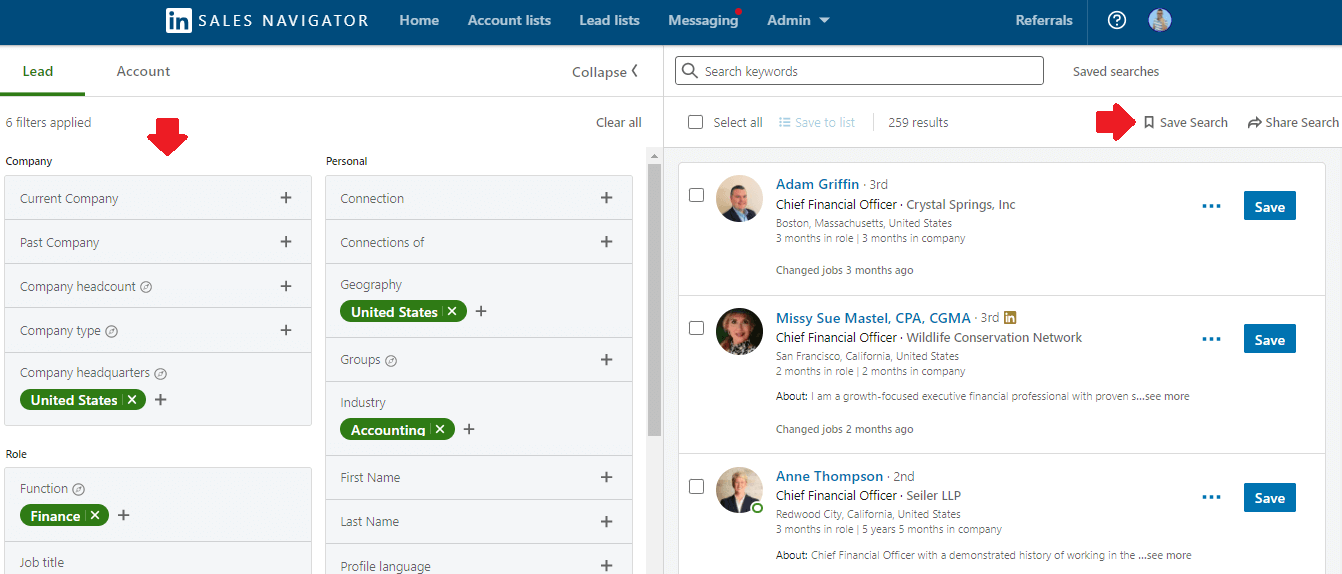
Another great way to find leads that are a twin picture of your ideal B2B Buyer Persona is to find that exact person, preferably your current customer, in Sales Navigator and hit the “View Similar” button. Sales Navigator will find leads most similar to the lead profile you select, according to position, age, education, and so on.

Save this list by clicking the “Save” button next to their names, and you are done.
2. Create an outreach campaign
You can outreach the leads you found manually, but to make this process easier, you can use a sales engagement tool to do it for you. Let’s take Skylead as an example. To create an outreach campaign, take the CSV file from LinkedIn results or URL from the Sales Navigator lead’s list, and upload or paste it into Skylead.

3. Create a Smart sequence for outreach
The Smart sequence will allow you to define the steps you need to take for your outreach towards the selected leads. Move and connect the elements, such as actions and conditions, will result in a sequence such as:
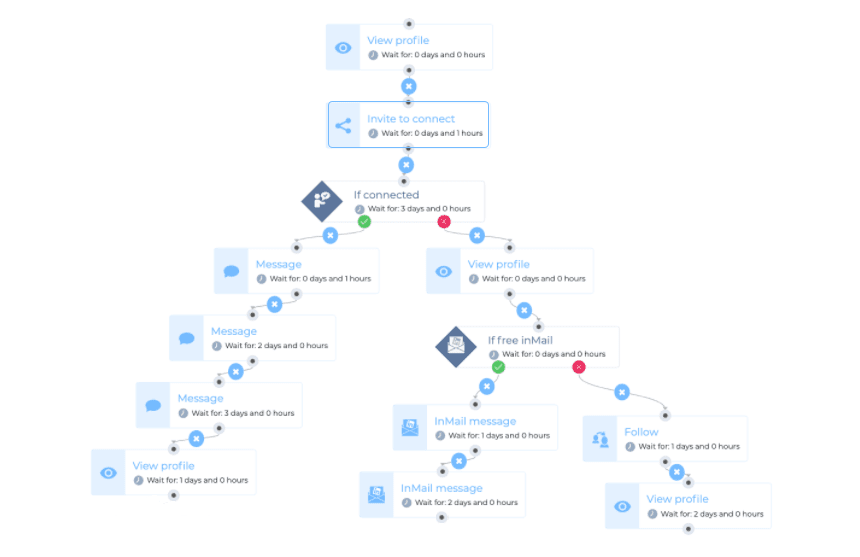
4. Personalize your approach
Remember when we mentioned the value proposition, motivation, and type character your B2B Buyer Persona is? This is where you are going to use them. When figuring out the message for the outreach, be sure to personalize it according to all these parameters.
Depending on how many steps your sequence has, you might use these pieces of information sporadically. Here is an example of one type of personalized message for outreach.
Hey {{firstName}},
I couldn't help but notice that working as {{occupation}} brings out different challenges such as {{Challenge1}}.
I know that {{Motivation}} is a huge factor in overcoming this challenge. But did you know that {{ValueProposition}} could be a perfect solution for it?
It would be great to hear more about how you operate in this regard and share some of my tips if you’re up for it.
How does Thursday at 1 PM sound?
And you are done! Relax and enjoy the results Skylead brings to you.
Summary
Buyer Persona helps you bring the right prospects to the table. Furthermore, it provides you with the details which you can use for prospecting and outreach, improving productivity and results. Here are the steps to remember:
- Customers’ Break-Down
- Define Demographic Parameters
- Define Psychographic Parameters
- Identify Goals And Pain Points
- Define Common Objections And Value Proposition
- Assemble The Buyer Persona
Now you go! Create your outreach campaign, use the information you gathered and watch leads convert more efficiently and with ease.
Wish to use Skylead to find and outreach your Buyer Persona with ease? We would be happy to meet! Drop us a message via chat on our website. Or, try out Skylead by signing up for a 7-day Free Trial.
Disclaimer: Skylead is not affiliated, endorsed by, or connected with LinkedIn in any way.
You chose your path and decided to walk towards Social Selling, a valley of flourishing prospecting fields, meaningful connections, and better conversion opportunities. Now we welcome you to the camp - The Ultimate Guide Part 2, where we will be discussing how to create a tailor-made Sales Strategy for your business.
If you haven’t checked out Part 1 yet, be sure to do so here, where we’ve covered:
- What is social selling
- How to measure social selling success
- 10 tips to boost your sales using social selling
Let’s jump to the sequel of our shared storyline and prepare you for the mountain climb.
Benefits of Social Selling
Firstly, let's distinguish why we are all doing this. Social selling is the most effective sales strategy in recent years. Thus, there are many statistics to prove how vast its potential can be:
76% of buyers are ready to have a social media conversation with potential providers.
Social sellers are 51% more likely to achieve sales quotas.
39% of B2B professionals said social selling reduced the amount of time they had to spend researching potential leads.
84% of C-Level executives use social media to make purchasing choices.
To name a few. So what does this mean, and how can your company benefit from it? Well…
1. Social Selling increases brand visibility.
When a sales team shares content and optimizes their social profiles, their networks grow and engage even more. Besides, these actions are free and organic, meaning you do not need to PPC the hell out of them.
2. Attracts more high-quality leads.
As brand visibility improves, so shall the quality of leads. When you have a team of social sellers armed with good quality content, they are educating their network. So, let's take LinkedIn as an example. Firstly, people on this social network are far more interested in education from their field of expertise. Secondly, the more you post valuable and specific content, the more interest you will trigger, and your niche network will grow, aka you will have the opportunity to reach more qualified leads.
3. Improves website traffic.
The more you share content from your company’s website, the more people will click on the link. On the other side, they will also search for more information on the web about your company.
4. Gaining respect as an individual and the company.
If you show you know what you are talking about and constantly offer value to your network, you will gain their respect. In addition, prospects aren’t easily swayed with any content. You need to provide them with what they do not know - constantly. The more you do, the more respect you will have “on the streets”. Consequently, more people will trust you.
5. Building relationships and gaining trust.
Would you rather talk to a real person or a logo? Of course, the real person. That is why social selling works as you get the chance to build relationships with people. We as a human race wish to feel the connection with the people first and foremost. That is why, apart from posting, you should focus on mingling and chatting with other people. The good-quality relationships you have, the more people will trust you, and that is the true benefit of it all. Do not forget to be honest, genuine, and authentic in the process, otherwise, it will not work.
6. Skyrockets conversion.
Due to gaining respect and building relationships, social selling is also a fantastic way to increase the number of meetings per month - meaning more chances to close the deal and more income to the company.
How to create a sales strategy for Social Selling
A sales strategy is a documented plan with activities and metrics for the sales team to follow and enables them to generate income for the company more efficiently. In other words, if you wish to do social selling, you cannot be sloppy - you must be detailed and organized as your main goal is to convert prospects into customers. In short, here are the steps to tailor-make your social selling strategy.
1# Determine which social media platforms are right for you
Most companies use different social media platforms to raise awareness and their presence. When it comes to social selling, you need to do the same. It might be overwhelming, but know this - you do not have to do everything on every platform possible, as you might do with your company’s presence. Think about what platform your prospects use the most and start from there. Once you establish your presence, you can use other platforms to connect with the prospects. For instance, here is what social media networks proved to be the most effective, according to DataBox.

2# Determine your goals and metrics
Social selling doesn't work unless you set goals. Without clear goals and metrics (which we mentioned in Part 1 of the Ultimate Guide), your random acts of social selling will produce uneven results. Hence, to prevent this and prepare a field for the most accurate social selling describe goals using specific words and KPIs.
Social Selling goal examples:
| Goal | KPI Metrics |
| Increase revenue by 20% | - Number of conversions, CLTV |
| Expand network by 350 connections | - Number of invitations sent; Number of connections accepted |
| Nurturing existing customers | - Number of conversations with existing customers |
| Build closer relationships with leads | - Number of warmed-up leads |
| Improve brand awareness by improving website traffic | - Number of webpages visits (UTM them when posting it) |
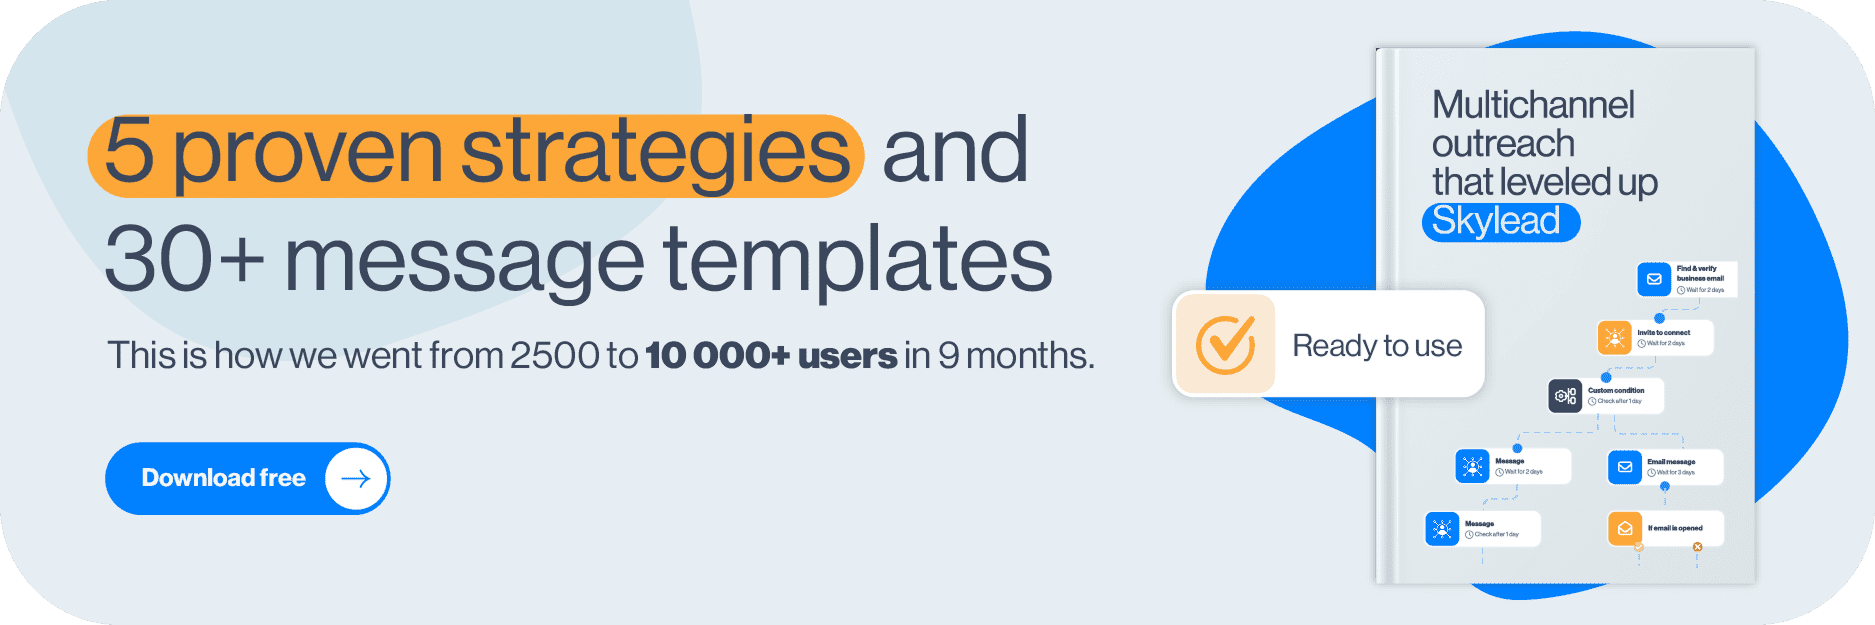
3# Determine the right ICP
We already mentioned in Part one the importance of the right ideal customer profile. So, be selective of who you interact with. In other words, you cannot expect that just everyone will buy your product or service. When prospecting on LinkedIn, find your niche ideal customer profile and build a relationship with them.
On this mission, you will find out that many tools can help you find who to reach out to.
4# Determine tools to support your sales strategy
Many tools can help out your social selling activities. Some might save you time when you do outreach, such as Skylead, some will help you filter your niche ICP like LinkedIn Sales Navigator, or you simply need to keep all your prospects organized, such as Pipedrive.
5# Determine your unique content strategy and product key benefits
To keep things clean, organized, and as simple as possible, you can create a separate document to join your sales strategy - a Content Strategy. For example, this can be a document that contains:
- Type of content you will be posting
- Posting frequency by days
- Content format
- Content distribution groups or channels
In addition, be careful about the type of content you post, as according to Social Spout, 46% of people may unfollow you if your content is too promotional.
6# Determine Social Selling activities
There are only a handful of social selling main activities you need to perform. You can decide which ones you will use, but you must know that this sales strategy works best if you combine them.
Post
Post your original, educational content, and do it frequently. Consequently, prospects will love it and follow you more.
Share
Sharing other people’s content for a change will eliminate the potential prospect’s perception that you’re self-centered.
Reactions
This is a useful social selling activity for the moments when you are short on time or if you do not have anything to contribute. It shows that you are following the prospect even though you are not engaging more actively.
Comment
Your comment must not be just a sales pitch. Instead, offer your educational 2-cents on the topic in discussion, and link your content or website page ONLY if it can be applied. In addition, comments are a nifty indicator of your genuine interest, as it shows that you are not solely the “distributor” of your own content, but rather a social being. Speaking of nifty - comments are also free publicity on other people’s posts.
Message
Engage with the prospect on a more personal level with DMs. Example:
Hey Bethany,
I’ve just noticed you reached your 2nd anniversary at SaleChart. Just wanted to congratulate you on that. How are things going at SaleChart?
Connection request or a Follow
Social experts say that it is best to wait to make a connection with someone until you’ve had an appropriate reason to. In order to create this “reason” you need to go personal. Therefore, reference their blog post, the content they shared, or mutual connection.
Example of the LinkedIn connection request that will stand out:
Hi Jessie,
Your comment about a couple of sales techniques on Michael's post was quite insightful. So I wanted to add you as my connection. If you are interested, I would like to discuss it further.
Once you determine the activities, you need to keep in mind that they should always be honest, relevant, and hyper-personalized.
7# Determine sales communication funnel
When you create a sales strategy, every activity has to belong to a certain part of the sales funnel. This applies to social selling, as well.
In other words, you need to establish a valid sales communication funnel to know how to engage and warm up the leads, apart from engaging with their content. As people are naturally different and there is no one-size-fits-all when it comes to social selling, we cannot give you the precise sales communication funnel. However, what we can do is to provide you with a basis to start with.
| Stage | Communication type |
| First contact | - Research, - Introduction |
| Interaction (Warm-up) | - Commenting - Liking - Sharing - Experience exchange |
| Interest | - Value 1 - Value 2 |
| Question | - Listening to customers pain points, how they handle the situation |
| Discussion | - Tailor-Made Value 1 - Tailor-Made Value 2 - Educational material |
| Conversion | - Ask for review or referral |
| Nurture | - Communication about product effects - Providing help |
8# Finishing up sales strategy: Activity checklist
Phew! That was a lot, wasn’t it? we’re almost done. Now that you’ve determined this sales strategy, create an activity checklist you need to do daily. Social selling can take a lot of time during the day, especially since sales reps already have a lot on their plate. Trust us because this sheet will help any salesperson organize daily activities and save a lot of time.
Social selling activities will depend on previous steps defined. Since this is the Ultimate Guide, here is an ultimate checklist, which you can use for any platform.
- Firstly, post a content
- Secondly, share relevant content
- Like or comment your prospect’s content
- Take a look at who viewed your profile (if available)
- Send a connection requests to those who did and personalize your approach if they are ICP
- Check out who interacted with your content. Additionally, interact with them
- If people who interacted with your content are not in your network, connect with them
- Review social media notifications for any birthdays, job change etc and act accordingly
- Add new leads to your CRM
- Check on your leads status in CRM and interact with them on social media
- Respond to any messages
- Initiate casual conversation with the leads
- Initiate the connections
- Engage in existing groups
- Find new groups and join
- Lastly, attend events
Once you start doing social selling, you must constantly provide valuable contributions (unless you are on vacation :). Uneven or infrequent social selling can backfire. Every action matters as long as you do not vanish and appear in a month or two.
Sales strategy examples for Social Selling
How does the theory above manifest into reality? Let’s take a look at short-form sales strategy examples.
1# Sales strategy: The one when you become a thought leader
Let’s start with the statistics. According to Hubspot, 92% of buyers are willing to engage with an industry thought leader. For instance, if you learn fast, write faster, and like to mingle, this is a perfect social selling strategy for you.
Thought leaders often use social media to share their experiences. Firstly, their posts are always straight to the point and educational - never promotional. Secondly, they act as a kind of influencer in their niche field.
Scenario: For example, let's say you have B2B software Budgetfy that scans companies' spending and suggests budget optimization.
Goals for 3 months
- Increase revenue by 10% (Metric: Percentage of revenue, profit rate)
- Expand network by 400 connections (Metric: Number of invitations sent, Number of connections accepted)
- Reach 60.000 website visits (Metric: Number of webpages visits)
- Publish a minimum of 36 posts
Social media platform
LinkedIn, Slack groups
ICPs
Chief financial officers, Accountants
Tools to use
- Pipedrive for managing leads
- Sales Navigator for lead search
- Skylead sales engagement tool & Cold Email Software to speed up outreach process (outreach campaign, lead discovery, connection requests, view and follow, hyper-personalized cold LinkedIn messaging)
Content strategy and product benefits
- Content format: Text, video, documents, image, link to website, LinkedIn poll
- Content type: content about budget optimization strategy, metrics to follow, business process optimization, finance trends, liquidity management, financial challenges, budget allocation, financial risk management, finance department digitalization…
- Distribution channels: LinkedIn profile, Slack channels, Website communities
- Posting frequency: posting approximately 5 times a week
- Key software benefits: easy control over company’s spending, all invoices in one place, budget optimization recommendations, all-in-one tool, data-driven decisions
Sales communication funnel
| Stage | Communication type |
| First contact | - Discovering the content that prospect shared, events attended, company, - Personalized outreach based on previous findings |
| Interaction (Warm-up) | - Commenting, Liking, Sharing, their content- Asking about the experience with the budgeting |
| Interest | - Budget optimization recommendation- All invoices in one place- Data-driven decisions |
| Question | - Asking Listening to customers pain points, how they handle the budget spendings (Example: they do not focus on finding the most cost-effective purchasing because they do not have time) |
| Discussion | - Offering value in the form of a solution and educational material: Budgetfy can recommend the most cost-effective purchasing options - Offering a call to talk more about their business and provide free trial |
| Conversion | - Communication about product effects and providing help |
| Nurture | - Ask for review or referral |
Social selling activities outside of direct messaging
- Post content
- Share relevant content
- Like or comment your prospect’s content
- Take a look at who viewed your LinkedIn profile
- Send a connection requests to those who did and personalize your approach if they are ICP
- Check out who interacted with your content and interact with them
- If people who interacted with your content are not in your network, connect with them
- Review social media notifications for any birthdays, job change etc and act accordingly
- Add new leads to Pipedrive
- Use LinkedIn Sales Navigator to find prospects
- Create Skylead outreach campaign to extend the network
- Check on your leads status in Pipedrive and send them a message
- Respond to any messages
- Initiate casual conversation with the leads that responded to cold outreach
2# Sales strategy: The one with the questions, groups and events
It is completely alright if you are not a content writer type. What you can do instead is to be active on other levels. Joining groups, asking thought-provoking questions, and starting conversations with the right people is also a nice way to go. What's more, well-thought-out questions in groups, you will attract ideal prospects and start a conversation with them.
Scenario
For example, let's say you have a marketing agency, specialized for generating leads.
Goals for 5 months
- Gain 5 new clients
- Expand network by 1000 connections (Metric: Number of invitations sent, Number of connections accepted)
- Build closer relationships with 100 leads (Metric: Number of warmed-up leads)
Social media platform
LinkedIn, Slack, Facebook, Quora
ICPs
Marketing managers, Chief Marketing Officers, CEOs
Tools to use
- Sales Navigator for lead search
- Skylead sales engagement tool & Cold Email Software to speed up outreach process
Content strategy and product benefits
- Content format: Text, documents, image
- Content type: questions, polls about latest LinkedIn lead generation strategies, asking how people generate leads in specific industries, what they find to be hardest, leads lists etc.
- Distribution channels: Slack channels, Facebook groups, Website communities
- Posting frequency: Approximately 2 times a week
- Key agency benefits: Extension of the company’s team, easy communication, creativity, data transparency, offering tailor-made, unique lead generation strategies, good quality leads
Sales communication funnel
| Stage | Communication type |
| First contact | - Discovering the content that prospect share - Attend the same events - Personalized outreach based on previous findings |
| Interaction (Warm-up) | - Commenting, Liking, Sharing, their content - Asking about the experience with generating leads |
| Interest | - Data transparency, good quality leads- easy communication - Good quality leads |
| Question | - Asking and listening to prospect’s pain points, how they handle lead generation (Example: they have though time to find good quality leads; listings do not work for them) |
| Discussion | - Offering value. For example, marketing agency owns a unique lead generation strategy creation process. Consequently, they gather good quality leads. - Offering a call to talk more about their business |
| Conversion | - Work in progress |
| Nurture | - Talking about results and asking for a referral |
Social selling activities outside of direct messaging
- Post questions
- Share relevant content
- Like or comment your prospect’s content
- Send LinkedIn connections, follow or add prospects
- Review social media notifications for any birthdays, job change etc and act accordingly
- Organize and document warmed-up leads
- Use LinkedIn Sales Navigator to find prospects
- Create Skylead outreach campaign to outreach the prospects
Summary
As seen from our examples, sales strategy can help you a great deal with your results, especially if we are talking about social selling. However, keep in mind that we’ve shortened our sales strategy examples, and you need to be as detailed as possible.
Repeating is the mother of learning, therefore here is what you need to determine for your social selling strategy:
- Which Social Media Platforms Are Right For You
- Your Goals And Metrics
- The Right ICP
- Tools To Support Your Sales Strategy
- Your Personal Content Strategy And Product Key Benefits
- Social Selling Activities
- Sales Communication Funnel
- Activity Checklist
Remember, social selling takes a lot of time. Once you see the first results, you will fall in love with them.
Wish to share love, help across the internet, and build relationships with prospects? Try out Skylead free for 7 days!